You press “Start” on your Whirlpool washer, but the machine refuses to spin while the lid lock light flashes red. Instead of agitating, the tub sits full of water or the cycle stalls completely in sensing mode. This specific error indicates the control board cannot confirm the lid is safely secured, halting all operation to prevent injury.
This guide explains how to diagnose a Whirlpool washer lock light flashing error using factory test modes and isolation techniques. You will learn to distinguish between a failed lid lock assembly and a defective main control board before buying parts. Follow these steps to restore your machine safely and efficiently.
Decode the Flashing Lid Lock Light Symptoms
A flashing red indicator is a deliberate safety warning, not a random glitch. Your washer stops because the control board lacks a confirmed “locked” signal from the lid mechanism. Without this confirmation, the unit will not agitate or spin, leaving your clothes soaking wet.
Common signs of this failure include:
* Red lid lock light flashing continuously during a cycle
* Washer fills with water but refuses to agitate or spin
* “Start” button yields no response from the machine
* Cycle gets stuck in sensing mode indefinitely
* Complete lack of response to any control inputs
Many owners assume the lock itself is broken, but the main control board can also send false signals. Accurate diagnosis prevents you from replacing good parts unnecessarily.
Why the Lid Lock Light Flashes
The lid lock system functions as a closed electrical circuit. The control board sends power to engage the mechanical lock, then waits for a return signal confirming engagement. If this signal is missing or inconsistent, the board halts the cycle immediately.
Two primary failures trigger this flash:
* Faulty lid lock assembly: The mechanism is worn out or electrically shorted.
* Failed control board: A stuck relay or corrupted logic falsely reads the lid as unlocked.
Distinguishing between these two causes is critical for a successful repair. Simple tests can identify the root cause without guesswork.
Check for Basic Issues First
Rule out simple mechanical obstructions before attempting complex diagnostics. A misaligned lid or dirty sensor often mimics a total component failure.
Perform these quick checks first:
* Ensure the lid closes fully with no gaps preventing engagement.
* Inspect the plastic strike tab on the lid for damage or misalignment.
* Clean the lock area of lint, moisture, or debris interfering with contact.
* Power cycle the unit by unplugging it for five minutes to clear glitches.
If the light continues flashing after these checks, proceed to advanced testing methods.
Run the Built-In Test Mode on Your Whirlpool
Whirlpool washers include a hidden diagnostic mode that allows direct command of the lid lock. This feature bypasses normal cycle logic to test the lock mechanism independently.
Enter Diagnostic Mode Correctly
Follow this specific dial rotation sequence to access the test menu. Precision is key, so turn the dial firmly to each position.
- Turn the cycle dial two clicks counterclockwise.
- Rotate the dial three clicks clockwise.
- Turn the dial one click counterclockwise.
- Finish with one final click clockwise.
- Watch for all indicator lights to flash, confirming entry.
Ignore any unusual flashing from secondary modules like cameras. Focus solely on the behavior of the lid lock indicator.
Command the Lid to Lock
Once in diagnostic mode, you can force the lock to engage manually. This step verifies if the physical assembly responds to electrical commands.
- Rotate the dial until the display reads “Spin and Done“.
- Press the Start button firmly.
- Listen closely for a distinct click as the lid locks within seconds.
Observe the physical lid to see if it secures tightly against the tub.
Interpret the Results
The reaction of the lid determines your next step. A successful lock means the assembly works, pointing to other issues.
- Lid locks successfully: The assembly is functional. The problem may be intermittent or related to control board timing.
- Lid does not lock: The lid lock assembly is faulty and requires immediate replacement.
This test provides a definitive answer. If the lock fails to engage here, the control board is likely not at fault.
Isolate the Control Board for Diagnosis
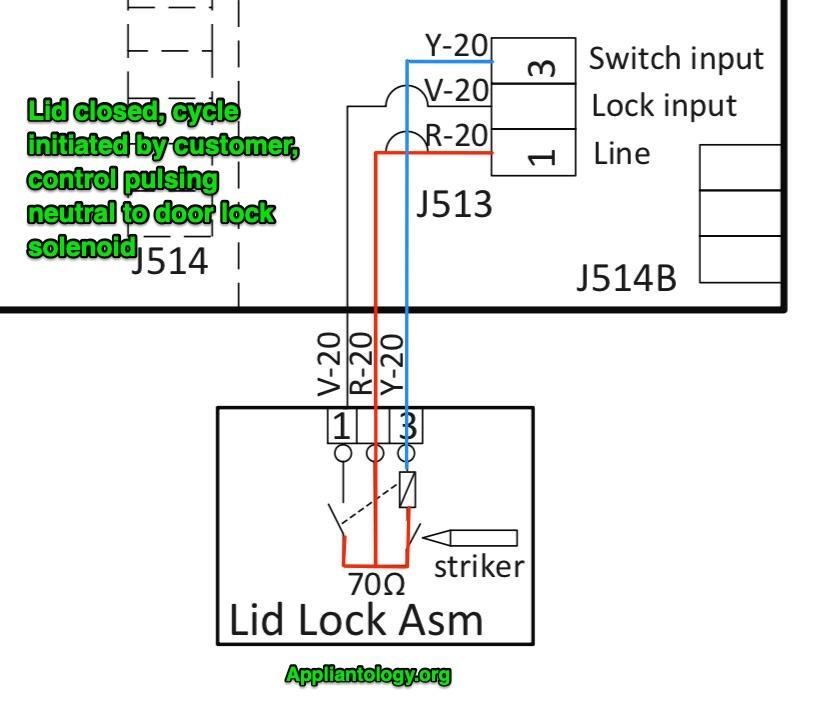
If the washer cannot enter test mode or the start button remains unresponsive, the control board itself may be the issue. Isolation testing determines if the board falsely activates the lock circuit.
Disconnect the Lid Lock Harness
Safely separate the lock from the main board to test the board’s behavior without a load. Always disconnect power before opening the machine.
- Unplug the washer from the electrical outlet.
- Insert a putty knife under the front edge of the control panel to release clips.
- Lift the panel carefully to access internal components.
- Locate the lid lock wire harness on the board, typically featuring Yellow, Blue, White, and Red wires.
- Press the release tab and disconnect the harness completely.
Reconnect the power source while keeping the lock harness disconnected.
Observe the Light and Sound
Watch the indicator light closely after powering on the unit with the lock disconnected. The board’s reaction reveals its internal status.
- Light stays off: The board correctly recognizes the open circuit. The lid lock is faulty.
- Light flashes or turns on: The board thinks the lid is locked even without a connection. The control board is defective.
- Clicking sound from board: A stuck relay is activating the circuit internally, confirming board failure.
This isolation method is the gold standard for identifying false lock signals. If the board activates the circuit with no load, it has failed internally.
Replace the Lid Lock Assembly

Diagnostic results pointing to a bad lid lock require replacement. This repair typically takes 20 to 30 minutes and requires only basic hand tools.
Tools and Parts Needed
Gather these items before starting the disassembly process. Having everything ready streamlines the workflow.
- Replacement lid lock matching your specific model number
- Phillips and flathead screwdrivers
- Putty knife for panel clips
- Drill with 1/4-inch bit for back panel screws
Ensure the new part number matches the old unit exactly.
Remove the Back and Top Panels
Accessing the lock requires removing the outer shell of the washer. Work carefully to avoid damaging plastic clips.
- Unplug the washer to ensure safety.
- Remove the front cover screw located on the back panel.
- Take out the three screws along the top edge of the back panel.
- Pull the back panel straight off the unit.
- Remove the two screws securing the top panel at the rear.
- Gently pull the front of the top panel forward to release retention clips.
- Lift and pivot the panel up, resting it securely against the wall.
Keep screws organized to facilitate easy reassembly later.
Extract the Old Lock
The lock is held in place by retention clips and slides into position. Remove it gently to avoid damaging surrounding wires.
- Squeeze the retaining clip on the lock assembly.
- Push down slightly and lift the lock up.
- Push the side tab inward and slide the lock to the left to unhook it.
- Pull the entire assembly out of the mounting slot.
- Unclip the wiring harness and pull it through the opening.
Inspect the wire for any fraying or melting before installing the new part.
Install the New Lid Lock
Reverse the removal process to install the new component. Ensure all connections are secure before closing the unit.
- Feed the new wire through the opening, using a flathead to open routing clips if needed.
- Slide the new lock in from the right side of the mounting slot.
- Push the lock in, then slide it to the right until it clicks into place.
- Reconnect the wire harness firmly to the control board.
- Reattach the top panel by snapping the front edge down securely.
- Reinstall the back panel and tighten all screws.
Verify the lock moves freely before running a test cycle.
Replace the Control Board

If isolation testing confirms the board is sending false signals, you must replace the main control board. This component manages all cycle logic and safety checks.
Boards for older Whirlpool models are often available for $50–$60 on secondary markets. Only perform this repair if testing definitively points to board failure.
Remove the Control Panel
Accessing the board requires removing the entire control interface from the top of the machine.
- Unplug the washer completely.
- Insert a putty knife into the gap at the top front corners.
- Press inward to release the hidden retention clips.
- Lift the control panel upward to expose the board housing.
Handle the panel gently to avoid stressing wire connections.
Disconnect and Remove the Board
The board connects to multiple systems, so document connections before removal.
- Label or photograph all wire connections before touching anything.
- Unplug every harness attached to the board.
- Remove the pressure hose if it connects directly to the board assembly.
- Unscrew the two mounting screws holding the board in place.
- Remove the main control knob to allow the board to slide out fully.
Keep track of every screw and connector location.
Install the New Board
Carefully seat the new board and reconnect all systems. Double-check every connection to prevent new errors.
- Slide the new board into the housing slot.
- Reinstall the control knob onto the shaft.
- Reconnect all wiring harnesses and the pressure hose.
- Secure the board with the mounting screws.
- Lower and snap the control panel back into place.
A single loose wire can cause the Whirlpool washer lock light flashing error to return.
Test the Repair Thoroughly
Verification ensures your repair was successful and the machine operates safely. Never skip the final testing phase.
Power Up and Reset
Restore power to the unit and listen for system initialization sounds.
- Plug in the washer.
- Listen for one or two distinct clicks indicating a system reset.
- Confirm the new part is recognized by the system.
These sounds confirm the electronics are communicating properly.
Check Indicator Lights
Visual inspection of the dashboard provides immediate feedback on system status.
- Lid lock light should remain off when the machine is idle.
- No flashing should occur unless a cycle is actively running.
Any unexpected lights indicate a remaining issue.
Run a Full Wash Cycle
Execute a complete cycle to verify mechanical and electrical function under load.
- Load the washer with clothes or run it empty.
- Select a normal wash cycle.
- Press “Start” and observe the machine.
Watch for the lid to lock immediately and the cycle to progress through fill, agitate, drain, and spin phases without stalling.
Confirm Safety Function
For control board replacements, verify the safety interlock still works.
- Temporarily remove the lid strike tab or lift the lid slightly during a spin cycle.
- The machine should stop or display an error immediately.
This confirms the new board correctly monitors lid status for user safety.
Prevent Future Failures
Proper maintenance extends the life of your repaired washer. Simple habits reduce stress on the lock and board.
Maintain the Lid Lock
Regular cleaning prevents debris from interfering with the locking mechanism.
- Wipe the lock area monthly to remove lint and moisture buildup.
- Ensure the lid closes fully every single time.
- Avoid slamming the lid to reduce mechanical wear on the lock.
Small actions prevent premature component failure.
Protect the Control Board
Electronics are sensitive to environmental factors. Protect your investment from power issues.
- Use a surge protector to guard against voltage spikes.
- Keep the area around the washer dry and well-ventilated.
- Address water leaks immediately to prevent moisture damage.
Moisture and power surges are leading causes of board failure.
Know When to Repair vs. Replace
Evaluate the overall condition of your appliance before investing in repairs.
- Repair if: The drum, tub, and motor are in good condition. Both lid lock and control board fixes are affordable.
- Replace if: The washer is over 10 years old with rust, leaks, or recurring issues. Newer models offer better efficiency.
Making the right choice saves money in the long run.
Frequently Asked Questions About Whirlpool Washer Lock Light Flashing
Why is my Whirlpool washer lid lock light flashing red?
The flashing red light means the control board cannot confirm the lid is locked. This safety feature stops the machine from spinning. It usually indicates a faulty lid lock assembly or a failed main control board sending false signals.
How do I reset the lid lock on my Whirlpool washer?
Unplug the washer for five minutes to reset the system. If the light persists, enter diagnostic mode by turning the dial two clicks left, three right, one left, and one right. This allows you to test the lock directly.
Can a bad control board cause the lid lock light to flash?
Yes, a defective control board can falsely signal that the lid is unlocked. If the light flashes even with the lock disconnected, the board has a stuck relay or internal logic failure requiring replacement.
How much does it cost to fix a flashing lid lock light?
Replacing a lid lock assembly is generally inexpensive and DIY-friendly. Replacing a control board costs slightly more, often around $50 to $60 for the part on secondary markets, plus labor if hired professionally.
What happens if I ignore the flashing lid lock light?
The washer will not spin or drain, leaving clothes soaking wet. Ignoring it prevents the machine from completing cycles. Continued use with a faulty lock can also pose a safety risk if the lid opens during high-speed spins.
Key Takeaways for Fixing Whirlpool Washer Lock Light Flashing
A Whirlpool washer lock light flashing is a clear diagnostic code indicating a safety circuit failure. Do not replace parts randomly. Use the built-in test mode to verify the lid lock assembly first, then use isolation testing to check the control board.
Most repairs involve either a simple lid lock replacement or a control board swap. Both are manageable DIY projects with the right guidance. By following these diagnostic steps, you can restore your washer quickly and avoid unnecessary service calls.
Start with the diagnostic mode today to identify your specific issue. With the correct part and this guide, your laundry routine will return to normal soon.