If your BMW door lock repair needs are due to a key that spins freely or a remote that suddenly stops working, you are likely facing a common mechanical or electrical failure. These issues frequently plague E46, E90, E60, and X5 models, often manifesting as broken internal levers or actuators that draw too much power.
This guide walks you through diagnosing the exact fault, replacing worn plastic gears or levers, and stopping Fuse 57 from blowing repeatedly. You will learn the specific steps to rebuild your lock cylinder or swap an actuator using the correct tools while avoiding costly mistakes that lead to water leaks or panel damage.
Diagnose the Real Problem First
You must determine if your issue is mechanical or electrical before removing any door panels. Misdiagnosing the problem often leads to buying the wrong parts and wasting hours of labor.
Check for Blown Fuse 57
If your power locks fail intermittently or not at all, inspect Fuse 57 in your interior fuse box immediately.
* A blown fuse that fails again quickly indicates an overloaded actuator drawing excessive current.
* If the fuse stays intact, the problem is likely mechanical, such as worn gears or a broken lever inside the cylinder.
Replace the fuse once. If it blows again the moment you attempt to lock the door, the actuator is shorting internally and requires replacement.
Test Mechanical Lock Cylinder Function
Insert your key and turn it manually to feel for resistance or slack in the mechanism.
* Key turns freely but nothing happens: The internal lever or roll pin is broken, a common issue on E46 and X5 models.
* Key feels stiff or binds: The internal gears may be stripped or misaligned within the housing.
* Remote works but key doesn’t: This points to a mechanical failure specifically within the lock cylinder.
* Key works but remote doesn’t: This suggests an electrical fault with the actuator motor itself.
Use this quick checklist to pinpoint your issue:
* Remote unlocks but key doesn’t → Lock cylinder lever failure
* Fuse 57 blows repeatedly → Failing actuator motor
* Door locks but won’t unlock → Stripped plastic gear
* Window must be halfway down to access → E90/E60 actuator access issue
Essential Tools & Parts You’ll Need
Skipping generic kits and using the right tools helps you avoid breaking clips, misaligning gears, or damaging the vital vapor barrier during repair.
Must-Have Tools
- 4mm Allen key – Required for lock cylinder and handle bolts
- T20 and T30 Torx bits – Essential for door panel and actuator screws
- 10mm socket – Needed for window regulator bolts
- Plastic pry tools – Ensures safe door panel removal without damage
- Flathead screwdriver – Used to pop off caps and clips
- Razor knife – Cuts butyl seal on vapor barrier cleanly
- Ballpoint pen (hollow) – Compresses high-tension springs safely
- Pliers and side cutters – Removes pins and trims roll pins
- Hammer and punch – Seats retaining pins flush with the housing
Critical Replacement Parts
| Part | Why It Matters |
|---|---|
| Internal lever (E46/X5) | Wears down over time; must match left/right turn direction |
| Roll pin (1.5–2mm steel) | Often missing in old units; essential for lock retention |
| Plastic gears (E60/E87/E90) | Must match pitch and tooth profile exactly to function |
| Small plastic engagement piece | Transfer from old to new actuator; brittle but vital |
| OEM actuator (not aftermarket) | Aftermarket units fail faster; use OEM for reliability |
| New door panel clips | Old ones break easily; replace all to prevent rattles |
| Butyl adhesive or vapor barrier | Prevents water leaks after resealing the door |
Fix E46 Lock Cylinder: Replace the Lever
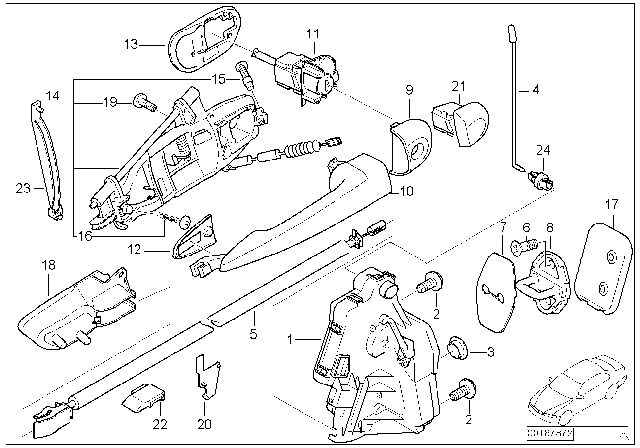
The E46 is notorious for a tiny internal lever that wears out until the key turns without engaging the lock mechanism.
Remove the Lock Cylinder
- Pop the plastic cap near the door handle using a flathead screwdriver gently.
- Loosen the 4mm Allen bolt beneath the cap but do not remove it completely yet.
- Insert the key and gently pull the cylinder outward to expose the mechanism.
- Pull out the small internal pin with pliers to access the inner components.
- Inspect for the roll pin and source a 1.5–2mm steel pin from a hardware store if missing.
Install the Correct Lever
Kits typically include left-hand (counterclockwise lock) and right-hand (clockwise lock) levers for different configurations.
* Match the notch and shape of your broken lever to the new replacement part.
* For E46 models, ensure you use the large tumbler version of the lever.
* For X5 (E53) or X3 (E83), you must use the small tumbler size instead.
Reassemble with Spring Compression
- Align the base plate into the three grooves so it sits perfectly flush.
- Insert the new lever with the bump facing down toward the housing floor.
- Ensure the higher end goes to the outer open area as this is critical for function.
- Slide spring in from the side carefully to avoid pinching your fingers.
- Use a hollow ballpoint pen to compress the spring loop over the peg securely.
- Hold tension while sliding the lever into its final locked position.
Pro Tip: Practice spring compression outside the housing first. It is high-tension and rushing leads to misalignment.
Secure and Test
- Slide the U-shaped lock piece into place and ensure it seats without resistance.
- Insert the roll pin and tap it flush with a hammer and punch gently.
- Lubricate moving parts with wheel bearing grease while avoiding the spring.
- Reinsert the cylinder, align keyway orientation, and tighten the 4mm bolt.
- Test manually to ensure it turns smoothly with no resistance or binding.
Replace E90/E60 Actuator: Stop Blowing Fuse 57
If Fuse 57 keeps blowing, the actuator motor is drawing excess current and must be replaced before it damages wiring.
Remove the Door Panel
- Remove T20 screws located at the top, middle, and bottom of the panel.
- Use plastic pry tools to release clips around the entire edge perimeter.
- Lift the top of the panel upward to unhook it from the window channel.
- Disconnect the speaker connector found behind the panel carefully.
Warning: Clips break easily during removal. Buy replacements before starting this job.
Access the Actuator
- Cut the butyl seal on the vapor barrier with a razor knife to expose the interior.
- Remove the window regulator cover by pushing the center clip and sliding the lever down.
- Lower the window halfway to align the access holes in the door frame.
- Push the white track clip back through the door hole to release the glass from the track.
- Remove the glass by pulling the clip back from behind and lifting it out.
- Unscrew two 10mm bolts and move the regulator aside to reveal the actuator.
Extract the Old Actuator
- Remove the door handle cover and undo the 4mm Allen bolt underneath.
- Unhook wiring and pull handle out to gain full access to the lock mechanism.
- Remove T20 bolt and keep the small plastic piece associated with it safe.
- Remove two T30 bolts holding the main actuator body in place.
- Disconnect electrical connector which is a push-in type connection.
- Disconnect lock cable from the actuator arm.
- Twist actuator forward and pull it out of the door cavity completely.
Install New Actuator: Don’t Skip This Step

OEM actuators are worth the extra cost because aftermarket units often fail within months of installation.
Transfer the Critical Plastic Piece
- Locate the small brittle plastic engagement piece on your old actuator unit.
- Remove it carefully and install it on the new unit to ensure proper function.
- Do not transfer the wiring harness as only this one piece ensures proper lock engagement.
Insert and Align
- Insert the new actuator, twisting it into place within the door frame.
- Pull the wire down to ensure the electrical connection is fully seated.
- Ensure flat side is out and the curve fits into the curved hole properly.
- Black plastic piece must seat in the notch to lock the mechanism.
- Reinstall rubber gasket over actuator to maintain weather sealing.
- Push light housing fully down to avoid interference with the door panel.
Reassemble Without Errors
One misstep ruins everything so follow this specific order to ensure success.
Reattach Handle and Lock
- Reconnect door handle fork by pushing forward until it snaps into place.
- Reinstall light housing which is easier to do without the bulb first.
- Insert lock cylinder and secure with the 4mm Allen bolt tightly.
Reinstall Window and Regulator
- Slide glass into track, ensuring correct side alignment before locking.
- Reconnect to regulator via white clips and secure the mechanism.
- Test window up/down for smooth operation with no binding or noise.
Final Connections
- Reconnect actuator electrical connector and verify the click.
- Reattach lock cable to the new actuator arm securely.
- Reconnect speaker wires behind the door panel area.
Seal and Reinstall Panel
- Replace all broken clips by squeezing them to test tension before installation.
- Press panel into place and listen for all clips to snap securely.
- Reinstall trim pieces and overhead light to finish the interior look.
- Reseal vapor barrier with butyl adhesive ensuring there are no gaps.
Critical: A bad seal leads to water intrusion and future electrical damage to your new parts.
Test Like a Pro
Do not assume it works immediately. Verify every function before considering the job done.
Functional Checkpoints
- Key turns smoothly and locks and unlocks the door
- Remote fob operates door lock from a distance
- Interior switch locks and unlocks reliably
- Door latches and opens smoothly without sticking
- No blown Fuse 57 after 24 hours of operation
- Auto-lock engages correctly when driving
- No rattles or loose panel clips when driving
Troubleshoot Common Failures
| Symptom | Likely Cause | Fix |
|---|---|---|
| Key turns but no action | Lever upside down | Reinstall lever with bump down |
| U-piece won’t seat | Spring not compressed | Use ballpoint tool and re-compress |
| Fuse 57 still blows | Bad actuator or short | Check wiring and replace actuator |
| Door won’t latch | Misaligned regulator | Adjust position and retest |
| Water in door | Bad vapor seal | Reapply butyl adhesive fully |
Extend Long-Term Reliability
Prevent future breakdowns with smart maintenance and the use of high-quality components.
Lubrication Strategy
- During rebuild: Use wheel bearing grease on metal parts only.
- After assembly: Spray Teflon dry lube to repel dust and debris.
- Linkages: Apply silicone lubricant for smooth movement of cables.
Note: Never grease springs as this reduces tension and causes premature failure.
Use OEM Parts
Aftermarket actuators and gears fail fast due to poor material quality. BMW-specific OEM parts last years longer.
Replace All Clips
Old door panel clips are brittle and weak. New ones prevent rattles and ensure a tight seal against water.
Frequently Asked Questions About BMW Door Lock Repair
Why does my BMW Fuse 57 keep blowing?
This happens when a failing door lock actuator draws excessive current due to internal wear or binding. You must replace the actuator to stop the fuse from blowing repeatedly.
Can I repair the plastic gears instead of replacing the whole actuator?
Yes, if the motor itself is functional, you can replace just the stripped plastic gears inside the actuator. However, if the motor is seized or drawing high current, a full unit replacement is necessary.
What tools do I need to remove a BMW door panel?
You will need T20 and T30 Torx bits, a 4mm Allen key, plastic pry tools, and a 10mm socket. Plastic tools are essential to avoid damaging the trim during removal.
How do I know if my E46 lock cylinder lever is broken?
If the key turns freely without locking or unlocking the door, the internal lever is likely broken or the roll pin is missing. This is a very common failure on E46 models.
Is it difficult to compress the spring during lock cylinder repair?
It is fiddly but manageable with practice. Using a hollow ballpoint pen to compress the high-tension spring while sliding the lever into place makes the process much easier.
Do I need to replace the vapor barrier when repairing the lock?
You do not always need a new barrier, but you must reseal the existing one with butyl adhesive. A compromised seal leads to water damage and electrical issues later.
Key Takeaways for Successful BMW Door Lock Repair
Fixing your BMW door lock requires identifying whether the failure is mechanical or electrical before starting. Mechanical issues often involve broken levers in E46 cylinders, while electrical problems usually stem from actuators blowing Fuse 57 in E90 and E60 models. Using OEM parts and following precise reassembly steps ensures your repair lasts.
Gather your specific tools like the 4mm Allen key and hollow pen for spring compression before beginning. Take your time with the vapor barrier resealing to prevent water damage, and always test all functions thoroughly before closing up the door. With patience and the right approach, you can restore full function to your vehicle without dealership costs.