
Upgrading your home security often feels like a job for a professional, but the Yamiry smart lock installation proves otherwise. This device eliminates complex wiring and expensive service calls, allowing you to install a high-tech lock in minutes using only a screwdriver.
This guide walks you through every step of the Yamiry smart lock installation process from start to finish. You will learn how to remove your old hardware, mount the new components, configure the app, and troubleshoot common issues without needing an electrician.
Verify Door Compatibility and Gather Tools

Success starts before you remove your existing hardware. Ensuring your door meets specific measurements prevents frustration during the Yamiry smart lock installation.
Check Critical Door Measurements
The lock fits standard residential doors with these exact specifications:
* Door thickness: Ranges from 1-3/8 inches to 2 inches.
* Backset distance: Supports 2-3/8 inches or 2-3/4 inches from the borehole center to the door edge.
* Borehole diameter: Requires a standard 2-1/8 inch hole.
Measure your door carefully before ordering or beginning work. If your door falls outside these ranges, you may need professional modification.
Collect Necessary Equipment
You do not need a specialized toolkit for this project. Gather these items before starting:
* Phillips head screwdriver or power drill
* Included Allen key (provided in the box)
* Four AA batteries (install these last)
No wiring tools or Wi-Fi gateways are required for basic operation. The entire process relies on mechanical assembly and simple battery power.
Remove Existing Door Knob Hardware
Clear the workspace by removing your current knob assembly. This step creates the open borehole needed for the new smart lock components.
Extract Old Knobs and Latch
Follow these steps to clear the door safely:
1. Locate the small release hole on the shank of the interior knob.
2. Insert a flathead tool or paperclip to press the internal tab.
3. Pull the interior and exterior knobs off the door simultaneously.
4. Unscrew the mounting plate from the edge of the door.
5. Slide the latch mechanism out of the door edge.
Save your existing screws only if they match the new hardware specifications. Otherwise, use the screws provided in the Yamiry kit to ensure proper fit.
Install Latch and Strike Plate Assembly
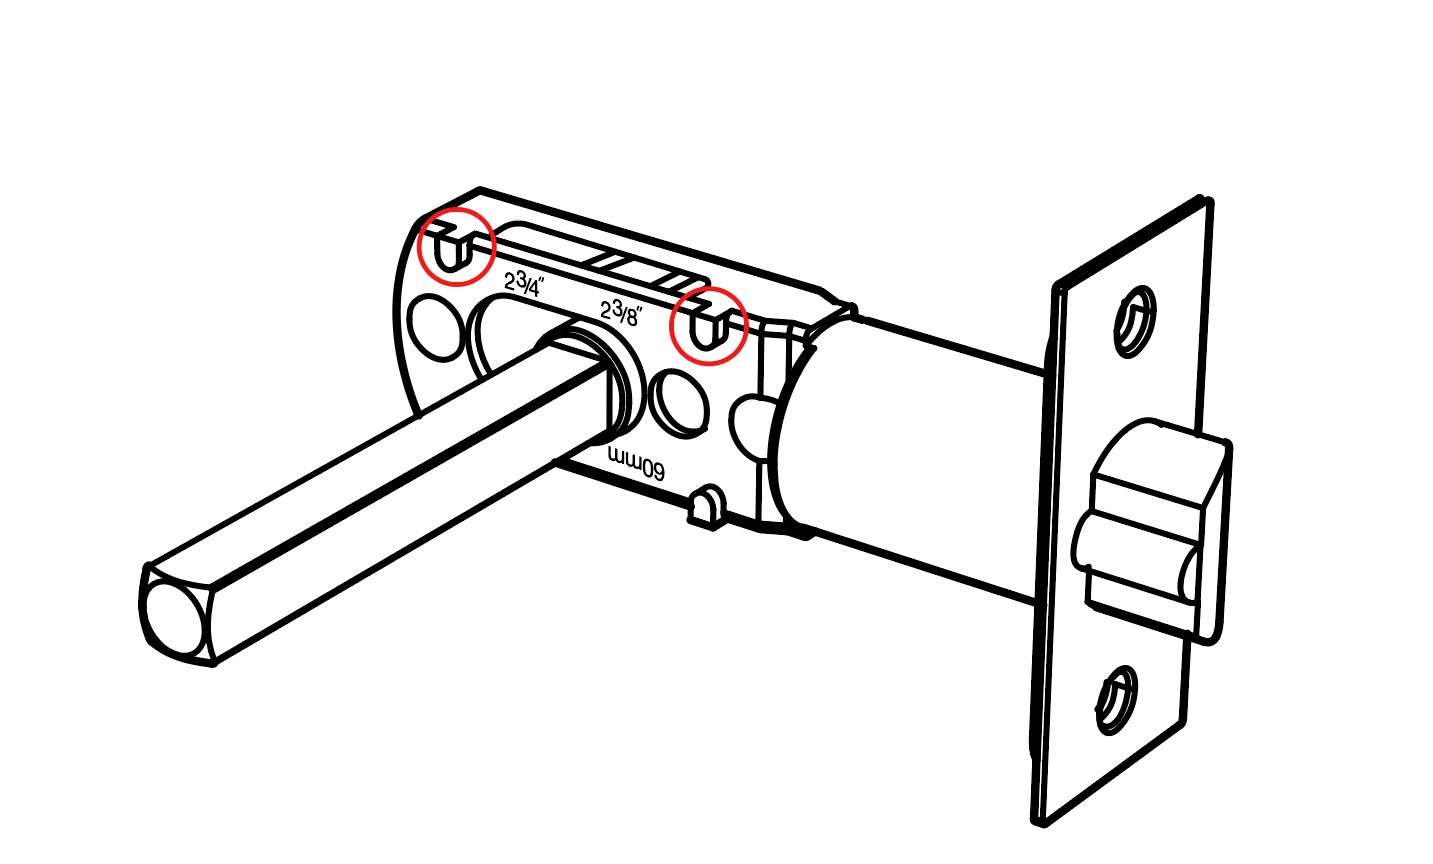
Proper latch installation ensures your door closes smoothly and locks securely every time.
Mount the New Latch Mechanism
Insert the Yamiry latch into the edge borehole with precision:
1. Place the latch into the hole with the curved side facing the door frame.
2. Ensure the tailpiece extends smoothly when turned by hand.
3. Secure the plate using the two provided screws and your screwdriver.
The curved side must face the direction the door swings to engage the frame correctly.
Adjust Strike Plate Alignment
Check the alignment between the latch and the door frame strike plate:
* Close the door gently to see if the latch catches.
* Loosen the strike plate screws if the latch misses the hole.
* Shift the plate slightly up, down, left, or right as needed.
* Tighten the screws once perfect alignment is achieved.
Use the included strike box extender if your door frame has a deep gap. Proper alignment prevents wear on the motor and ensures reliable locking.
Attach Outside Knob and Weather Sealing
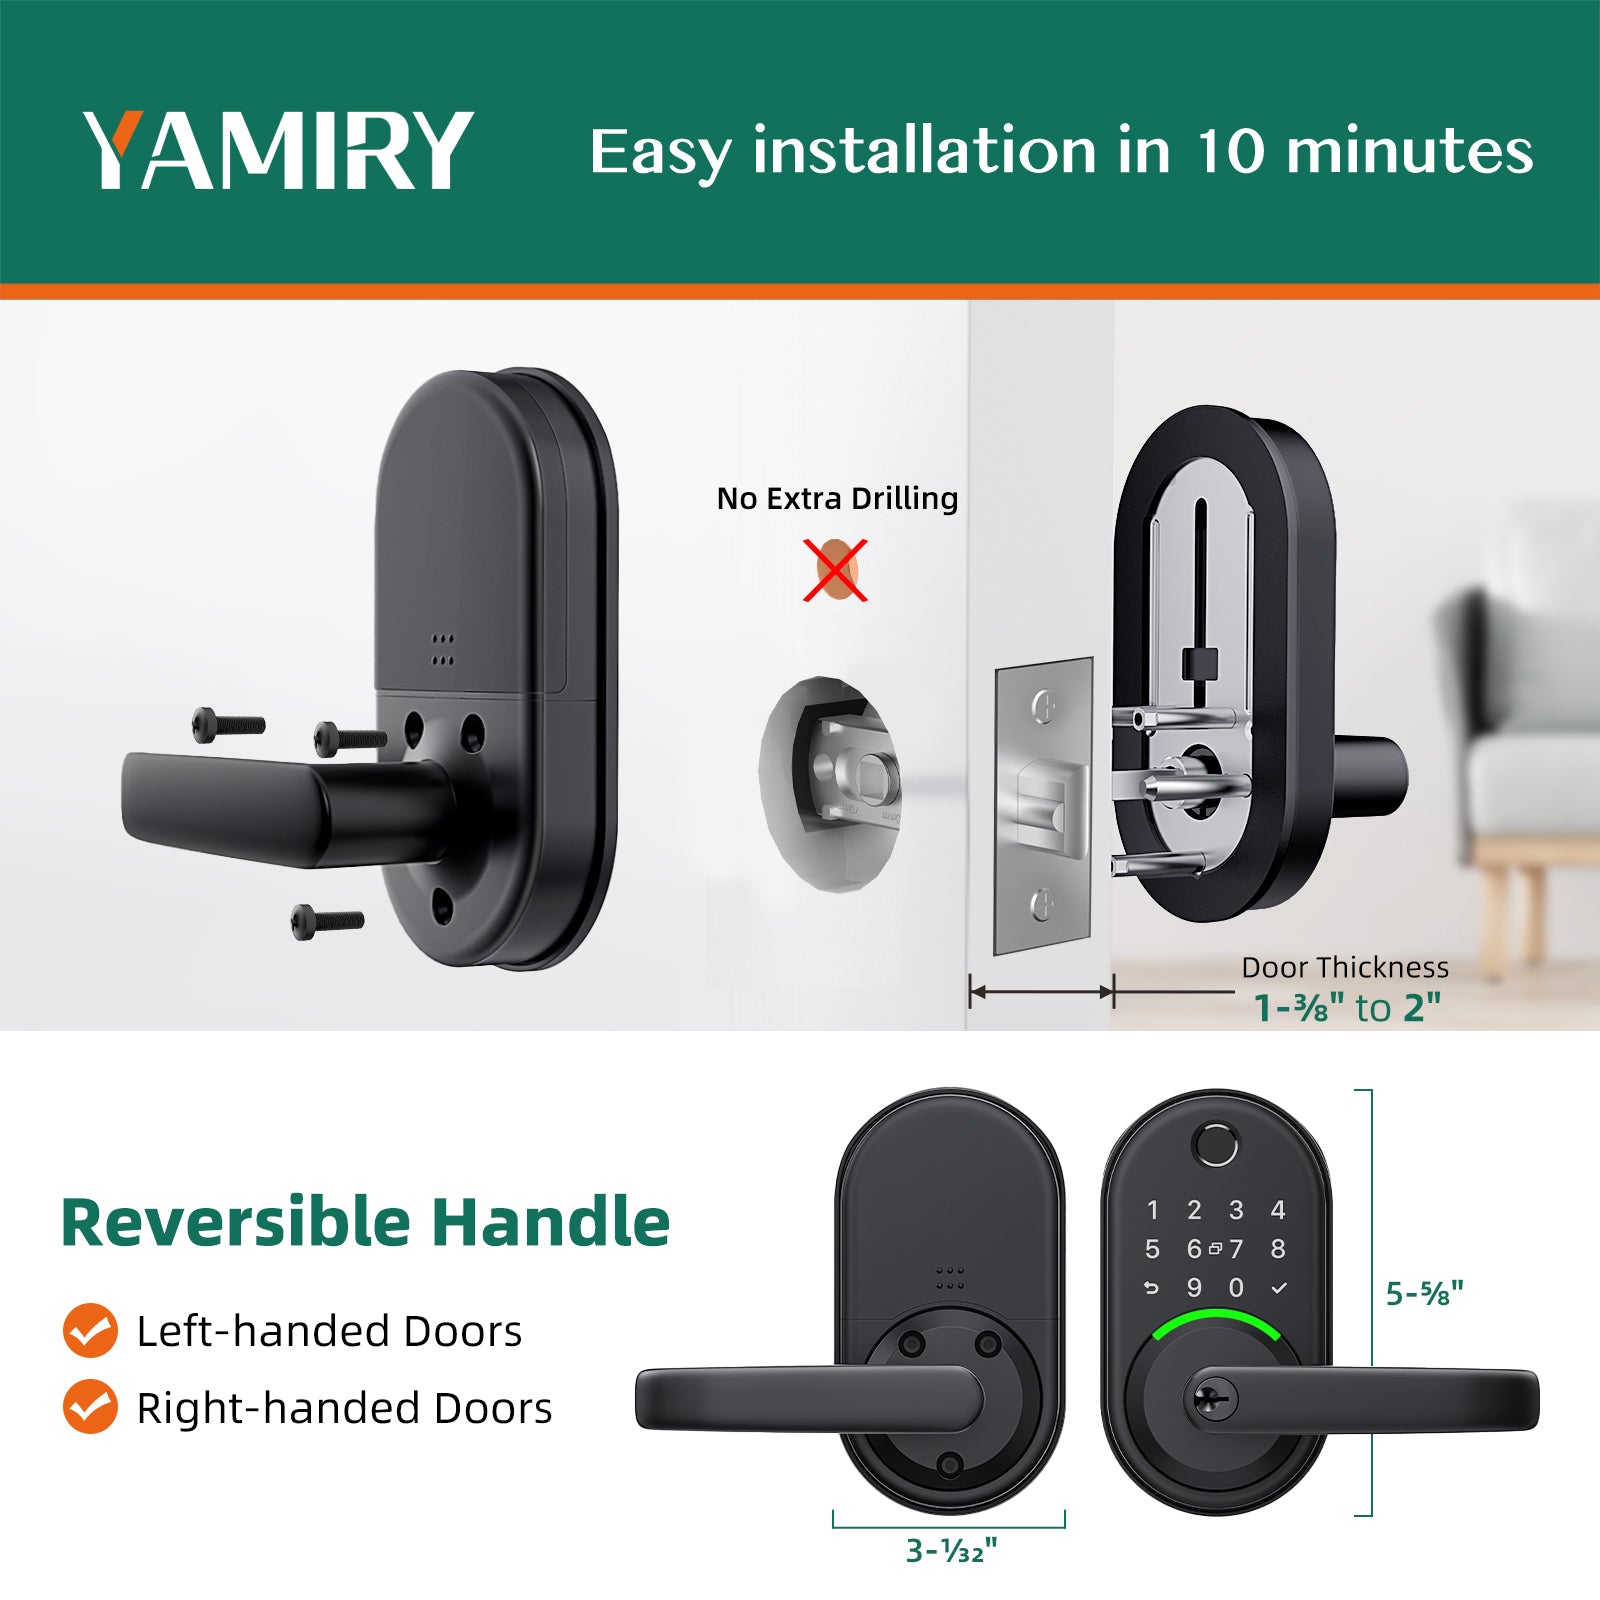
The exterior unit houses the fingerprint sensor and keypad. Correct installation here is vital for weather resistance and functionality.
Insert Metal Connecting Rod
Prepare the outside knob before mounting it to the door:
1. Take the metal rod (tailpiece) and insert it fully into the outside knob.
2. Push until you hear a distinct click indicating it is locked in place.
3. Verify the rod does not wiggle or fall out.
Forgetting this step is a common mistake that renders the lock non-functional. The rod connects the external sensor to the internal locking mechanism.
Apply Weather Protection Gasket
Protect your investment from the elements with the included rubber gasket:
* Slide the rubber gasket over the base of the outer knob assembly.
* Ensure it sits flat against the mounting surface.
* Press firmly to create a tight seal.
This gasket seals against rain and dust, which is critical for exterior doors exposed to harsh weather. It extends the lifespan of the electronics significantly.
Route Wiring Through Door Borehole
The Yamiry smart lock uses internal wiring to connect the exterior sensors to the interior power source.
Thread Wires Carefully
Handle the pre-attached wiring with care during installation:
1. Pass the wired connector from the outer knob through the main borehole.
2. Guide the wires gently to avoid pinching or sharp bends.
3. Place the outer assembly flush against the door surface.
Never cut or splice these wires. Damage to the wiring harness voids the warranty and requires a full replacement unit.
Mount Inside Knob and Connect Power
This step completes the mechanical connection between the interior and exterior units.
Align and Secure Inner Knob
Connect the two halves of the smart lock system:
1. Match the inner knob connector to the wires coming from the outside.
2. Plug the wiring harness in until you hear a soft click.
3. Insert the metal rod into the inner knob mechanism.
4. Position the inner housing flush against the door surface.
Ensure no wires are pinched between the housing and the door. Misalignment here can cause the lock to jam.
Fasten Mounting Screws Securely
Lock the assembly in place using the provided hardware:
* Insert the main mounting screws and tighten them evenly.
* Remove the small side screw using the included Allen key.
* Access the hidden screw hole revealed by removing the side screw.
* Tighten the final screw for full stability.
Wait to insert batteries until both sides are fully mounted and secured. This prevents accidental activation during assembly.
Insert Batteries and Power On System
Activating the lock is the final physical step of the Yamiry smart lock installation.
Load Four AA Batteries
Power the device by following the polarity diagram inside the compartment:
1. Open the battery compartment on the inside knob.
2. Insert four AA batteries ensuring correct positive and negative orientation.
3. Close the compartment cover securely.
The lock operates on standard AA batteries with a life of up to 12 months under normal use. Always use fresh alkaline batteries for best performance.
Verify Initial Power Response
Check that the system boots up correctly:
* The keypad lights up briefly upon power insertion.
* A voice prompt announces “Power on” if alerts are enabled.
* The LED flashes blue indicating readiness for setup.
If there is no response, recheck battery orientation and ensure the internal wiring connector is fully seated.
Configure App and Add Access Methods
While the lock works with default settings, the YAMIRY Home app unlocks full potential.
Download App and Pair Device
Connect your phone to the lock via Bluetooth:
1. Install the YAMIRY Home app from the iOS or Android store.
2. Create an account or log in to your existing profile.
3. Tap “Add Device” and scan the QR code found on the lock or packaging.
No Wi-Fi gateway is needed for fingerprint, passcode, or key fob usage. The app connects directly to the lock via Bluetooth for local management.
Enroll Fingerprint Credentials
Set up the fastest unlock method for daily use:
* Navigate to Members and select Add Fingerprint in the app.
* Place your finger on the keypad sensor and press firmly.
* Repeat the scan five times with slight angle adjustments.
* Name the user for easy identification in the activity log.
Clean the sensor before enrollment for best results. The system recognizes fingerprints in under one second with high accuracy.
Create Passcodes and Temporary Keys
Manage access for family members or short-term visitors easily.
Generate Permanent and Temporary Codes
Create custom access credentials through the app interface:
* Permanent Code: Enter a 4 to 9 digit code, assign a name, and save.
* One-time Code: Valid for 6 hours, ideal for deliveries.
* Short-term Code: Active for 5 minutes for quick entry.
* Custom Schedule: Set specific start and end times for recurring access.
Avoid obvious codes like 1234 or birth years for security. All temporary codes expire automatically without manual deletion.
Sync Key Fobs and Cards
Enable tap-to-open convenience for users who prefer physical tokens:
1. Select Add Key Fob within the app menu.
2. Hold the fob or card within one inch of the keypad.
3. Wait for the confirmation beep and blue LED flash.
You can register up to 20 fobs or cards per lock. Attaching a fob to a car keychain provides instant access without searching for a phone.
Configure Auto Lock and Passage Mode
Automate your security settings to match your daily routine.
Enable Auto Lock Feature
Prevent accidentally unlocked doors with this automation:
* Go to Settings and select Auto Lock.
* Choose a delay time between 5 seconds and 1 minute.
* Disable this feature if you prefer manual locking.
If Auto Lock is off, you must hold the checkmark icon for 3 seconds to lock manually. This feature ensures your door is never left vulnerable.
Activate Passage Mode
Keep the door unlocked during events or maintenance work:
* Navigate to Settings and choose Passage Mode.
* Set a duration for 1 hour, 4 hours, or all day.
* Schedule recurring times for regular intervals like weekends.
Auto Lock is disabled while Passage Mode is active. This allows free flow of traffic without constant unlocking.
Test All Functions and Troubleshoot
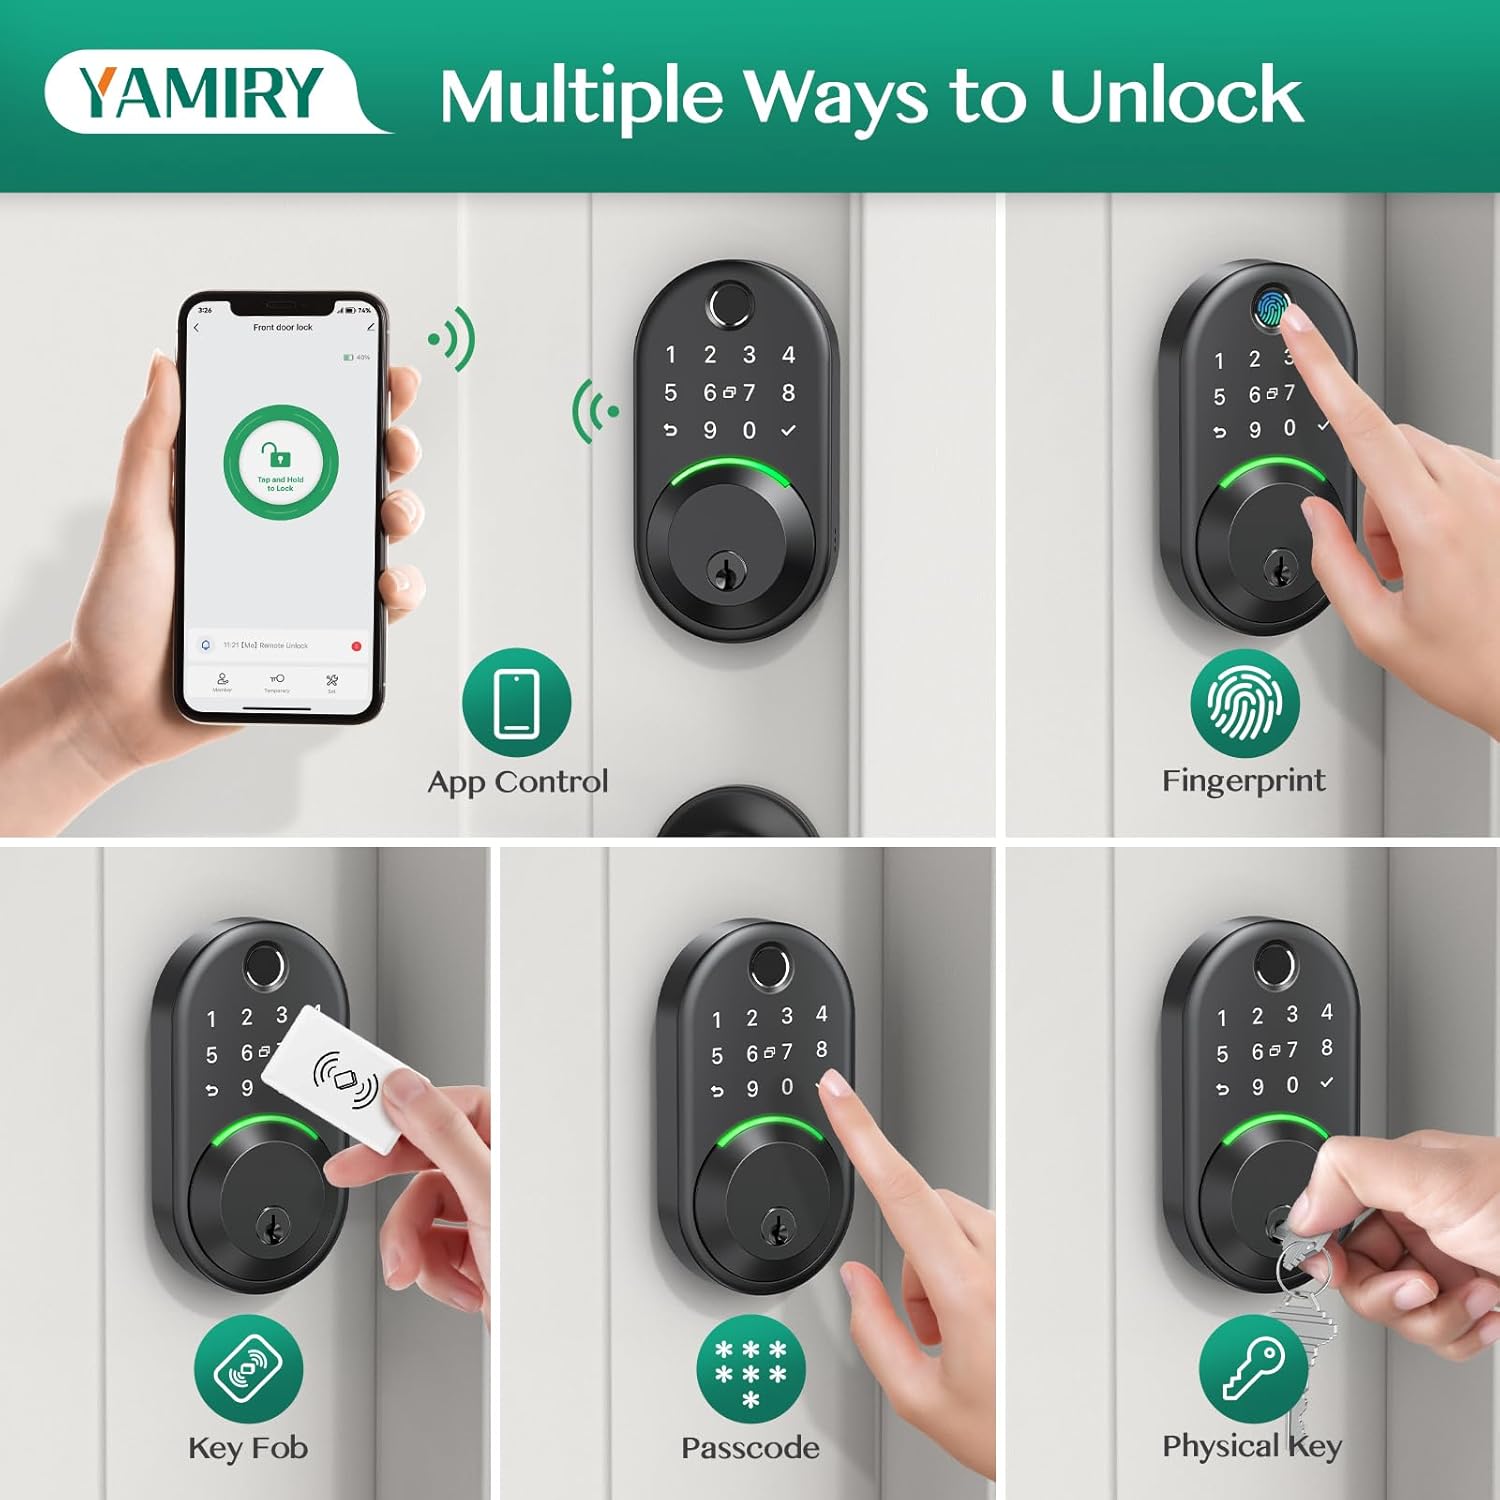
Verify every feature works before considering the Yamiry smart lock installation complete.
Run Full Function Checklist
Test each access method multiple times to ensure reliability:
* Fingerprint: Should unlock in under 1 second.
* Passcode: Enter code to verify green light and unlock.
* Key Fob: Tap near sensor for blue flash and unlock.
* App Unlock: Press the blue button for remote release.
* Auto Lock: Open and close door to confirm timed locking.
* Manual Lock: Hold checkmark for 3 seconds to hear “Locked.”
Repeat each test two to three times. If any method fails, re-pair in the app or reboot the lock by removing batteries for 10 seconds.
Resolve Common Installation Issues
Address typical problems quickly without support calls:
* No Response: Check battery orientation and reseat the wiring connector.
* Fingerprint Errors: Clean the sensor and re-enroll with dry fingers.
* Auto Lock Failure: Ensure the door closes fully to trigger the sensor.
* App Connection: Stay within 10 feet and enable Bluetooth and location services.
Most issues stem from loose connections or misaligned latches. Double-check your mechanical assembly if digital features struggle.
Maintain Lock Performance and Lifespan
Regular maintenance keeps your Yamiry smart lock running smoothly for years.
Perform Monthly Checks
Monitor these key areas to prevent failures:
* Battery Level: Check the top-right icon in the app regularly.
* Sensor Cleanliness: Wipe the keypad weekly with a dry cloth.
* Screw Tightness: Re-tighten mounting screws every three months.
* Latch Movement: Apply graphite powder annually for smooth operation.
Replace batteries when the app indicates levels below 20 percent. Proactive maintenance avoids being locked out unexpectedly.
Protect Against Weather Elements
Extend the life of exterior units with proper care:
* Inspect the rubber gasket regularly for cracks or wear.
* Avoid spraying water directly on the keypad when cleaning.
* Shield the lock from prolonged direct sunlight if possible.
These steps extend the device life by over two years in harsh climates. Proper care ensures your Yamiry smart lock installation remains secure and functional.
Frequently Asked Questions About Yamiry Smart Lock Installation
Does Yamiry smart lock installation require professional wiring?
No, the installation requires no complex wiring or electrician. You only need to connect a simple internal plug and insert four AA batteries to power the system.
How long does the Yamiry smart lock installation take?
Most users complete the entire Yamiry smart lock installation in under 20 minutes. The process involves basic tools and straightforward mechanical steps suitable for beginners.
Can I install this lock if my door has a non-standard backset?
The lock supports standard backsets of 2-3/8 inches or 2-3/4 inches. If your door differs significantly from these measurements, you may need professional modification before installation.
What happens if the batteries die completely?
You can use the included emergency physical key to unlock the door. Additionally, the app provides low-battery warnings well before total power loss occurs.
Do I need a Wi-Fi gateway for the lock to work?
No, a Wi-Fi gateway is not required for fingerprint, passcode, key fob, or local Bluetooth app access. The gateway is only needed for remote unlocking from anywhere.
How many users can I add to the Yamiry smart lock?
You can add unlimited app users and store up to 20 key fobs or cards. The system allows flexible management of permanent and temporary access codes for guests.
Key Takeaways for Successful Yamiry Smart Lock Installation
The Yamiry smart lock installation offers a secure, feature-rich upgrade without the need for professional help. By following the mechanical steps carefully and configuring the app settings, you gain five distinct unlock methods and real-time security monitoring.
Remember to test every function thoroughly and maintain the battery levels for optimal performance. Start your Yamiry smart lock installation today to enjoy keyless convenience and enhanced peace of mind for your home.