
Does your Kaba Simplex lock refuse to open because the combination is lost or forgotten? Unlike electronic systems, these mechanical units store codes in physical gears that require a specific kaba lock reset procedure to access. You cannot simply bypass the front panel, so understanding the correct disassembly and alignment steps is critical for regaining entry.
This guide details the exact methods for routine code changes and full emergency resets on Simplex 1000, L1000, and 5000 models. You will learn which tools are mandatory, how to align internal shear lines without damaging gears, and the specific reassembly order for left-hand versus right-hand locks.
Perform a Routine Kaba Lock Reset With Known Code
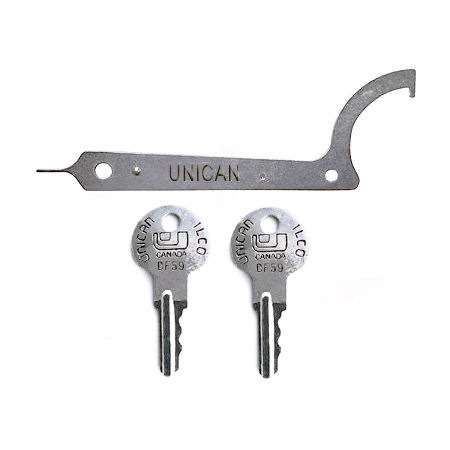
Use this method when you possess the current combination and simply need to update access credentials. This process avoids full disassembly and typically takes less than three minutes to complete.
Gather Required Tools and Prepare the Door
You must have the DF 59 Control Key and the Kaba Spanner Wrench ready before starting. Ensure the door remains open throughout the entire process to prevent accidental lockouts. Verify that the passage feature is disengaged and the turn knob sits in the vertical upright position.
Enter the Existing Combination Correctly
Turn the outside handle once to the stop position and release it to verify the latch does not retract. Input your current code by pressing the buttons in sequence. You should feel a distinct click with each press confirming the mechanism registered the input.
- Factory Default: Press buttons 2 and 4 together, release, then press 3.
- Verification: If no click occurs, recheck your sequence or button alignment.
Engage the Combination Change Sleeve
Insert the DF 59 key into the change plug on the lock face and turn it counterclockwise to remove the cylinder. Place the spanner wrench into the exposed combination change sleeve. Turn the wrench clockwise to the stop, then rotate it counterclockwise to the stop to engage the reset mechanism.
Program Your New Secure Sequence
Turn the outside handle to the stop position again and ensure the latch stays extended. Enter your new combination using at least three buttons for optimal security. Remember that each button can only be used once per sequence.
- Press buttons firmly to hear the registration click.
- You may press two buttons simultaneously as a single step.
- Avoid simple patterns like 1-2-3 for better security.
Finalize the Reset and Secure the Unit
Turn the handle fully clockwise to retract the latch and hold it there. Release the handle and turn it to the stop again to confirm the latch only moves with the new code. Reinstall the combination change plate using the DF 59 key and turn it clockwise until snug.
Test the New Code Thoroughly
Enter the new combination three to five times while the door is still open. Confirm that only the correct sequence retracts the latch successfully. Your kaba lock reset is now complete and ready for daily use.
Execute Emergency Reset for Lost Combinations on Simplex 1000

Disassemble the lock housing to access the internal code chamber when the combination is unknown. This full mechanical reset is the only way to regain access without the original code.
Disassemble the Lock Housing Components
Remove the six Phillips screws securing the back plate to the front housing. Detach the guide bracket by removing its two screws and sliding it backward off the clutch linkage. Use a small flat-blade screwdriver to lift the chamber links off the control shaft carefully.
- Simplex 1000: Uses one link.
- L1000: Uses two links labeled C and D.
Extract the chamber by removing the Phillips screws at each end and pulling it out gently. Remove the shaft bushing from the control shaft while holding the chamber with key stems facing you.
Clear Previous Combination Memory
Use pliers to rotate the control shaft counterclockwise and then release it immediately. This action clears all gear memory and resets the internal mechanism for a fresh start. You will feel slight resistance during this rotation which is normal.
Align Code Gears to the Shear Line
Look through the rectangular windows in the dust cover to view the five code gears. Your goal is to align all L-shaped gear pockets to the shear line or open position. Identify the gear farthest from alignment and depress its corresponding key stem.
- Release the stem and watch the gear snap closer to alignment.
- Repeat for the next most misaligned gear in sequence.
- Start over if any gear passes the shear line accidentally.
Finalize the Reset State Configuration
Depress the lockout slide at the top of the chamber and release it. Rotate the control shaft counterclockwise with pliers and release it again. Confirm the lockout slide pops out while the button underneath stays depressed to indicate reset mode.
Set and Lock the New Combination
Press the key stems in your desired sequence such as 5 and 2 together followed by 4 and 1. Rotate the control shaft clockwise with pliers until the code change button pops up. Check the windows to ensure no gear pockets remain at the shear line.
Reassemble the Lock in Reverse Order
Reinstall the shaft bushing with the flat side facing up. Slide the chamber back in and secure it with the two end screws. Reattach the chamber links ensuring correct orientation for your specific model type.
- Right-Hand L1000: Install C first then D.
- Left-Hand L1000: Install D first then C.
Replace the guide bracket and secure it with two screws. Install the back plate and tighten all six screws firmly. Ensure the turn knob shaft aligns vertically with the passage actuator slot before final testing.
Reset Kaba Simplex 5000 Series Without the Code
The 5000 series uses a different chamber design that requires removal from the door for access. Follow these specific steps to reset this model effectively.
Remove and Disassemble the Unit Completely
Detach both outside and inside assemblies from the door frame. Remove the base plate by unscrewing the two Phillips screws holding it. Extract the combination chamber by removing the two screws securing it to the base plate.
Unscrew the small Phillips screws on the dust cover noting that newer models may use only one screw. Hold the chamber by the screw tabs and rotate the reset cam fully back toward the key stems.
Recover Lost Combination Mechanically
Identify the gear pocket farthest from alignment with the L-shaped leg of the unlocking slide. Press its key stem with a flat-blade screwdriver and record the number as the gear moves to alignment. Repeat this process for each misaligned gear to deduce the full sequence.
- Rotate the reset cam back toward stems if you make an error.
- This step reveals the original combination before you change it.
Program New Combination Sequence
Ensure all gears are aligned before pressing the combination change button at the top of the chamber. Rotate the reset cam back toward the key stems and release it. Enter your new sequence by pressing the key stems in the desired order.
Push and release the black slide once to lock the sequence. The code change button will pop up to confirm success. Rotate the reset cam fully to lock the new combination into place permanently.
Reassemble and Test 5000 Series Locks
Reinstall the dust cover and secure it with the correct number of screws. Place the baseplate flat on your work surface for easier handling during reassembly. Reinstall the combination chamber using two screws while checking cam alignment.
- Ensure the thin cam rests against the black unlocking slide.
- Ensure the thick cam rests against the piston.
Reattach the outer assembly to the baseplate and flip it over. Secure the unit with the two remaining screws. Reinstall the complete lock on the door while keeping the door open for testing.
Perform Final Operational Tests
Enter the new combination and press the inner button. Turn the outside handle to verify the latch retracts smoothly. If the lock fails to open recheck the cam alignment and confirm you pushed the black slide.
Critical Tools and Model Differences Explained
Understanding the specific tools and mechanical differences prevents damage during a kaba lock reset. Each model has unique requirements for links and cam systems.
Required Tools Summary
- DF 59 Key: Essential for accessing the change sleeve on 1000 and L1000 models.
- Spanner Wrench: Required to rotate the change sleeve on 1000 and L1000 units.
- Pliers: Necessary for rotating control shafts on all mechanical models.
- Flat-Blade Screwdriver: Used for lifting links and pressing stems on all units.
- Phillips Screwdriver: Required for disassembly of all model types.
Model-Specific Mechanical Differences
The Simplex 1000 uses a single chamber link while the L1000 requires two links labeled C and D. The 5000 series uses no links but relies on a dual-cam system with thin and thick cams. Installation order for L1000 links depends entirely on whether the lock is left-hand or right-hand oriented.
| Feature | Simplex 1000 | L1000 | 5000 Series |
|---|---|---|---|
| Links | One | Two (C and D) | None |
| Reset Method | Internal Chamber | Internal Chamber | Remove Chamber |
| Cam System | Control Shaft | Control Shaft | Reset Cam |
Troubleshooting Common Reset Errors
Gears passing the shear line during reset indicates an incorrect alignment sequence. Restart the process from the beginning and follow the farthest misaligned gear rule strictly. The mechanism rejects partial resets so precision is mandatory.
The latch retracting without a code suggests the passage feature is engaged or the shaft is misaligned. Disengage the passage mode and verify the turn knob shaft aligns vertically with the actuator. Check drive pin orientation for left or right-hand specifications.
If the code change button does not pop up you likely did not rotate the shaft fully. Ensure you turned the control shaft or reset cam clockwise to the hard stop. Depress the lockout slide first before attempting the final rotation.
A lockout slide staying depressed means the mechanism was not cleared properly. Rotate the control shaft counterclockwise and release it again to clear the state. Repeat until the slide pops out correctly.
Pressing the wrong key stem during 5000 recovery requires a full reset of the gears. Rotate the reset cam back toward the key stems and release to clear the error. Start the alignment process over to avoid setting an incorrect code.
Pro Tips for Long-Term Success

Always mark L1000 links C and D before removal to avoid mixing them up during reassembly. Use at least three buttons for your combination as Kaba recommends this for maximum security. Store your DF 59 key and spanner wrench in a secure master cabinet for future access.
Never force gears past their mechanical limits as this causes irreversible damage. Test every new combination with the door open to prevent accidental lockouts. A successful kaba lock reset restores full function to your mechanical lock without needing power.
Frequently Asked Questions About Kaba Lock Reset
Can I reset a Kaba Simplex lock without the original code?
Yes, but you must disassemble the lock to access the internal combination chamber. There is no front-access override for lost codes on mechanical Simplex models.
What tools do I need for a Kaba Simplex 1000 reset?
You need a DF 59 control key, a spanner wrench, pliers, and screwdrivers. The DF 59 key is critical for routine changes and cannot be substituted easily.
How do I know if my L1000 links are installed correctly?
Right-hand locks require link C installed before link D. Left-hand locks require link D installed before link C. Incorrect order prevents the lock from functioning.
Why won’t the code change button pop up after programming?
This usually means the control shaft or reset cam was not rotated fully to the stop position. Ensure you complete the full rotation after entering the new sequence.
Can I use the same button twice in a Kaba Simplex combination?
No, each button can only be used once per combination sequence. You must select unique buttons for each step of your code.
What is the factory default code for new Kaba Simplex locks?
New locks typically come with a factory default of buttons 2 and 4 pressed together followed by button 3. Change this immediately after installation for security.
Key Takeaways for Successful Kaba Lock Reset
Performing a kaba lock reset requires patience and strict adherence to mechanical sequencing. Whether updating a known code or recovering from a lost combination, using the correct tools and following the specific steps for your model ensures success. Always test your new code with the door open before considering the job complete.
Keep your specialized tools accessible and mark all internal components during disassembly to avoid reassembly errors. With these techniques, you can maintain secure access to your facility without professional assistance. Save this guide for future reference to handle any lockout situation efficiently.



