When your Jeep Wrangler door lock switch not working leaves you stranded, the culprit is often a broken wire or bent pin rather than a dead actuator. This frustrating issue plagues JK and JLU models where the interior button fails while the key fob still functions perfectly outside.
This guide walks you through diagnosing severed harness wires, straightening connector pins, and replacing faulty actuators with confidence. You will learn specific repair steps to restore your locks without paying expensive dealership diagnostic fees.
Verify the Exact Cause of Failure

You must confirm the root cause before removing any trim or buying parts. A non-responsive interior button does not automatically mean the switch itself is dead.
Test Key Fob and Exterior Mechanisms
Start by pressing your key fob buttons to lock and unlock all doors. If the remote works, your door lock actuators and central body controller are functional. This confirms the issue is isolated to the interior switch circuit or its power supply.
Next, test the exterior door handle locks manually. If they engage properly, you have verified that the mechanical systems downstream of the switch are intact.
Swap Switches to Isolate the Fault
If the driver side fails but the passenger side works, try swapping the switches if they are compatible. If the passenger switch works on the driver side circuit, your original switch is defective.
If neither switch works on the driver side, the problem lies upstream in the wiring or connector. This simple test saves you from replacing good parts.
Inspect the Fuse Box
Most Jeep Wranglers use a single fuse for all door locks. If other doors respond to the fob, the fuse is likely fine. Locate the fuse box under the dash and check fuse #59 or #61 depending on your model year.
Replace any blown fuses immediately. However, do not assume a good fuse means the circuit is healthy since many failures occur beyond the fuse box.
Straighten Bent Connector Pins
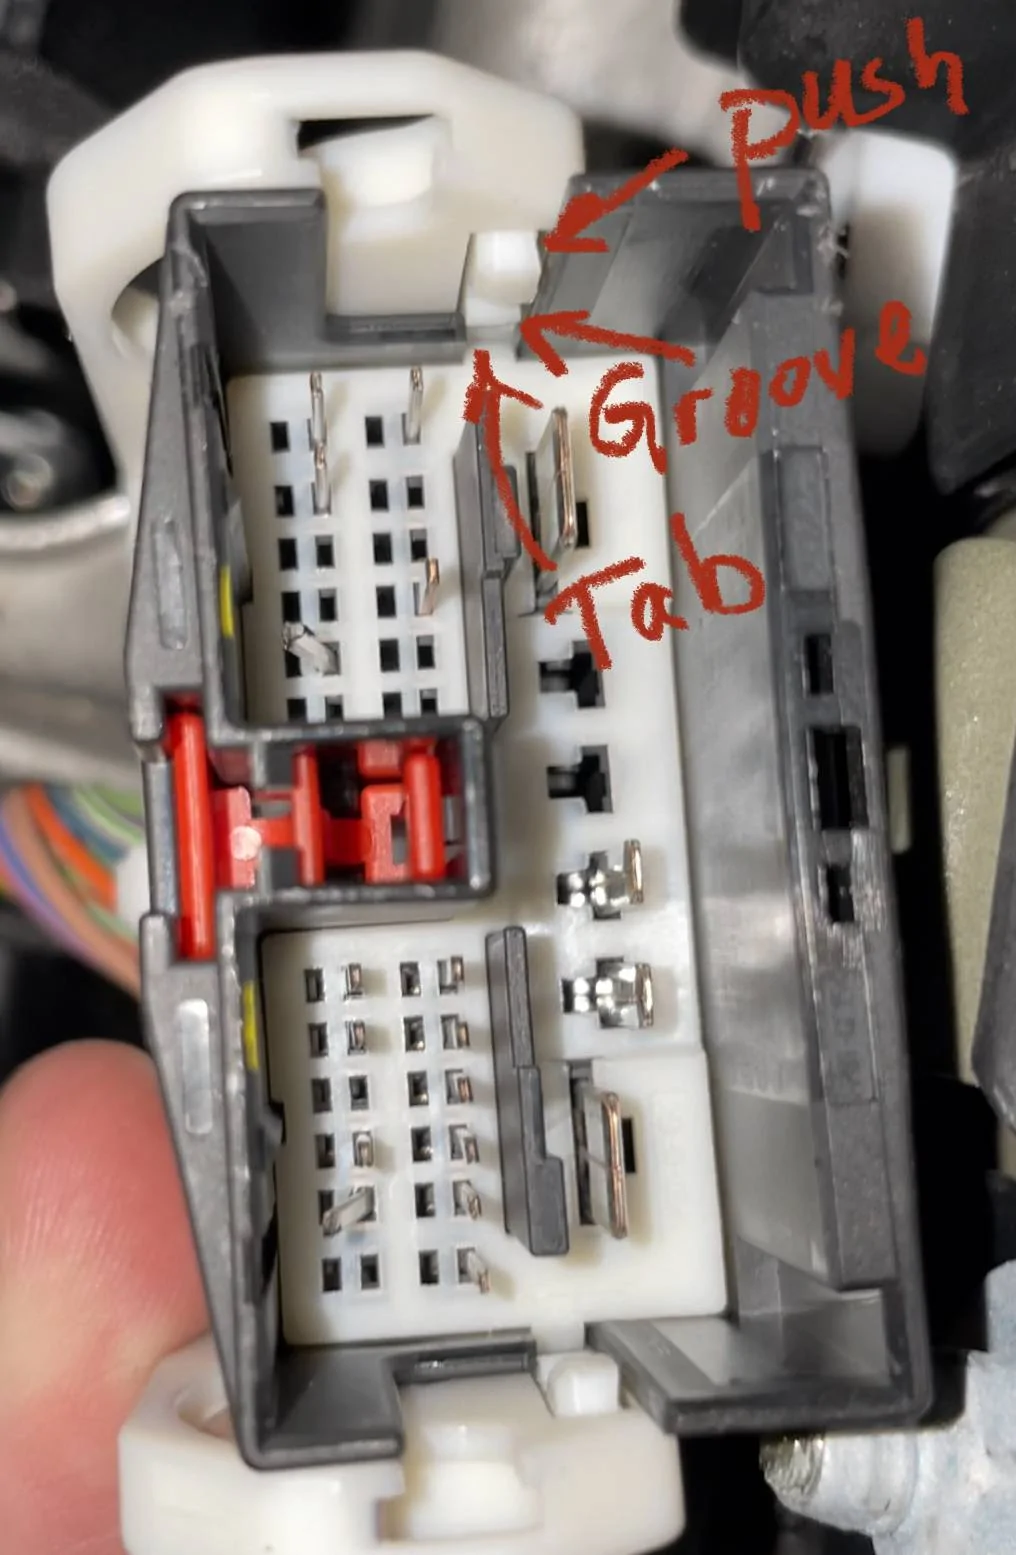
Frequent door removal causes connector pins to bend, breaking the electrical circuit. This is the most common cause for owners who take their doors off for summer driving.
Locate the Kick Panel Connector
Find the electrical connection between the door and body in the foot well area. Remove the lower trim panel near the door to access this harness connector. On the driver side, it sits behind a plastic cover near the brake pedal.
Inspect for Upward Bent Pins
Disconnect the harness and examine the female side on the body carefully. Look at the top row of pins for any that are bent upward. These misaligned pins prevent contact even when the connector looks fully seated.
Pro Tip: Use a flashlight and magnifier because bent pins can be very subtle to see.
Straighten Pins Gently
Use a small flat-blade screwdriver or your fingernail to press bent pins down. Align them flush with the others without applying too much force. These pins are delicate and can snap if you push too hard.
Reconnect and Test Functionality
Reattach the connector firmly until you hear a click. If the switch still fails, disconnect and reconnect it again. The act of reseating often realigns the pins enough to restore contact in under five minutes.
Repair Severed Wiring in Harness

If pins are straight, broken wires inside the cloth loom are the next likely culprit. These breaks often happen near the foot well where the harness bends sharply.
Identify the Damage Location
The wiring runs from the door switch through the kick panel into the body harness. Breaks often occur where the harness bends near the floor. The cloth loom may look perfect while wires break internally.
Warning: Do not skip tactile inspection. Pull gently on the harness because a broken wire will extend further than others.
Find the Specific Broken Wire
Peel back the cloth loom to expose the wires inside. Look for these common failure points:
* Blue with red or purple stripe (Most frequent in JLU models)
* Green and purple (Reported in 2020 Rubicon)
* Solid purple (General reports across models)
Use a multimeter to test continuity or simply look for frayed strands.
Splice the Wire Correctly
Once you find the break, follow these steps:
1. Cut out the damaged section of wire completely.
2. Strip insulation from both remaining ends carefully.
3. Solder in a short jumper wire using 14 to 16 gauge wire.
4. Seal the connection with heat shrink tubing.
Pro Tip: Add extra slack before splicing because wires often retract when cut.
Reassemble and Test Immediately
Wrap the repaired section with electrical tape or new loom material. Secure the harness with zip ties to prevent future flexing. Test the switch immediately before reinstalling any trim panels.
Replace the Entire Wiring Harness

Replacing the full harness is necessary if multiple wires are damaged or splicing fails to fix the issue.
Order the Correct Part Number
Use part number 68299333AH for the door switch and mirror harness. This part fits JK and JLU models specifically. Aftermarket and OEM options range from $60 to $120.
Install the New Harness
- Remove the door panel and kick panel trim completely.
- Unplug the old harness at both the switch and body ends.
- Route the new harness along the original path carefully.
- Reconnect everything and test before final reassembly.
This provides a clean and permanent fix for recurring wiring issues.
Diagnose a Failing Door Lock Actuator

A clicking switch with no door movement suggests a broken actuator rather than an electrical fault.
Recognize Actuator Failure Signs
Look for these specific symptoms of mechanical failure:
* Door will not open from inside even when unlocked
* Key fob clicks but the latch does not release
* Beeping sound when locking indicates the system thinks the door is open
* Passenger side works fine while driver side fails
These signs mean power reaches the switch but the actuator cannot move the latch.
Remove the Door Panel Safely
- Disconnect the negative battery terminal to prevent shorts.
- Remove three screws located in the handle cup, under the map pocket, and near the pull handle.
- Use plastic trim tools to pop the clips working from the bottom up.
- Disconnect the single electrical plug for the switch.
Manage the Window Regulator
The window regulator blocks full panel removal so you must secure the glass first.
Secure the Window Glass
- Lower the window completely to the bottom.
- Locate the plastic clips holding the regulator to the panel.
- Insert two flathead screwdrivers to release the clips gently.
- Tape the glass securely to the top of the door frame.
Critical: Never remove the panel without securing the window to prevent it from falling.
Replace the Door Lock Actuator
Remove the Old Unit
- Unplug the actuator electrical connector by pressing the tab and sliding.
- Release the mounting clips holding the unit.
- Disconnect the exterior door handle rod using a clip tool.
- Unhook the two inner cables for the lock and interior handle.
- Pull out the actuator and inspect for cracked housing.
Reinforce the New Actuator
New units like the Dorman 93196-4 often fail due to weak plastic housings.
- Inspect the new unit for any stress cracks immediately.
- Apply epoxy to any weak points on the housing.
- Wrap a zip tie around the housing for added support.
Pro Tip: This reinforcement prevents 90% of repeat failures in new actuators.
Install and Reconnect Components
- Mount the new actuator securely in the door frame.
- Reattach inner cables ensuring they are fully seated.
- Reconnect the exterior handle rod carefully.
- Plug in the electrical connector firmly.
Reassemble and Calibrate System
Reinstall the Door Panel
- Align the window regulator with top and bottom brackets.
- Feed the small bolt through the door frame hole.
- Reconnect the switch harness before snapping clips.
- Snap all clips into place firmly.
- Reinstall the three screws you removed earlier.
Adjust the Lock Mechanism
If the door does not latch properly, locate the hex bolt on the actuator. Loosen it slightly and adjust the actuator position. Test until the lock engages smoothly every time.
Final Testing Procedures
- Reconnect the negative battery terminal.
- Test lock and unlock functions with both switch and fob.
- Open from inside and outside to confirm release.
- Clean weep holes at the bottom of the door.
- Apply silicone lubricant to the latch and moving parts.
Prevent Future Failures
Handle Door Removal Carefully
Inspect connector pins every time you remove your doors. Straighten any bent pins before reconnecting. Seat the connector firmly until you hear a click.
Inspect the Harness Annually
Check the foot-well harness for exposed wires or stretched sections. Look for cracked loom material even if you never remove doors.
Lubricate and Clean Regularly
Apply silicone spray to the latch and actuator linkage every six months. Clear weep holes with a wire or compressed air. Avoid WD-40 because it attracts dust and dries out.
Frequently Asked Questions About Jeep Wrangler Door Lock Switch Not Working
Why does my key fob work but the interior door lock switch does not?
This indicates the actuator and central controller are functional. The problem is isolated to the interior switch circuit, wiring harness, or connector pins.
Which wire colors commonly break in the Jeep Wrangler door harness?
The blue wire with a red or purple stripe is the most common failure. Green and purple wires also break frequently in 2020 Rubicon models.
How do I fix bent pins in the door connector?
Disconnect the harness in the kick panel and gently press bent pins down with a small screwdriver. Reconnect firmly to restore electrical contact.
What part number replaces the Jeep Wrangler door wiring harness?
Part number 68299333AH replaces the door switch and mirror harness for JK and JLU models. This part fixes multiple wire breaks at once.
Can I reinforce a new door lock actuator to prevent failure?
Yes, apply epoxy to weak points and wrap a zip tie around the housing. This reinforcement prevents the plastic from cracking again.
How long does it take to repair a broken door lock wire?
Most wiring repairs take under 30 minutes if you have basic tools. Bent pin fixes often take less than five minutes to complete.
Key Takeaways for Fixing Your Jeep Wrangler Door Lock Switch
A Jeep Wrangler door lock switch not working is usually caused by severed wires in the foot-well harness or bent connector pins from door removal. You can fix most issues by splicing broken wires or straightening pins without replacing the entire system. Actuator failure is less common but requires panel removal and reinforcement of the new unit.
Start by testing your key fob to isolate the electrical fault before removing any trim. Follow the diagnostic steps in this guide to save money on dealership fees and keep your Wrangler ready for adventure.