
Struggling with a slippery bolt or a rusted nut often leads to frustration until you learn how to use lock pliers effectively. These powerful tools clamp down and stay locked, freeing your hands for critical turning or welding tasks without slipping.
This guide teaches you to adjust the jaw opening, engage the locking mechanism securely, and release tension safely. You will master troubleshooting common grip issues and selecting the right tool size for your specific project needs.
Adjust the Jaw Opening Correctly
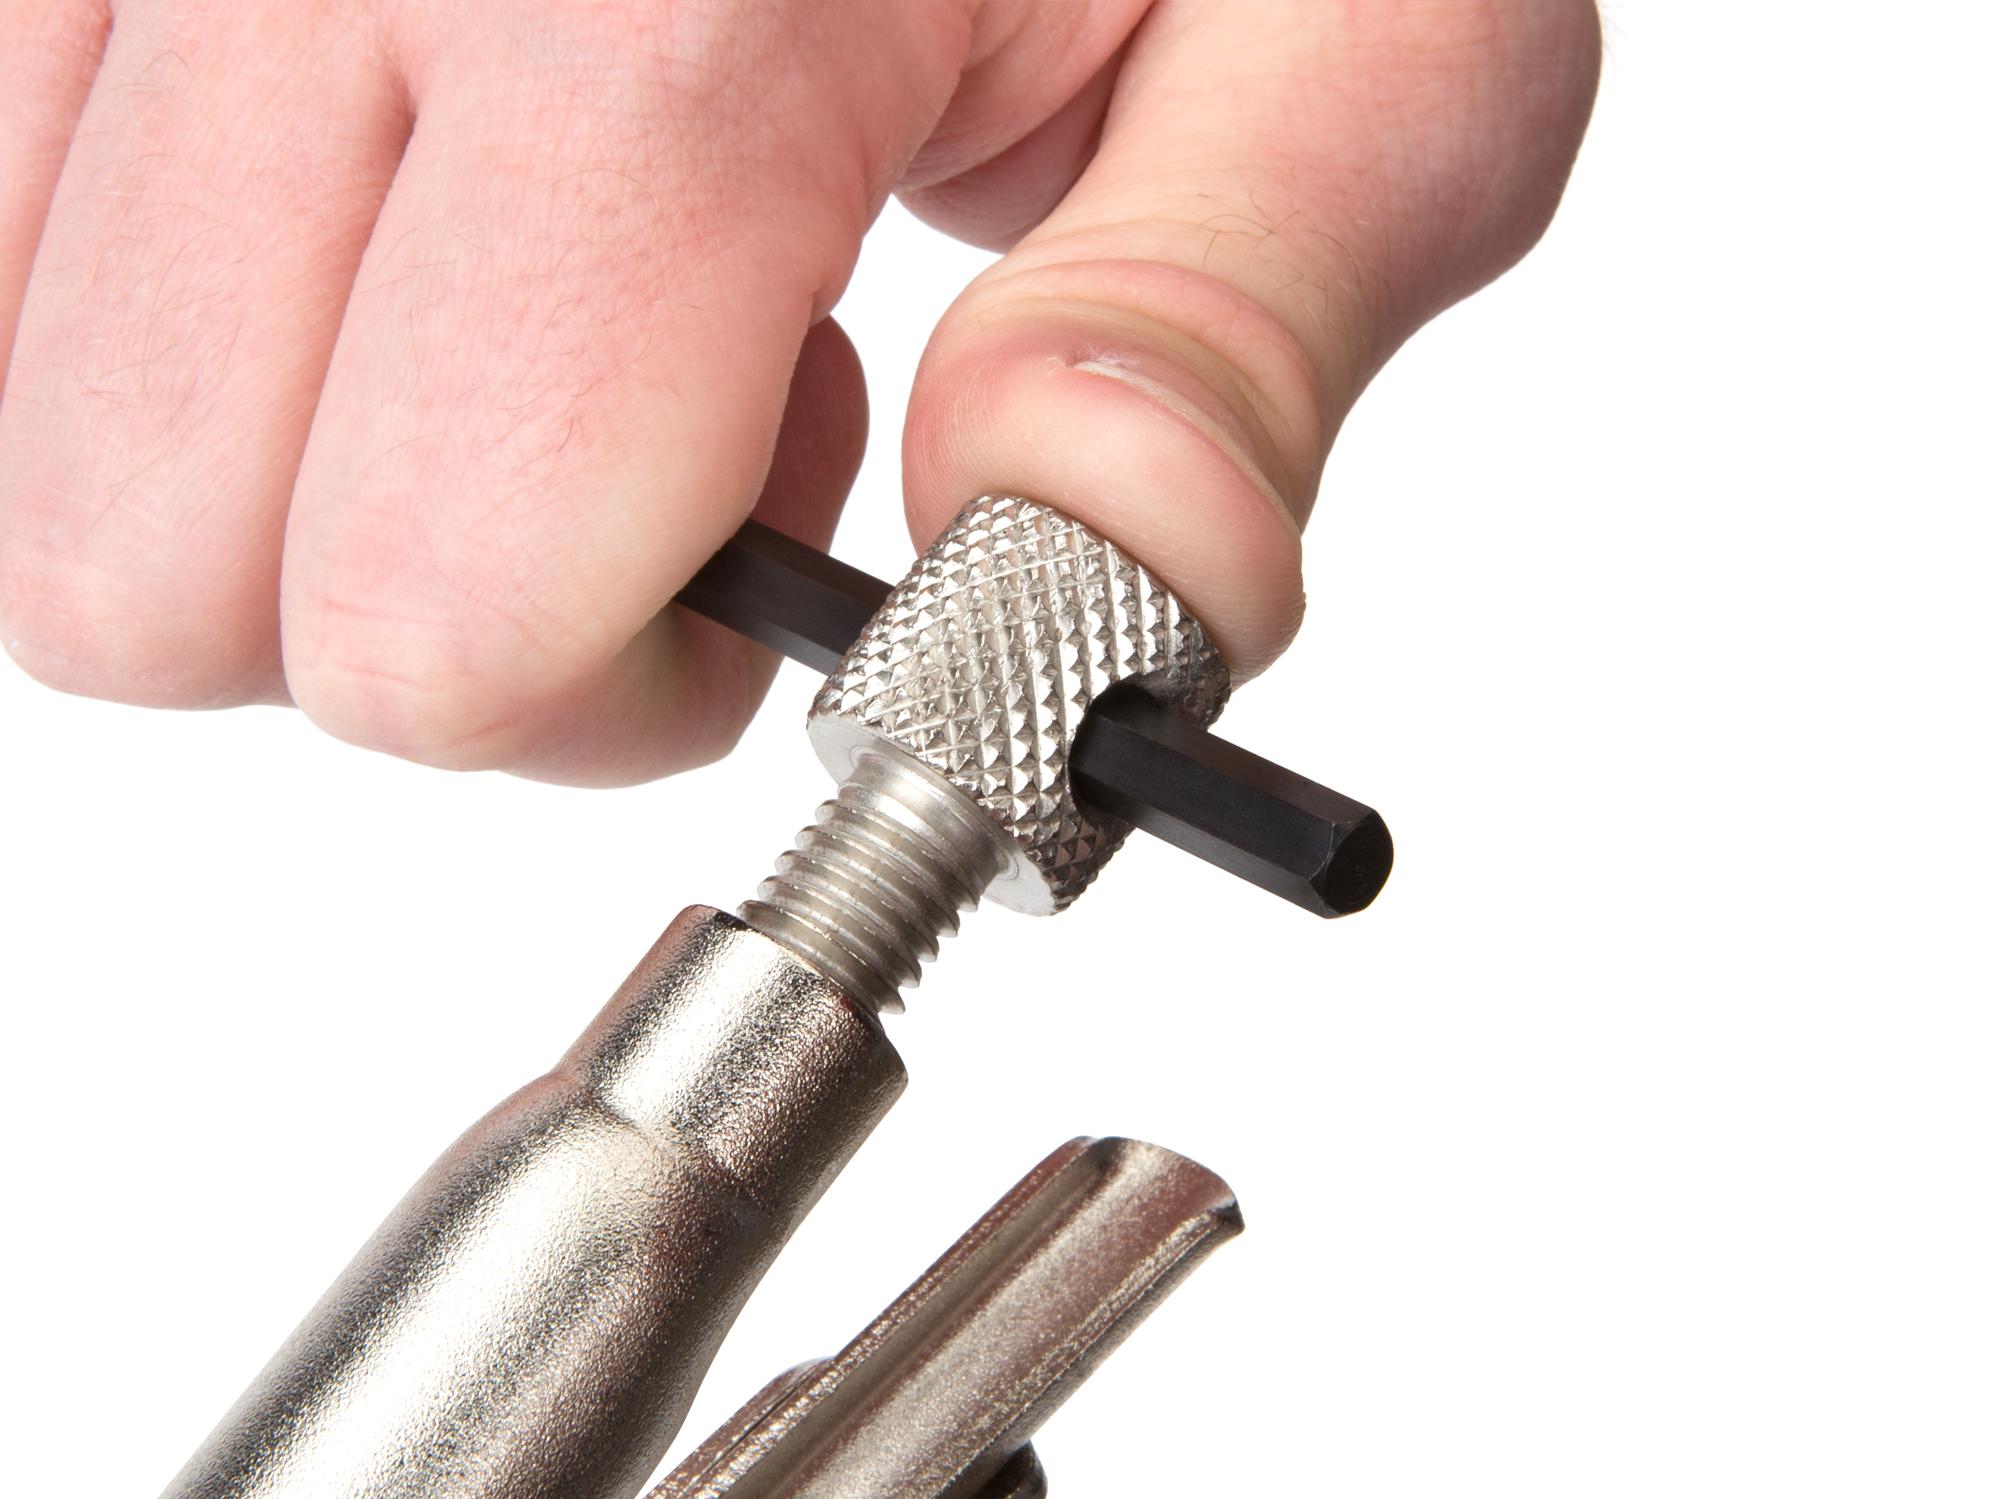
Proper setup begins with the adjustment bolt located near the pivot point of the handles. You must configure this setting before attempting to grip any object to ensure a secure hold.
Rotate the Adjustment Bolt
Turn the bolt at the base of the handles to change the jaw width.
* Clockwise rotation closes the jaws and increases clamping force.
* Counterclockwise rotation opens the jaws and reduces pressure.
Start with the jaws slightly wider than your target object. This positioning allows you to place the tool easily without forcing it onto the workpiece.
Set the Initial Gap Size
Test the opening by hand to ensure the jaws slide around the workpiece with minimal resistance. If the gap is too tight, you cannot close the handles enough to engage the lock.
Pro Tip: Align curved jaws with the curve of round pipes or bolts to maximize contact area and prevent slipping.
Position and Lock the Pliers Securely
Once the jaws are set to the approximate size, you are ready to secure the tool onto your object. Correct placement ensures maximum leverage and safety during operation.
Place the Jaws Correctly
Center the object between the serrated jaws so the full length of the teeth makes contact. Avoid gripping sharp edges or corners as this reduces grip stability and may damage the workpiece.
For stubborn fasteners, position the pliers so the applied force turns the nut or bolt directly.
Squeeze to Engage the Lock
Squeeze the handles together firmly until you feel a distinct click. The over-center locking mechanism snaps into place, keeping the handles closed and applying constant pressure to the object.
Visual Cue: The upper handle shifts slightly forward when fully locked. If it does not click, the jaws are likely too wide, requiring you to tighten the adjustment bolt.
Fix Common Locking Problems
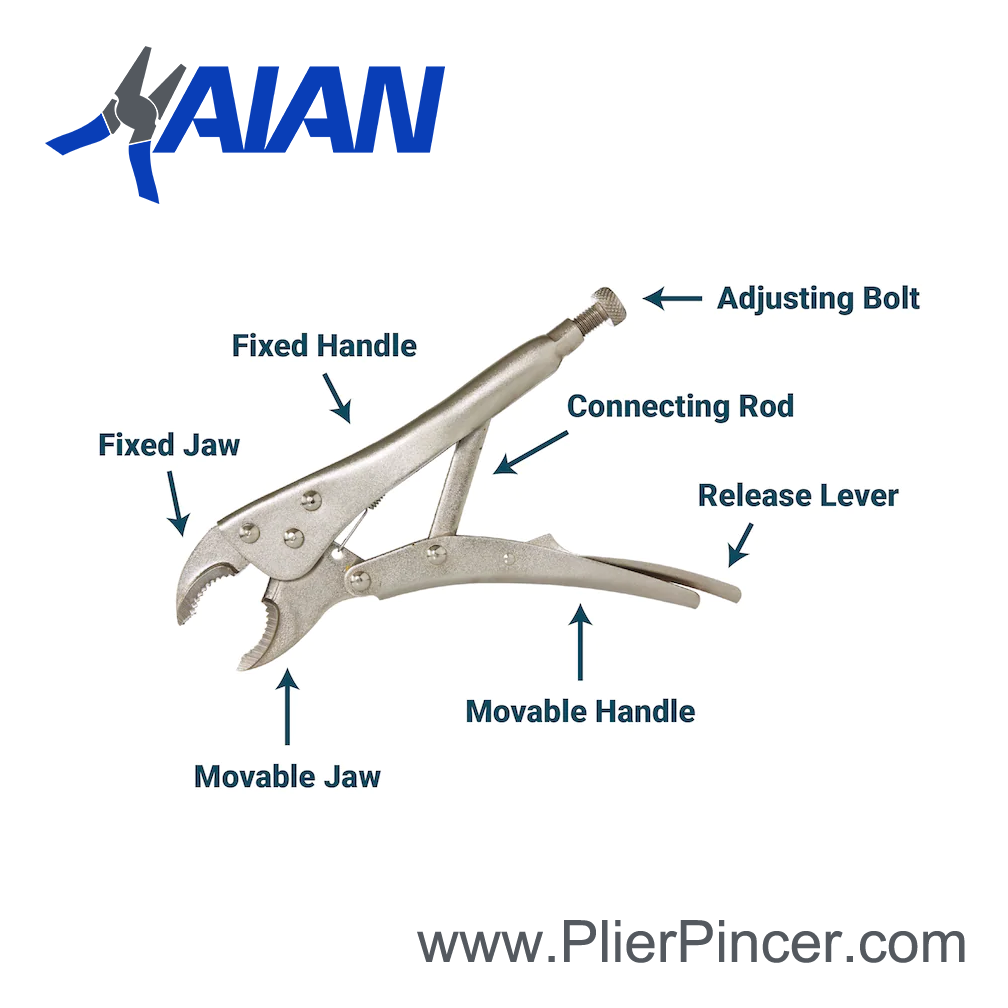
Even with careful setup, you might encounter issues where the tool fails to perform as expected. Understanding these problems helps you adjust quickly.
Pliers Won’t Lock
Cause: The jaws are set too closed or the object is too small for the current setting.
Fix: Unlock the pliers and turn the adjustment bolt counterclockwise to widen the gap. Reposition the tool and try locking again.
Grip Feels Loose or Slips
Cause: The jaws are set too open or the serrations are worn down.
Fix: Unlock the tool and turn the bolt clockwise slightly to increase tension. Inspect the teeth if slipping persists, as worn serrations reduce grip significantly.
Damaging Delicate Materials
Cause: Sharp serrated jaws dig into soft metal, plastic, or painted surfaces.
Fix: Loosen the adjustment slightly to reduce pressure. You can also wrap the jaws with electrical tape or leather to protect the surface.
Release and Remove Safely
Never pry or twist the tool while it is locked. Always disengage the locking mechanism first to prevent injury or damage.
Use the Release Lever
Locate the small lever on the back of the upper handle. Squeeze this lever inward toward the handle to break the lock.
The spring mechanism will pop the jaws open slightly. Pull the handles apart to fully open the pliers and remove them from the object.
Quick-Release Models
Some advanced pliers feature a quick-release button near the pivot point. Press this button once to disengage the lock instantly. This feature is ideal for tasks requiring rapid repositioning.
Choose the Right Size and Type

Selecting the correct locking pliers improves control and ensures safety for your specific task. Different sizes offer varying levels of leverage and reach.
Know Your Sizes
- 6.5-inch: Best for tight spaces and small fasteners.
- 7-inch: Balanced option for general use cases.
- 10-inch: Provides maximum leverage for large pipes or heavy-duty tasks.
A three-piece set covering these sizes handles most mechanical and DIY needs effectively.
Match Jaw Style to Task
- Curved Jaws: Ideal for round objects like pipes and bolts.
- Straight Jaws: Better for flat surfaces or sheet metal work.
- Needle-Nose Locking Pliers: Designed to reach into narrow gaps.
Avoid Common Mistakes
Experienced users sometimes make errors that damage the tool or the workpiece. Avoiding these pitfalls extends the life of your pliers.
Never Use as a Hammer
Striking the pliers can crack the hardened steel jaws or break the pivot point. The tool is not designed for impact forces.
Don’t Pry with Them
Using locking pliers as a pry bar can bend the handles or snap the mechanism. Use a dedicated pry bar or crowbar for leverage tasks.
Don’t Over-Tighten
Excessive force can deform the workpiece or strip the threads on the adjustment bolt. If the pliers resist locking, the setting is likely too tight.
Maintain Your Locking Pliers
Regular maintenance ensures your tool performs reliably for years. A well-cared-for tool provides better grip and smoother operation.
Clean After Use
Wipe off grease, dirt, and metal shavings after every use. Debris trapped in the serrations reduces grip efficiency and can scratch future workpieces.
Check for Wear
Inspect the teeth regularly for flattening or chipping. Worn teeth cause slipping. Also check for looseness at the pivot, which indicates the tool is worn out.
Lubricate the Mechanism
Apply a drop of light machine oil to the pivot and adjustment screw every few months. This keeps the action smooth and prevents rust from forming.
Safety Tips Every User Must Know
Locking pliers generate immense pressure, so using them safely is critical. Follow these protocols to protect yourself.
Wear Safety Glasses
High clamping pressure can send metal flakes or rust flying, especially on corroded parts. Always wear eye protection when operating these tools.
Use Gloves When Needed
Protect your hands from pinching hazards, particularly when releasing the lock under tension. Gloves also provide better grip on oily handles.
Don’t Extend the Handles
Never add a pipe to the handles to increase leverage. This can break the pliers suddenly, causing serious injury. Use a larger size if more torque is needed.
When to Use Locking Pliers
These tools excel in scenarios where standard wrenches or clamps fail. Knowing when to deploy them saves time and effort.
Hold Irregular Shapes
They are perfect for gripping broken bolts, stripped nuts, or bent rods that standard wrenches cannot grab securely.
Hands-Free Clamping
Use them to hold parts steady for drilling, welding, or gluing. This acts as a third hand, allowing you to work freely.
Emergency Wrench Substitute
When a nut is too damaged for a socket, locking pliers can often grip the remains tightly enough to loosen it.
Pipe and Hose Work
Curved jaws grip pipes securely for tightening fittings or holding hoses during cutting operations.
Troubleshoot at a Glance
| Issue | Quick Fix |
|---|---|
| Won’t lock | Loosen adjustment bolt |
| Slips during use | Tighten bolt slightly |
| Damages surface | Use tape or padding |
| Stiff action | Clean and oil pivot |
| Weak grip | Check for worn teeth |
Frequently Asked Questions About How to Use Lock Pliers
How do I stop locking pliers from damaging soft materials?
Wrap the jaws with electrical tape, leather, or rubber before clamping. You can also loosen the adjustment bolt slightly to reduce the clamping force while maintaining a secure hold.
What direction do I turn the adjustment bolt to tighten the grip?
Turn the adjustment bolt clockwise to close the jaws and increase clamping tension. Turn it counterclockwise to open the jaws and reduce the pressure on the object.
Can I use locking pliers as a hammer or pry bar?
No, you should never use them as a hammer or pry bar. Striking the tool can crack the jaws, and prying can bend the handles or snap the pivot mechanism.
Why won’t my locking pliers snap into the locked position?
The jaws are likely set too tight for the object. Unlock the tool and turn the adjustment bolt counterclockwise to widen the gap, then try squeezing the handles again.
How do I clean the serrated jaws effectively?
Wipe off grease and metal shavings with a rag after each use. Use a small brush to remove debris trapped between the teeth to ensure a strong grip.
Key Takeaways for Using Lock Pliers Safely
Mastering how to use lock pliers requires understanding the adjustment bolt and the locking mechanism. Always set the jaw width slightly larger than your object before squeezing to engage the lock securely.
Remember to wear safety glasses and never use the tool as a hammer or pry bar. Regular cleaning and lubrication will keep your pliers functioning smoothly for years.
Start by practicing on scrap metal to feel the locking action before tackling important repairs. With proper technique, this versatile tool becomes an indispensable part of your workshop arsenal.



