
You slide the key into the ignition, but it won’t turn, leaving you stranded with no click or engine start. This frustrating scenario often points to a stuck ignition cylinder rather than a broken key or faulty steering column.
You can fix ignition lock issues using basic tools and specific cleaning techniques before calling for a tow. This guide details how to diagnose the problem, apply the correct lubricants, and rebuild worn pin stacks to restore smooth operation.
Diagnose Why Your Key Won’t Turn
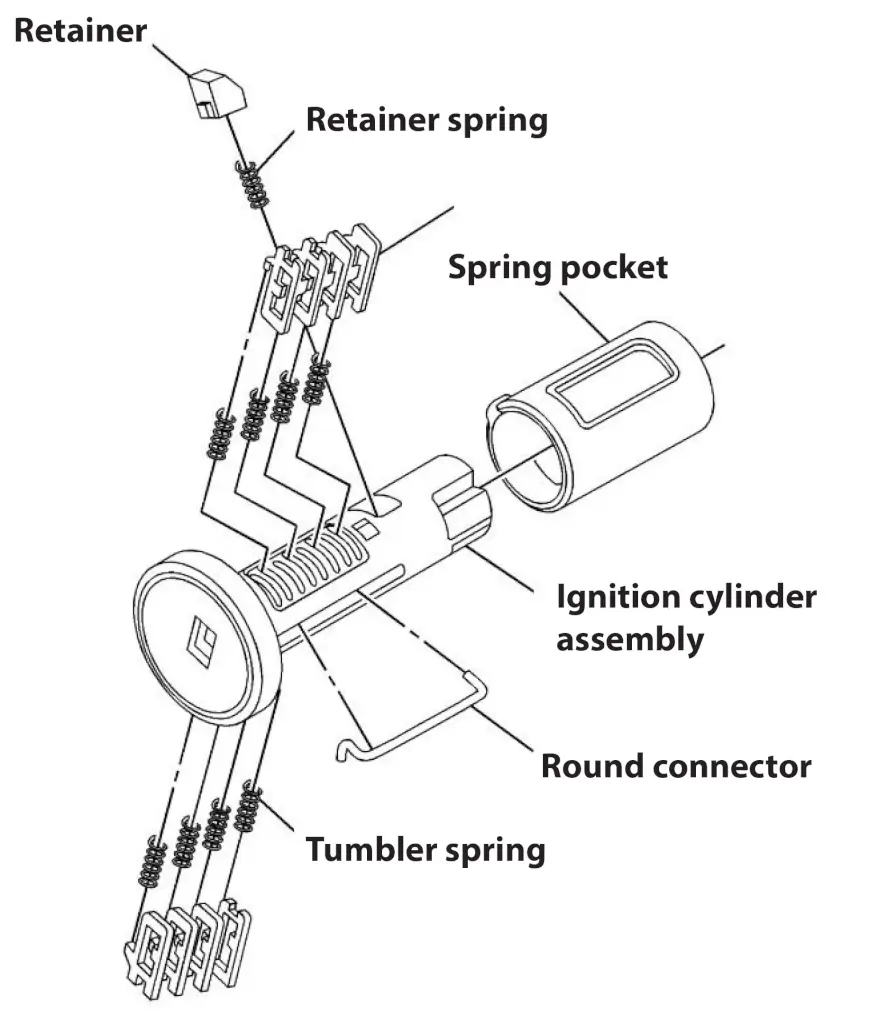
Confirming the root cause saves time and prevents unnecessary part replacements. The behavior of your key provides the first major clue regarding the internal state of your ignition system.
Key Inserts But Won’t Rotate
This specific symptom indicates an internal cylinder problem where tumbler pins are stuck. Common causes include dried lubricant, dirt buildup, or corrosion on the metal surfaces. Do not force the key as excessive pressure can snap the blade or damage internal components permanently.
Key Meets Insertion Resistance
If the blade cannot slide in smoothly, the issue likely lies with the key itself or external debris. A bent key or damaged housing requires different solutions than internal cylinder cleaning. Focus your repair efforts here only if insertion is smooth but rotation fails.
Test Before Applying Fluids
Try turning the key with gentle wiggling motions to see if slight movement aligns sticky pins. If the cylinder remains unresponsive after two or three attempts, proceed to the cleaning phase. This simple test confirms whether the issue is minor friction or a seized mechanism.
Clean and Lubricate the Ignition Cylinder
Most stuck ignition locks respond well to proper cleaning and lubrication without requiring disassembly. Using the correct fluids is critical to avoiding future damage.
Apply Synthetic Lubricant Correctly
Start with a high-quality, 100% synthetic lubricant such as silicone or Teflon-based spray. Never use WD-40 or petroleum oils because they attract dirt and create gummy residue over time. Spray the lubricant onto the key blade, insert it fully, and work it in and out several times to distribute the fluid.
Deep Clean with Contact Cleaner
Switch to a dry, non-flammable contact cleaner if the lock still feels stiff after initial lubrication. This solvent dissolves old grease and oxidation without leaving behind any residue. Insert the key, spray directly into the slot, and work the key back and forth vigorously two or three times.
Agitate and Test for Smoothness
Spend three to five minutes working the key in and out while applying light turning pressure. You should feel the resistance decrease gradually as the internal components loosen up. Wipe the key clean before each insertion to avoid introducing new dirt into the freshly cleaned cylinder.
Rebuild the Ignition Cylinder When Cleaning Fails
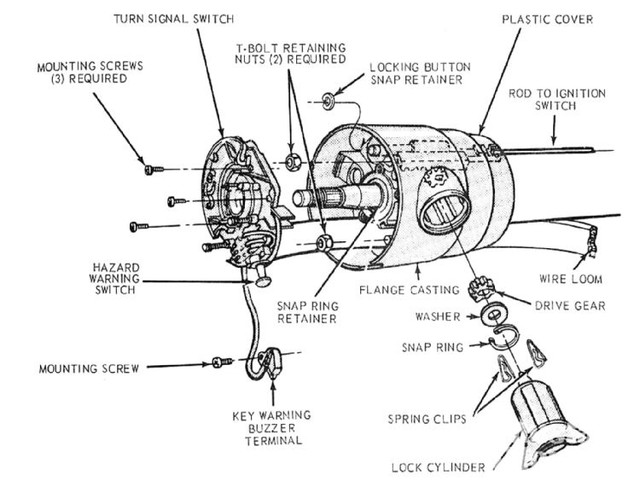
A full rebuild becomes necessary when cleaning protocols fail to restore function or when internal pins are worn. This process requires patience and attention to detail but saves the cost of a new unit.
Remove the Ignition Cylinder Safely
Push down the steering column shroud and insert the key to turn it to the Run position. Press the release tab on the bottom using a flathead screwdriver and gently pull the cylinder out. Keep the key inserted during removal to maintain proper pin alignment within the housing.
Disassemble and Inspect Internal Parts
Slide the key forward slightly to release internal retention and carefully remove the end cover. Note the location of the white plastic retainer so you do not lose it during the process. Inspect the interior for corroded pins, broken springs, gummy residue, or worn cylinder walls.
Identify Damaged Components
Look specifically for pins that appear corroded or springs that look compressed and weak. If the cylinder walls show deep scoring or the housing is cracked, replacement is better than repair. Visible damage to these core components confirms the need for a full rebuild kit.
Replace Pins and Springs Precisely
The heart of the lock is the pin stack, consisting of tiny metal cylinders that align only when the correct key is inserted. Accuracy during this step determines whether your key will turn.
Match Pin Numbers Exactly
Pins are numbered 1 through 5, with each number corresponding to a specific height in the key cut. Replace each old pin with the exact same number from your rebuild kit to ensure proper alignment. Never reuse old springs because they lose tension and cause unreliable locking performance.
Install Pins in Specific Sequence
Replace all pins on one side of the cylinder first to maintain organization and prevent confusion. Flip the cylinder to complete the other side, inserting the key after each pin to check for flush alignment. Every pin must sit perfectly flush with the cylinder body when the key is fully inserted.
Reassemble Securely with Retainer
Reinstall the end cover and ensure the white plastic retainer seats properly before snapping it closed. A loose cover indicates the retainer is not seated correctly, which can lead to immediate failure. Double-check this connection before attempting to reinstall the cylinder into the vehicle.
Reinstall and Test the Cylinder
Never skip the testing phase, as a misaligned or bound cylinder can fail while you are driving. Proper verification ensures safety and reliability.
Pre-Installation Check
Insert the key and rotate it smoothly through Accessory, Run, and Start positions before installation. Verify there is no binding, skipping, or rough spots during this rotation. If the key does not turn smoothly, disassemble and recheck your pin alignment immediately.
Reinstall in the Steering Column
Turn the key to the Run position and align the cylinder notch with the column slot. Squeeze the retaining tabs and slide the cylinder in, then release the tabs to lock it securely in place. Ensure you hear a distinct click, as a loose fit means the retainer or housing is damaged.
Final Functional Test
Turn the key through all positions five to ten times to confirm consistent operation. Start the engine repeatedly and remove the key to test the release mechanism thoroughly. Confirm the steering lock engages and disengages properly before considering the job complete.
Prevent Future Ignition Lock Issues
A rebuilt or cleaned cylinder can last for years if you follow a strict maintenance schedule. Preventative care is far easier than emergency repairs on the side of the road.
Lubricate Every 6 to 12 Months
Apply synthetic lubricant to your ignition cylinder every six to twelve months to prevent friction buildup. Always wipe your key blade clean before inserting it to avoid introducing grime. This simple routine keeps internal parts free of debris and ensures smooth operation.
Avoid Common Maintenance Mistakes
Never force the key if it feels stiff, as this can break the key inside the cylinder. Avoid using petroleum-based oils that attract dirt and degrade internal components over time. Always replace springs during rebuilds because worn springs cause inconsistent locking behavior.
Know When to Replace Completely
Some situations require full replacement rather than repair, such as a cracked cylinder housing. If internal metal components are broken or a key has sheared off inside, a new unit is necessary. Repeated failure after a proper rebuild also indicates it is time for replacement.
Troubleshoot Common Failures
Use this guide to address issues that may arise during or after your repair attempt. Quick identification of these problems saves significant frustration.
Key Still Won’t Turn After Cleaning
This issue suggests severe internal corrosion, a broken pin, or a misaligned cylinder during reinstallation. Disassemble the unit again to inspect for damaged parts that cleaning cannot fix. If components are physically broken, you must replace the entire cylinder.
Cylinder Feels Loose After Installation
A missing or broken white plastic retainer is the most likely cause of a loose cylinder. Replace the retainer immediately, or inspect the housing for wear if the problem persists. A compromised housing may require replacing the entire lock assembly for safety.
Key Turns But Engine Won’t Start
This symptom indicates an electrical issue rather than a mechanical lock problem. The fault likely lies with the ignition switch, starter relay, battery, or wiring behind the cylinder. Remember that the lock cylinder only controls mechanical rotation, not electrical power delivery.
Essential Tools and Materials
Gather these items before starting your repair to ensure a smooth workflow. Having the right equipment prevents delays and potential damage.
- Synthetic lubricant (silicone or Teflon-based)
- Non-flammable contact cleaner
- Pick tool for pin removal
- Flathead screwdriver for release tabs
- Replacement pin kit numbered 1 through 5
- New springs included in rebuild kits
- Clean rag for wiping keys and parts
Keep a spare key available in case your working key breaks during the process.
Final Verification Checklist
Ensure your repair is successful by running through this final checklist. Do not drive the vehicle until every item is confirmed.
- Key turns smoothly through all positions
- Engine starts consistently without hesitation
- Cylinder is securely seated with no wobble
- Key removes and reinserts without issue
- Steering lock releases when starting
- No unusual noises or resistance felt
If all boxes are checked, your effort to fix ignition lock problems is complete and successful.
Frequently Asked Questions About Fixing Ignition Locks
Can I use WD-40 to fix a stuck ignition?
No, you should never use WD-40 or petroleum-based oils in an ignition cylinder. These substances attract dust and dirt, creating a gummy residue that worsens the problem over time. Stick to 100% synthetic lubricants like silicone or Teflon sprays.
How long does the cleaning process take?
The cleaning and lubrication process typically takes about 3 to 5 minutes of active work. You must spend this time working the key in and out to distribute the cleaner and loosen internal components effectively.
What if my key turns but the car won’t start?
If the key turns smoothly but the engine does not crank, the issue is likely electrical, not mechanical. Check your battery, starter relay, or the electrical ignition switch behind the cylinder rather than the lock itself.
Do I need to replace all springs during a rebuild?
Yes, you must replace every spring when rebuilding an ignition cylinder. Old springs lose tension, which leads to unreliable locking and potential failure of the entire mechanism.
How often should I lubricate my ignition lock?
Experts recommend lubricating your ignition cylinder every 6 to 12 months as preventive maintenance. Regular lubrication prevents dirt buildup and keeps the internal pins moving smoothly.
Key Takeaways for Fixing Your Ignition Lock

Fixing an ignition lock often requires only cleaning and lubrication rather than expensive replacement. Most failures stem from dried lubricant or dirt, which synthetic sprays and contact cleaners can resolve quickly.
Always match pin numbers exactly and replace all springs when rebuilding a cylinder. Proper maintenance and the use of correct materials ensure your vehicle starts reliably for years to come.



