A folding knife that fails to lock is a serious safety hazard rather than a mere annoyance. Whether you rely on your blade for daily tasks or outdoor adventures, a loose lock puts your fingers at immediate risk during use. The good news is that most locking failures stem from specific, fixable issues like vertical play or lock slip. You can restore secure performance with basic tools and the right diagnostic approach.
This guide teaches you how to fix a knife that won’t lock by addressing three common failure types with proven repair methods. You will learn to diagnose vertical blade play, correct lock slip geometry, and reposition detent balls for stronger retention. These techniques require only simple tools like a screwdriver and fine sandpaper to bring your knife back to factory-tight condition.
Diagnose the Specific Lock Failure Type
Identifying the exact nature of the failure is the critical first step before attempting any repairs. Different symptoms require distinct solutions, and misdiagnosis often leads to unnecessary modifications or unsafe results. You must determine if the issue is vertical movement, outward slip, or weak retention.
Identify Vertical Blade Play Symptoms
Vertical blade play occurs when the blade moves up and down while in the locked position. This gap usually forms because the liner or frame no longer fully engages the blade tang due to wear or factory tolerance issues.
To test for this:
* Open the blade fully into the locked position.
* Apply light pressure to both the edge and the spine without forcing it.
* Watch closely for any visible movement between the lock bar and the tang.
If you notice wiggle, the liner likely needs repositioning to close the gap. This is a common issue in everyday carry knives subjected to frequent use.
Detect Dangerous Lock Slip
Lock slip is a critical failure where the lock bar moves outward instead of compressing inward when pressure is applied to the spine. This geometric flaw can cause the blade to close unexpectedly on your hand during heavy use.
Test safely using this method:
* Place the knife spine-down on a soft wooden block.
* Press down gently on the handle to simulate cutting pressure.
* Observe if the lock bar shifts outward away from the blade.
If the bar moves out, the knife suffers from a geometry issue or surface misalignment. This is not normal wear but a design or manufacturing flaw that requires correction.
Check for Weak Detent Engagement
A weak detent allows the blade to deploy accidentally from pocket movement or light impact. This issue compromises safety by making the knife unpredictable when closed.
To diagnose a weak detent:
* Hold the knife firmly in the closed position.
* Tap the pommel lightly against your palm or shake the knife.
* If the blade deploys on its own, the detent tension is too low.
Common causes include misaligned detent balls, carbon buildup on the lock face, or wear from heavy usage. Fixing this often involves repositioning the detent ball for better engagement.
Adjust Liner Position to Eliminate Blade Play

Repositioning the liner is the fastest fix for vertical play in liner lock knives. By moving the liner forward, you eliminate the gap between the lock and tang to restore solid contact.
Disassemble the Knife Safely
You must remove the handle scales to access the internal liner mechanism. Work carefully to avoid losing small components or damaging the finish.
Follow these steps:
* Select the correct screwdriver size (T6, T8, or T9) to match your knife’s screws.
* Work over a soft cloth to catch screws and prevent scratches.
* Unscrew both sides carefully, noting that some knives use one long pivot screw while others use multiple short ones.
Once the scale is removed, the liner pressing against the blade tang will be fully visible.
Reposition the Liner Forward
With the scale removed, you can now adjust the liner position. The goal is to close the gap without making the blade difficult to open.
- Gently push the liner toward the blade’s heel using your fingertip.
- Use a screwdriver wrapped in a cloth if you need more leverage.
- Adjust by feel and sight since there is no specific measurement required.
Ensure you close the gap between the liner and tang without over-tightening the mechanism.
Test and Reassemble the Components
Reattach the scale and open the knife to verify the repair. The blade should lock solidly with no up-and-down movement.
- If play remains, repeat the adjustment by moving the liner slightly more.
- If the blade is hard to open, you have gone too far and must bend the liner back slightly.
- Reinstall all screws and tighten the pivot screw just enough to stop side-to-side wobble.
This method restores factory-level tightness and typically takes under ten minutes to complete.
Sand Lock Face to Stop Slip Issues
When spine pressure causes lock slip, precision sanding can correct minor geometry flaws. This technique refines the contact surface without altering the overall tang angle.
Prepare Fine Grit Sanding Tools
You need specific materials to perform this delicate repair without damaging the knife. Do not use coarse grits as this process is about refinement, not material removal.
Gather the following:
* A narrow strip of 1000–1200 grit sandpaper (1/8″ wide by 1″ long).
* A clean and well-lit workspace.
* An optional thin metal shim to guide the paper.
This specific grit range ensures you polish the surface rather than grinding it down aggressively.
Sand the Lock Face Gently
The sanding process relies on the natural tension of the lock bar to guide the abrasive.
- Slide the sandpaper under the lock bar until it contacts the tang.
- Let the lock’s spring tension pull the paper across the surface without forcing it.
- Move the blade slightly if it sticks, but keep pressure extremely light.
- Perform 4–5 passes, then retest the lock immediately.
This subtly rounds the corner of the lock face to improve the contact angle and prevent outward movement under load.
Know When This Method Works
This repair is effective only under specific conditions related to the knife’s geometry.
- Effective if: The tang angle is close to ideal (7–8 degrees) and only minor misalignment exists.
- Won’t fix: Severely over-angled tangs or knives with structural damage.
This method is reversible and non-destructive, making it ideal for warranty-covered knives from brands like ZT or Benchmade.
Reposition Detent Ball for Stronger Lock
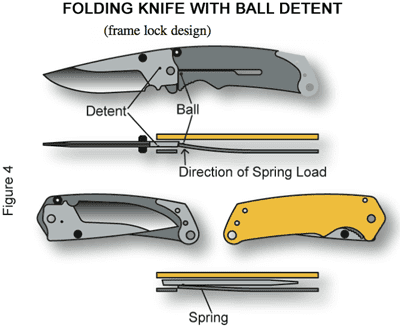
A properly positioned detent ball ensures the blade stays closed until intended and locks firmly when deployed. This adjustment fixes weak retention issues caused by misalignment.
Inspect the Detent System
Before adjusting, disassemble the knife to locate the detent ball, which is usually made of steel or silicon carbide. Look for carbon buildup, wear on the ball, or poor positioning relative to the lock bar peak.
The ball should press into the highest point of the lock bar arc when the blade is closed. If it sits too low or off-center, retention force decreases significantly.
Adjust the Ball Position
Use a jeweler’s screwdriver or needle-nose pliers for this delicate task.
- Gently nudge the detent ball toward the peak of the lock bar’s travel path.
- Do not remove the ball; just reposition it slightly for better contact.
- Aim to increase retention force so the blade does not deploy accidentally.
The goal is to align the ball so it engages the lock bar at its highest point during closure.
Reassemble with Care
Proper reassembly prevents new issues from arising after the repair.
- Apply lubricant to the detent ball while the blade is open to keep oil off the lock face.
- Lightly lube pivot bearings if your knife has them.
- Install stop pins for both open and closed positions if applicable.
- Reattach scales and tighten screws evenly using the correct size driver.
Test the knife to ensure the blade opens smoothly and locks with a crisp click.
Prevent Future Lock Issues
Maintenance habits play a huge role in long-term reliability. Small preventive steps can stop minor issues from becoming major failures.
Lubricate Without Compromising Grip
Use a lightweight lubricant like Tri-Flow or mineral oil on pivot points and the detent ball. Avoid getting oil on the lock face because grease reduces friction and can cause slippage. Re-lube every three to six months or after heavy use.
Tighten Screws Regularly
Handle screws loosen over time due to vibration and use. Check them monthly with the correct driver and re-tighten just enough to secure the handle. If screws won’t stay tight, apply a drop of blue Loctite (242) to the threads.
Monitor Lock Performance
After any repair, test the lock weekly for the first month. Use the wooden block method to simulate spine pressure and look for new play or slipping. Early detection prevents dangerous failures in the field.
When to Claim Warranty
Not every issue requires a DIY fix. If your knife fails under normal use, it may be a craftsmanship defect covered by the manufacturer.
Signs of a Warranty-Eligible Failure
Lock slip occurring with light spine pressure or blade play in a brand-new knife indicates a defect. Many premium brands use replaceable lock inserts, allowing them to fix the issue without voiding your warranty.
How to File a Claim
Contact the manufacturer or retailer to describe the failure and your testing results. Provide photos or video if requested and ship the knife if required. Do not assume it is user error, as a properly made knife should lock securely under normal conditions.
Test Repairs Safely and Effectively

Never test a repaired lock with aggressive spine whacks, as this is unnecessary and risky. Safe testing ensures your repair holds without damaging the knife.
Use the Wooden Block Method
Place the knife spine-down on a soft wood block and press down with moderate hand pressure. Watch for any movement in the lock bar. If it holds firm, it is safe for normal use.
Avoid Common Testing Mistakes
Do not use metal surfaces for testing as they can damage the blade edge. Avoid applying full body weight to the spine. Test incrementally after each adjustment to ensure predictable performance.
Frequently Asked Questions About Fixing Knife Locks
Can I fix a liner lock that has vertical play?
Yes, you can fix vertical play by disassembling the handle and gently pushing the liner forward toward the blade tang. This eliminates the gap causing the movement and restores a solid lock-up.
What grit sandpaper should I use to fix lock slip?
Use 1000–1200 grit sandpaper cut into a narrow strip. This fine grit polishes the lock face to correct minor geometry issues without removing significant material or damaging the knife.
Why does my folding knife blade open in my pocket?
This is caused by a weak detent, often due to a misaligned detent ball or carbon buildup. Repositioning the ball toward the peak of the lock bar usually resolves the issue.
Is lock slip dangerous to my fingers?
Yes, lock slip is dangerous because it allows the blade to close unexpectedly under pressure. This can lead to serious injury if the blade snaps shut on your hand during use.
Do I need special tools to fix a knife that won’t lock?
No, you typically only need a matching screwdriver, a strip of fine sandpaper, and perhaps a jeweler’s screwdriver. These basic tools are sufficient for most liner and frame lock repairs.
Key Takeaways for Fixing Your Knife That Won’t Lock
Fixing a knife that won’t lock involves diagnosing the specific failure type and applying the correct repair method. Vertical play requires repositioning the liner, lock slip needs precision sanding, and weak retention demands detent ball adjustment. Each fix restores safety and reliability with minimal tools.
Always test your repairs using the wooden block method before returning the knife to service. Small, incremental adjustments are key to finding the perfect balance between security and smooth operation. With these techniques, you can extend the life of your tool and ensure every deployment is safe.