You stand at your door with the right key, but it hits a wall and refuses to enter. This frustrating stall often signals internal misalignment or wear rather than a broken key. When your key will not go into lock, panic is unnecessary since most causes have simple mechanical fixes.
This guide reveals the three primary reasons keys fail to insert and provides step-by-step repair instructions. You will learn to realign cylinders, secure loose tail pieces, and correct rekeying errors to restore smooth access immediately.
Misaligned Key-in-Knob Cylinder Prevents Entry

A misaligned cylinder is the leading reason a key will not go into lock on residential doorknobs and levers. Repeated daily use gradually loosens the screw cap located at the rear of the cylinder assembly. This movement pushes the internal plug forward, causing it to protrude and block the keyway entrance. The bottom pins fail to align with the key cuts, creating a hard stop before the key can engage the mechanism.
How to Detect Plug Protrusion
You can often see or feel this issue before attempting to force the key.
- Remove the knob or lever from the door to expose the cylinder.
- Inspect the rear of the cylinder to see if the plug extends beyond the housing.
- Attempt to gently push the plug back with your finger to see if it moves.
- Try inserting the key again once the plug feels flush.
Pro Tip: A properly seated plug sits flush with the housing. If it shifts easily, the retaining cap needs tightening.
Steps to Realign and Secure the Cylinder
Correcting this alignment requires removing the cylinder to access the rear retention mechanism.
- Hold the plug firmly in place with one hand while removing the cylinder from the door.
- Flip the cylinder over to access the small detent pin at the rear.
- Press the detent pin inward to release the plug tension.
- Tighten the screw cap just enough to hold the plug securely without over-tightening.
- Reinstall the cylinder and test the key insertion.
Warning: Over-tightening the cap can crack the housing or damage internal springs. Use finger-tight pressure plus a quarter-turn with a screwdriver.
Loose Tail Piece Blocks Mortise Lock Access
Commercial aluminum storefronts often use mortise cylinders that rely on a tail piece to connect the cylinder to the latch. Two tiny screws secure this metal piece, but vibration and heavy traffic frequently loosen them over time. When these screws loosen, the entire cylinder shifts position, distorting the keyway geometry. This misalignment creates a physical barrier that stops the key will not go into lock scenarios in high-traffic business entrances.
Diagnosing Tail Piece Movement
Visual inspection and a gentle wiggle test can confirm if the tail piece is the culprit.
- Look for visible gaps between the cylinder face and the door surface.
- Gently wiggle the cylinder to check for side-to-side movement.
- Observe if the cylinder face appears crooked or tilted relative to the door.
- Listen for rattling sounds when shaking the door slightly.
Visual Cue: A tilted cylinder face almost always indicates internal misalignment caused by a loose tail piece.
Securing the Tail Piece Properly
Fixing this issue involves accessing the rear of the mortise cylinder to tighten the connection screws.
- Remove the mortise cylinder by unscrewing the mounting bolts from the door edge.
- Locate the two small screws securing the tail piece at the back of the cylinder.
- Tighten both screws firmly but carefully to avoid stripping the threads.
- Apply blue Loctite (medium strength) to the screw threads to prevent future loosening.
- Reinstall the cylinder and verify that the key inserts smoothly.
Expert Note: Blue Loctite allows for future disassembly while resisting vibration better than thread friction alone. Avoid over-tightening, as stripped screws may require full cylinder replacement.
Rekeying Errors and MACS Violations Stop Insertion
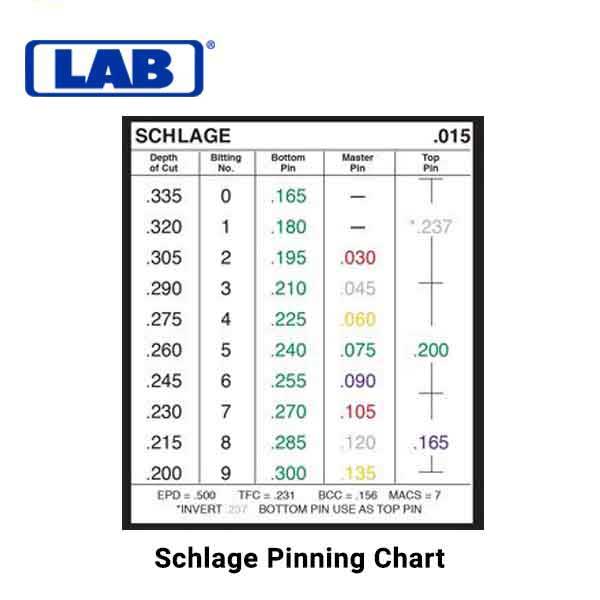
If your key will not go into lock immediately after a rekeying job, the issue is likely a MACS violation. MACS stands for Max Adjacent Cut Specification, a manufacturer rule limiting the depth difference between adjacent key cuts. Exceeding this limit causes the pin stacks to bind mechanically inside the lock cylinder. For instance, Schlage allows a maximum 7-unit difference, so a cut of 1 next to a cut of 9 creates an impossible 8-unit jump.
Identifying Problematic Key Cuts
You can spot potential MACS violations by examining the key profile closely.
- Examine the key for deep cuts positioned directly next to shallow cuts.
- Use a manufacturer MACS chart to verify allowable spacing between cuts.
- Measure cut depths with a key gauge if precise tools are available.
- Check if the key feels weak or thin in areas with extreme depth differences.
Fact: Extreme cuts remove significant material, making the key structurally weak and prone to bending, which worsens insertion issues.
Correcting MACS-Related Blockages
Resolving this issue requires disassembling the cylinder to adjust the pin configuration.
- Remove the cylinder from the door carefully to avoid losing small components.
- Disassemble the plug using a follower tool to keep pins organized.
- Re-evaluate all pin lengths and positions against the key cuts.
- Replace any top pins or master pins that cause over-travel restrictions.
- Rekey the lock using depths that comply with MACS standards.
Prevention Tip: Always double-check cut sequences against MACS charts before cutting a new key. Use a pinning follower tool to ensure no pin is too tall or improperly seated.
Worn or Damaged Keys Mimic Lock Failure
Sometimes the lock is perfect, but a damaged key prevents insertion. Keys wear down over years of use, developing bent tips, chipped edges, or uneven surfaces. These imperfections make the key incompatible with the tight tolerances of the lock mechanism. If your key will not go into lock, always rule out key damage before assuming the lock itself is broken.
Signs of a Compromised Key
Look for these physical indicators that your key needs replacement.
- The key bends easily when you apply slight pressure during insertion.
- Visible burrs, jagged edges, or shiny spots appear on the key blade.
- The key does not slide in as smoothly as a spare or original copy.
- The key feels “off” or catches slightly when approaching the cylinder.
Testing and Replacing Bad Keys
Confirming key damage is a simple process involving comparison with a known good copy.
- Try inserting a known good duplicate or the original key into the lock.
- If the spare inserts smoothly, the first key is definitely the issue.
- Replace worn keys with a fresh cut from a trusted locksmith or high-quality machine.
- Avoid using the damaged key to prevent further harm to the lock pins.
Pro Tip: Use OEM-spec blanks for replacements. Cheap aftermarket keys often have inconsistent tolerances that cause insertion problems.
Foreign Debris and Corrosion Block Keyways

Dirt, rust, or excess lubricant can clog the keyway and physically block entry. This issue is common in outdoor locks or units exposed to moisture and dust. When debris accumulates, it reduces the available space for the key blade, causing the key will not go into lock symptoms even with a perfect key and cylinder.
Cleaning the Keyway Safely
Remove obstructions without damaging the internal components using these steps.
- Spray a dedicated lock cleaner (non-oily) directly into the keyway.
- Use compressed air to blow out loose residue and dried lubricant.
- Insert and remove a clean, correct key several times to help clear buildup.
- Never force a key into a dirty lock, as this can break the key off inside.
Tool Recommendation: Use a keyway brush or dental pick for stubborn grime that spraying alone cannot remove.
Bent or Broken Key Fragments Inside
Sometimes the reason your key will not go into lock is that part of another key is already stuck inside. You might not see the obstruction without close inspection, leading you to believe the lock is broken. This hidden fragment creates a physical barrier that stops any new key from entering.
Checking for Internal Obstructions
Inspect the keyway thoroughly before attempting any repairs.
- Shine a bright flashlight directly into the keyway to illuminate the interior.
- Look for broken metal fragments near the front of the cylinder.
- If visible, use hooked tweezers or a broken key extractor to remove it.
- Avoid pushing the fragment further into the lock mechanism.
Warning: Do not push further. Jamming another key can wedge the fragment deeper, making extraction much harder.
Prevent Future Insertion Issues
Avoid recurring problems by implementing a regular maintenance schedule for your locks.
Monthly Quick Checks
- Inspect cylinder alignment on all knobs and levers.
- Test key insertion to ensure it remains smooth with no resistance.
- Clean keyways every 3 to 6 months, especially for outdoor locks.
After Rekeying Verification
- Always check MACS compliance before installing new pins.
- Test the key in and out ten times to ensure smooth operation.
- Keep an OEM-spec spare key sealed as a backup reference.
Using the Right Lubricant
- Apply dry graphite lubricant to keyways annually.
- Prevent corrosion and reduce friction without attracting dust.
Avoid Oil-Based Lubricants: They collect dirt and form gummy buildup over time, leading to more blockages.
When to Call a Locksmith
Not all issues are suitable for DIY repair, and some situations require professional tools. Seek professional help if the cylinder won’t come out after loosening screws or if you suspect internal damage. You should also call a pro if multiple keys fail to insert or if the lock is on a high-security commercial system. A licensed locksmith can diagnose deeper issues like warped housings or compromised cylinder cores.
Frequently Asked Questions About Key Insertion Problems
Why won’t my key go into the lock at all?
The most common causes are a misaligned cylinder plug, a loose tail piece in mortise locks, or a MACS violation after rekeying. Dirt, debris, or a broken key fragment inside the lock can also block entry completely.
Can a bent key stop me from opening my door?
Yes, a bent or worn key can mimic lock failure. The imperfections prevent the key blade from sliding into the tight keyway. Always try a spare key to rule out key damage before assuming the lock is broken.
What is a MACS violation in locksmithing?
A MACS violation occurs when adjacent key cuts differ too much in depth, exceeding manufacturer limits. This causes pin stacks to bind mechanically, preventing the key from inserting or turning smoothly in the lock.
How do I fix a loose mortise cylinder?
Remove the cylinder from the door and tighten the two small screws securing the tail piece at the back. Apply blue Loctite to the threads to prevent vibration from loosening them again in the future.
Is WD-40 safe for cleaning stuck locks?
No, WD-40 is oil-based and attracts dirt, eventually forming a gummy residue that worsens lock issues. Use a dedicated non-oily lock cleaner or dry graphite lubricant for safe maintenance.
Key Takeaways for Fixing Key Insertion Issues
When your key will not go into lock, the solution usually lies in addressing mechanical misalignment or wear. Start by checking for a protruding plug in key-in-knob cylinders or a loose tail piece in mortise locks. If the lock was recently serviced, verify that the key cuts comply with MACS standards to prevent binding.
Regular maintenance, such as tightening screw caps and using dry lubricants, prevents most insertion failures. If simple adjustments do not resolve the issue, inspect for debris or damaged keys before calling a professional. With these steps, you can restore smooth operation and secure access to your property quickly.