
A broken door lock actuator turns a simple task into a daily frustration, especially when only one door refuses to respond. You might hear a faint click or see the lock pin shudder, yet the mechanism fails to engage properly.
This guide teaches you how to replace lock actuator components yourself for under $50 instead of paying a dealership over $500. You will learn to diagnose the specific failure, remove your door panel safely, and swap the faulty motor in less than an hour.
Confirm Your Door Lock Actuator Is the Culprit
Do not start disassembling your door until you verify the actuator is the actual problem. Many users waste time replacing parts when the issue lies in a fuse or wiring harness.
Isolate the Failure to One Door
Check if the problem affects only a single door while others work normally. If your key fob locks the passenger side but not the driver side, the issue is localized. This specific symptom points directly to the lock actuator rather than the central system.
Listen for Audible Clues
Pay close attention to the sounds coming from inside the door panel when you press the lock button.
* Clicking or grinding noises indicate the motor is trying to turn but cannot move the gears.
* Silence suggests the motor has completely failed or power is not reaching it.
* Weak whirring means the motor is worn out and lacks torque.
Pro Tip: Place your ear against the door panel while someone presses the lock button. A faint hum confirms electricity is reaching the unit, proving the internal motor is the failure point.
Gather Essential Tools and Replacement Parts

Having the right equipment prevents broken clips and stripped screws during your repair. Prepare your workspace before starting.
Required Hand Tools
- Phillips #2 and flathead screwdrivers
- Torx bits (T10, T20, T25, T30)
- Socket set with 7mm and 10mm sizes
- Plastic trim removal tools
- Needle-nose pliers
- Impact driver for stubborn screws
Select the Correct Replacement
You have two main options for fixing the issue.
* Full Actuator Unit: Costs $30–$50 and replaces the entire assembly.
* Internal Motor Only: Costs $5–$9 and fixes the specific broken component.
Critical Note: Match your motor shaft type carefully. Most Toyota and Lexus models from 2002 to 2006 require a 10mm D-shaped shaft. Honda and Acura vehicles often need longer shafts, so do not mix them.
Additional Supplies
- JB Weld Plastic Putty or Loctite 401 for sealing
- Isopropyl alcohol (90%+) for cleaning surfaces
- Light grease for lubricating gears
- Butyl tape for resealing vapor barriers
- Safety goggles and gloves
Remove the Door Panel Without Damage
Accessing the lock actuator requires removing the interior door trim. Proceed slowly to avoid breaking plastic clips.
Prepare the Vehicle
Turn off the engine and disconnect the negative battery terminal to prevent electrical shorts. Roll the window all the way up to ensure it stays in place during removal.
Steps for Toyota and Lexus Models
- Pry off the trim tab near the door handle starting from the bottom.
- Remove the handle cup by prying outward to expose a Phillips screw.
- Unscrew the three mounting screws located near the handle, at the bottom, and under the small cover.
- Disconnect the lock and window cables by removing the retaining pins.
- Pull the panel upward to clear the window channel and disconnect wiring harnesses.
Steps for GMC Yukon Models
- Pry the door handle trim to release front and back tabs.
- Slide out the push pin and lift the trim upward.
- Remove the T20 screws near the handle and switch plus the 7mm top bolt.
- Pull the panel up and out, then disconnect the light socket and wiring.
Expert Note: Take photos of cable routing and connector positions before disconnecting anything. This visual aid makes reassembly much faster.
Extract the Faulty Lock Actuator Assembly

With the panel removed, you can now access the internal mechanism to remove the broken unit.
Expose the Mechanism
Peel back the vapor barrier carefully using a trim tool. Locate the lock actuator near the latch, which appears as a small black box with attached gears.
Disconnect and Remove
- Pop the lock rod off its bracket using a screwdriver.
- Remove the mounting hardware securing the unit. Toyota models typically use three screws, while GMC uses T30 bolts.
- Disconnect the electrical connector by pulling the tab straight out.
- Slide the actuator out through the access hole.
Warning: Hold the unit firmly as you remove it. Dropping it into the door cavity can damage other components or make retrieval difficult.
Choose Between Full Replacement or Motor Repair
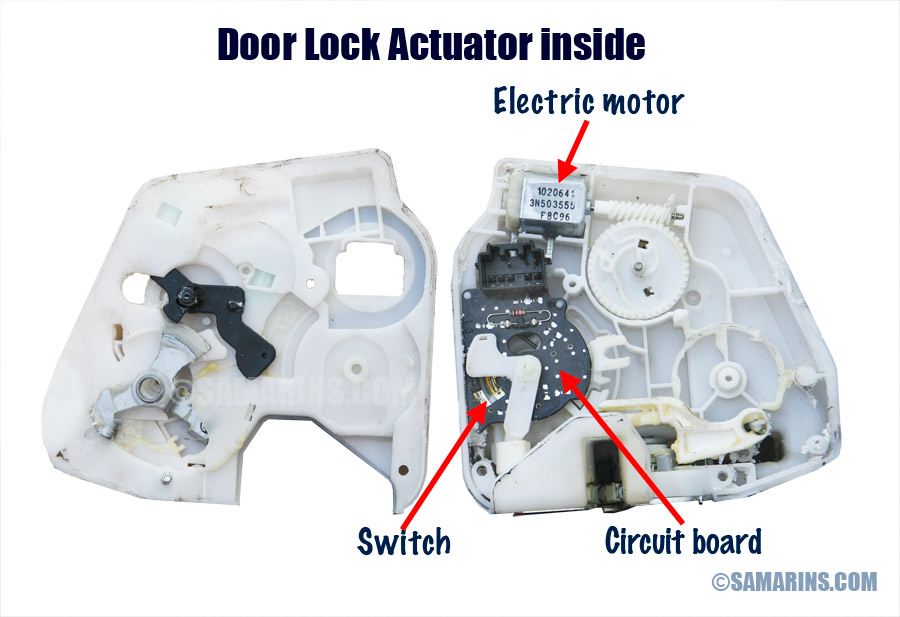
Decide whether to replace the whole unit or just the internal motor based on your budget and vehicle model.
Option 1: Replace the Entire Unit
This method is fastest and ideal if the plastic housing is cracked.
1. Align the gears on the new unit to match the old one.
2. Slide the assembly into place and insert mounting screws.
3. Reconnect the lock rod and electrical connector.
4. Test the latch manually with a screwdriver to ensure smooth operation.
Option 2: Replace the Internal Motor
This approach saves money by targeting the specific failed component.
1. Open the housing: Pry off the top cap or cut the seam with a Dremel if sealed.
2. Remove old motor: Slide the motor out and note the shaft alignment.
3. Install new motor: Press the gear onto the new shaft and insert it until it clicks.
4. Seal the unit: Clean edges with alcohol and apply plastic epoxy to the seam.
Eco Friendly: Repairing the motor reduces electronic waste by reusing the functional plastic housing and gears.
Reinstall Components and Reassemble Door
Reverse your disassembly steps carefully to ensure everything fits correctly.
Reinstall the Actuator
Slide the unit back into the door and align the copper rod with the latch. Secure it with the original screws or bolts. Reconnect the lock rod until it snaps in place.
Reattach Cables and Wiring
Reconnect all electrical connectors and cables. Ensure the white lock cable and window cable snap securely into their connectors. Verify that wiring harnesses are locked in place.
Replace Vapor Barrier and Panel
Smooth the vapor barrier back into position and seal any tears with butyl tape. Align the top of the door panel with the window channel and press the edges down to engage all clips. Reinstall all screws and trim caps.
Final Check: Ensure the door panel sits flush with no gaps. Rattles often indicate a clip is missing or a screw is loose.
Test the Repair Thoroughly
Never consider the job done without verifying full functionality.
Verification Steps
- Reconnect the negative battery terminal.
- Test locking and unlocking with the key fob.
- Use the interior switch to cycle the locks.
- Try the physical key to ensure mechanical engagement.
- Listen for smooth motor sounds without grinding.
Troubleshooting: If the lock fails, check your wiring connections and inspect the fuse for the door lock circuit.
Frequently Asked Questions About Replacing Lock Actuators
How much does it cost to replace a lock actuator?
Dealerships charge $550 to $1,000 for this repair. Doing it yourself costs under $50 for a full unit or just $5 to $9 if you replace only the internal motor.
Can I replace just the motor inside the actuator?
Yes, most failures occur in the small electric motor. You can open the housing and swap the motor if you match the shaft size, such as the 10mm D-shaped shaft for many Toyota models.
How long does it take to replace a door lock actuator?
The entire process typically takes under 60 minutes per door. This includes removing the panel, swapping the part, and reassembling everything.
What tools do I need to remove the door panel?
You will need Phillips and flathead screwdrivers, Torx bits (T10–T30), a socket set, and plastic trim tools. An impact driver helps with stubborn screws.
Why is my door lock clicking but not moving?
A clicking sound usually means the motor is receiving power but cannot turn the gears. This indicates internal motor failure or stripped gears within the lock actuator.
Do I need to replace the whole door handle assembly?
No, the actuator is a separate component from the handle. You only need to remove the door panel to access and replace the actuator unit or motor.
Key Takeaways for Replacing Your Lock Actuator
Fixing a broken door lock is a high-value DIY project that saves significant money. By diagnosing the issue correctly and choosing between a full unit swap or a simple motor replacement, you can restore functionality for a fraction of the dealer cost. Remember to match your motor shaft size and seal the housing properly to prevent future moisture damage.
Gather your tools and follow the specific steps for your vehicle model to complete this repair in under an hour. If one actuator has failed due to age, consider checking the opposite door soon, as it may be next in line for replacement.



