
A broken door lock creates an immediate security risk and leaves your home vulnerable. Whether your key refuses to turn or the latch fails to catch, you can often fix these issues with basic tools and a systematic approach.
This guide shows you exactly how to repair a broken door lock by diagnosing cylinder jams, fixing internal mechanisms, and realigning strike plates. You will learn proven methods to restore smooth operation without expensive replacements.
Diagnose Why Your Door Lock Won’t Work
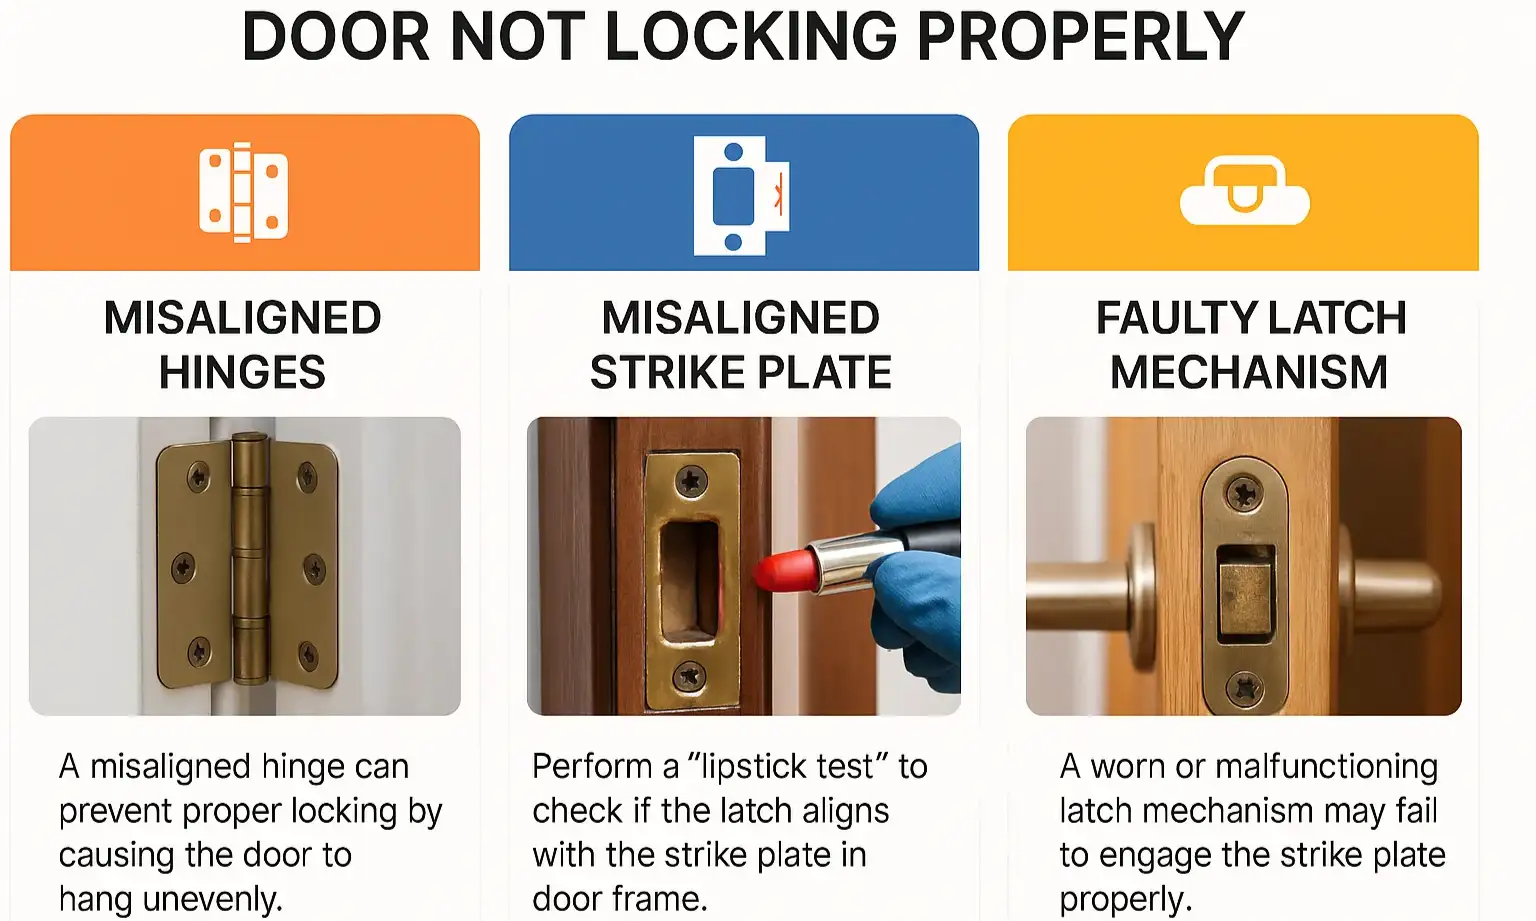
Correctly identifying the root cause prevents wasted effort and protects delicate internal parts from further damage. Most failures fall into five distinct categories that require different repair strategies.
Why the Key Won’t Turn in the Cylinder
A key that refuses to turn usually indicates a dry or dirty cylinder. Debris accumulation or dried lubricant prevents the pins from moving freely within the housing. If the key turns partially before sticking, the issue is likely a lack of proper lubrication.
What Causes a Stuck or Frozen Handle
A handle that will not move often points to a disconnected spindle or seized internal gears. If the knob spins freely without retracting the latch, the spindle has likely detached from the mechanism. Complete immobility suggests corrosion or broken internal components binding the system.
Why the Door Fails to Latch Properly
Failure to latch is almost always a misalignment issue between the bolt and the frame. Seasonal wood swelling or loose hinges can shift the door enough to prevent the bolt from entering the strike plate hole. The mechanism works, but the parts no longer line up.
Reasons for Stiff Lock Operation
Stiffness indicates excessive friction between metal components inside the lock. This often happens when old lubricant dries out or when oil-based products attract dust to form a gritty paste. Forcing a stiff lock can break internal tabs or bend the spindle.
Why the Door Pulls Open Easily
If the latch extends but the door opens with a gentle pull, the strike plate is misaligned. In some cases, a broken spring inside the lock prevents the latch from extending fully into the frame. The bolt simply rests against the frame rather than securing the door.
Gather Essential Tools for Lock Repair
Using incorrect tools can strip screws or scratch sensitive internal pins. Prepare these specific items before starting your repair work to ensure a smooth process.
Required Screwdrivers and Extraction Tools
- Phillips and flathead screwdrivers for removing faceplates and hinge screws
- Allen wrench for modern locks utilizing hex screws
- Flashlight to inspect the keyway and internal latch mechanism
- Toothpick or soft brush for removing debris without scratching metal
- Pencil for marking alignment points on the door frame
Best Lubricants for Door Locks
- Graphite powder or spray works best for lock cylinders because it does not attract dirt
- Silicone-based lubricant is ideal for latches, springs, and external moving parts
- Avoid WD-40 and oil-based products as they attract dust and create gunk over time
Cleaning Supplies for Deep Maintenance
- Mild soap and water for cleaning disassembled parts only
- Clean, dry cloth to wipe and dry components thoroughly
- Small container for soaking removable cylinder parts
Fix a Stuck Lock Cylinder Quickly
When the key will not turn, the problem usually lies inside the cylinder mechanism. You can often resolve this without full disassembly by following proper lubrication steps.
Apply Graphite Lubricant Correctly
- Shake the can of graphite lubricant lightly to mix the contents.
- Insert the straw nozzle directly into the keyhole opening.
- Spray two to three short bursts into the cylinder interior.
- Insert the key and jiggle it gently back and forth five times.
- Turn the key fully to test movement and repeat if necessary.
Pro Tip: Use the key as a piston to help work the graphite deep into the pin chambers for maximum effect.
Remove Debris from the Keyway
If lubrication fails, physical obstruction may be blocking the mechanism. Shine a flashlight into the keyhole to look for lint, dirt, or broken key fragments. Use a toothpick or soft brush to gently extract visible debris. Never use metal tools like paperclips as they can scratch pins and worsen the issue.
Deep Clean a Severely Stuck Cylinder
For chronic sticking issues, remove the cylinder for a complete cleaning. Remove the interior trim screws and pull out the lock cylinder carefully. Soak the cylinder in warm, soapy water for five to ten minutes to dissolve grime. Use a soft brush to clean the keyway and exterior surfaces thoroughly. Dry all components completely with a cloth and let them air dry before reinserting. Re-lubricate with graphite before reassembly to ensure smooth operation.
Repair a Broken Latch or Knob Mechanism
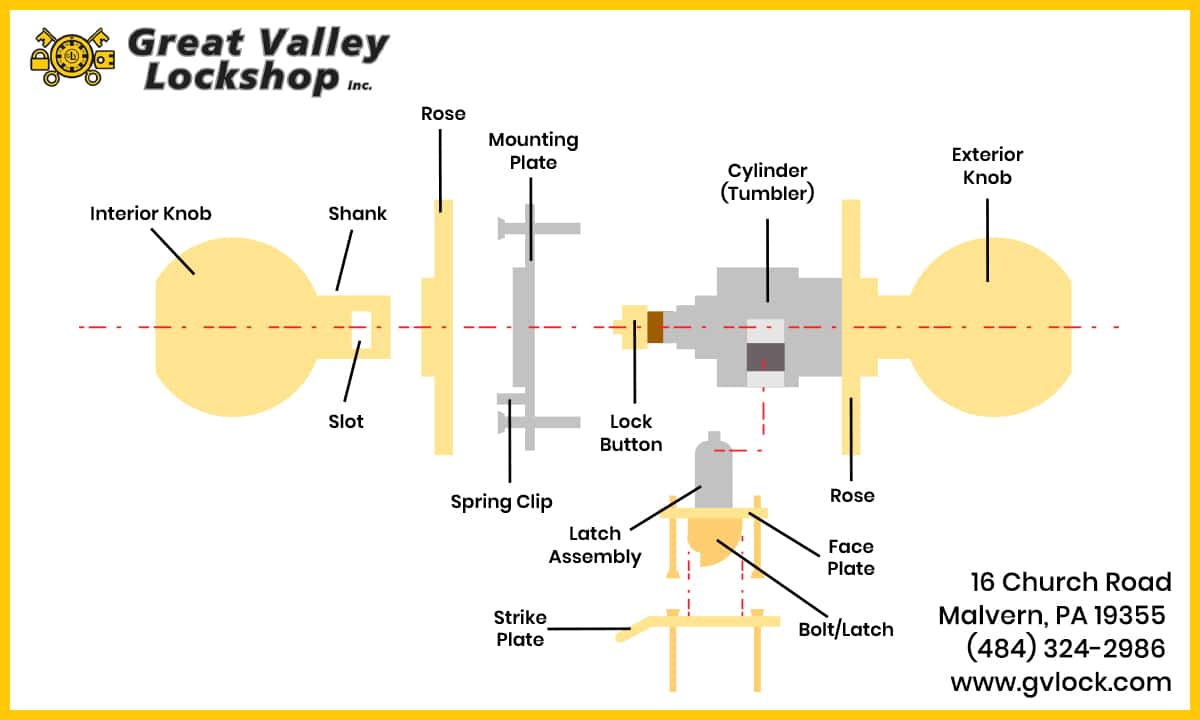
When the handle fails to retract the latch or the lock button will not stay down, internal components likely need attention. This process requires careful disassembly and precise reassembly.
Remove the Lock Assembly Safely
- Locate the two or three screws on the interior side near the handle base.
- Use a Phillips screwdriver to remove the screws completely.
- Gently pull the interior knob and rose plate away from the door surface.
- Slide the entire latch mechanism out from the edge of the door.
Warning: A small spring-loaded tab called the latch retainer may fall out. Keep this part visible and safe.
Inspect Internal Components for Damage
Lay all parts out in order on a clean surface. Check for a broken spring that fails to provide tension for latch return. Look for a dislodged retainer tab that prevents the latch from locking. Inspect the spindle for bends that stop the knob from turning the latch. Examine the latch bolt for wear that prevents full extension.
Lubricate Moving Metal Parts
Apply silicone-based lubricant sparingly to the latch bolt shaft and the spring mechanism. Coat the spindle ends and any metal-on-metal contact points lightly. Using too much lubricant attracts dust, so a thin layer is sufficient for smooth operation.
Reassemble the Lock with Precision
- Insert the latch bolt into the housing so it slides smoothly.
- Reattach the spring and retainer tab ensuring the tab sits flush.
- Align the interior and exterior knobs so the spindle slides through both.
- Slide the entire assembly back into the door edge carefully.
- Secure with screws tightened just enough to hold without warping the housing.
Critical: Over-tightening is a top cause of post-repair failure. Stop tightening when resistance feels firm.
Test the Handle and Latch Function
Turn the knob to ensure the latch extends and retracts smoothly. Push the door shut to verify the latch catches without forcing. Pull the handle to confirm it disengages cleanly. If sticking occurs, apply more silicone lube. If the lock will not stay closed, check the retainer tab alignment again.
Fix Door and Deadbolt Misalignment
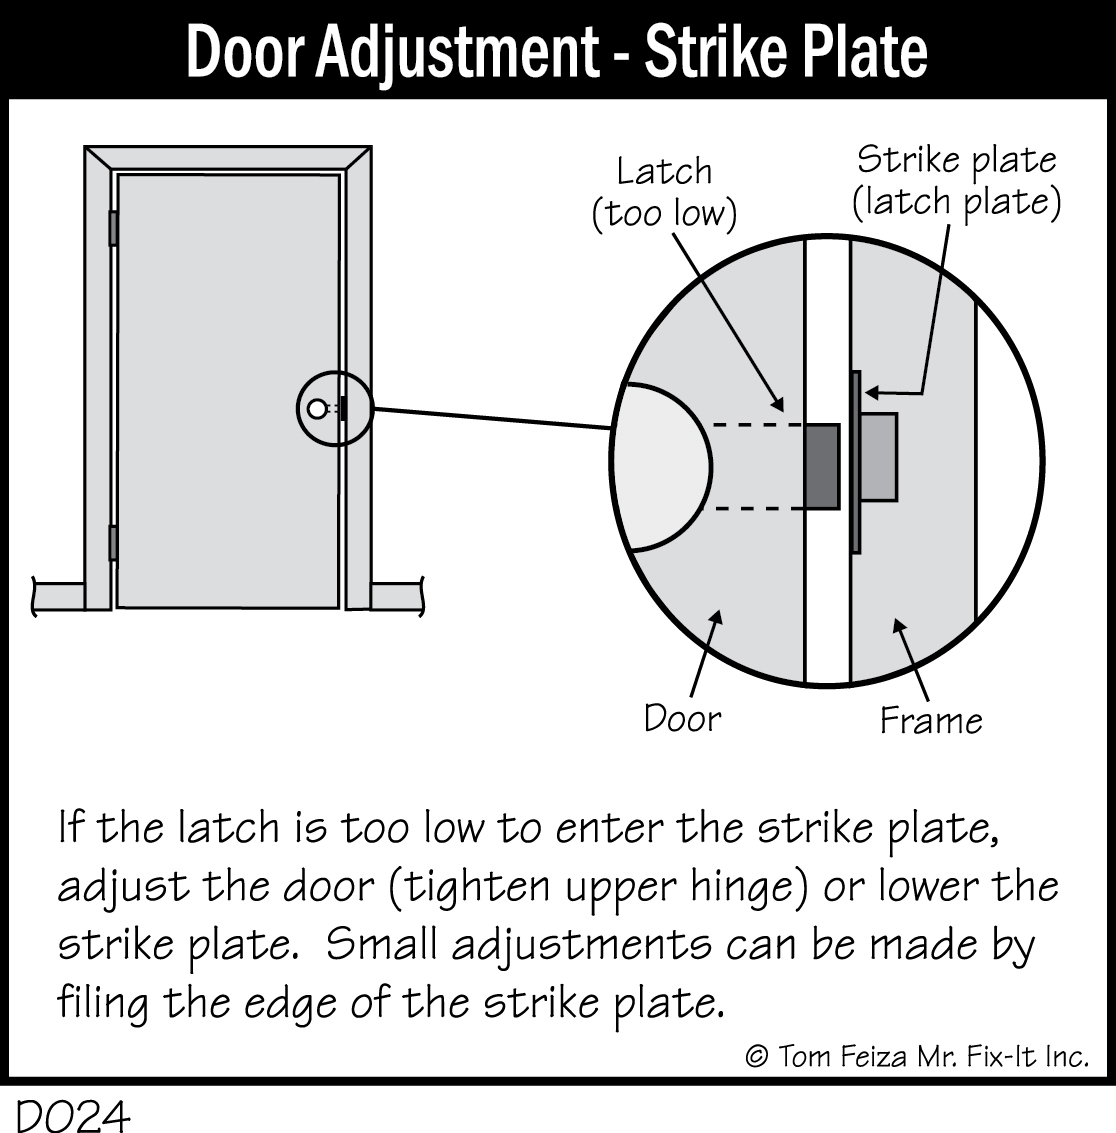
Misaligned strike plates cause ninety percent of deadbolt issues according to industry data. Fixing alignment is fast, effective, and often requires no new parts.
Diagnose Alignment Issues Accurately
- Open the door and extend the deadbolt manually.
- Hold the bolt against the door frame and mark the top and bottom with a pencil.
- Close the door and observe where the marks land relative to the strike plate hole.
- Compare the mark positions to determine the direction of misalignment.
Interpret Alignment Marks Correctly
- Marks above the hole mean the strike plate is too low and must be raised
- Marks below the hole mean the strike plate is too high and must be lowered
- Door must be pushed hard to lock means the plate is too deep and must move out
- Latch doesn’t reach means the plate is too far out and must move in
Adjust the Strike Plate Position
- Loosen the two screws holding the strike plate securely.
- Tap the plate gently with a hammer to reposition it vertically or horizontally.
- Place cardboard shims or metal washers behind the plate for depth changes.
- Re-tighten screws and test the deadbolt five to six times.
Pro Tip: File the strike plate hole slightly larger if the bolt drags on the edges during engagement.
Fix Sagging Doors with Hinge Adjustment
Adjust the hinges if the entire door appears misaligned. Loosen the top hinge screws on the door jamb slightly. Gently lift or shift the door to close gaps between the door and frame. Re-tighten screws securely and test the lock function. Fill stripped screw holes with wood filler or toothpicks and glue before re-drilling.
Prevent Future Lock Failures Effectively
Regular maintenance extends lock life and prevents emergency repair situations. A little preventative care goes a long way in keeping your security system functional.
Lubricate Every Six to Twelve Months
Use graphite in the keyhole and silicone on the latch mechanism twice a year. Perform this maintenance in spring and fall to combat seasonal humidity changes. This schedule keeps internal parts moving smoothly without buildup.
Avoid Common Maintenance Mistakes
- Never use WD-40 as it gums up over time and attracts debris
- Do not force the key or handle as this breaks internal tabs
- Avoid over-tightening screws which warps the mechanism housing
Inspect Your Lock Regularly
Check for loose hinge screws every few months to prevent sagging. Look for paint buildup around the strike plate or latch that could cause binding. Ensure the door closes smoothly without sticking or requiring excessive force.
When to Replace Instead of Repair
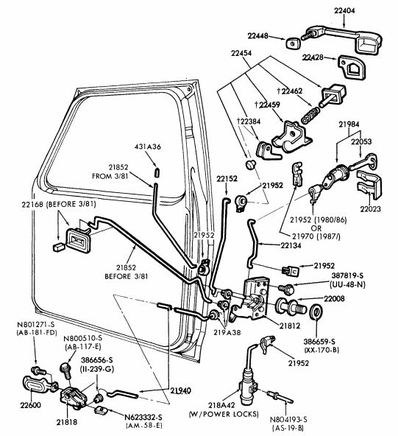
Some locks cannot be saved and require replacement for security and functionality. Recognizing these signs saves time and ensures your home remains secure.
Internal Parts Are Broken Beyond Repair
Replace the lock if the retainer tab is cracked or the spindle is bent beyond repair. A cylinder that will not accept the key at all even after cleaning indicates internal failure. Broken springs that cannot be sourced separately also necessitate replacement.
Lock Fails Repeatedly After Repair
If you have cleaned, lubricated, and aligned the lock but it still fails, replace it. Recurring issues suggest worn internal components that cannot be fixed with basic maintenance. Persistent problems compromise your home security.
Upgrade for Better Security
Consider replacing old locks with deadbolts featuring anti-pick pins or smart lock technology. Measure the backset distance from the door edge to the center of the bore hole before purchasing. Standard backsets are typically two and three-eighths inches or two and three-quarters inches.
Frequently Asked Questions About Door Lock Repair
Can I use WD-40 to fix a stuck door lock?
No, you should never use WD-40 on door locks. Oil-based lubricants attract dust and debris that eventually form a gritty paste, making the sticking problem worse over time. Use graphite powder for cylinders and silicone spray for latches instead.
How long does it take to repair a broken door lock?
Most sticking or misalignment issues can be resolved in approximately 10 minutes with basic tools. Complex internal repairs requiring full disassembly may take 20 to 30 minutes depending on your experience level.
Why does my key turn but the door won’t unlock?
This usually indicates a disconnected spindle or broken internal linkage between the cylinder and latch. The key turns the cylinder, but the motion is not transferring to the latch mechanism due to a broken component.
What causes a door lock to stop working suddenly?
Sudden failure often results from misalignment due to seasonal wood swelling or loose hinges. Internal component breakage or accumulation of debris in the cylinder can also cause immediate operational failure.
How often should I lubricate my door locks?
You should lubricate your door locks every six to twelve months for optimal performance. Perform this maintenance in the spring and fall to account for seasonal humidity changes that affect metal components.
Key Takeaways for Repairing Your Broken Door Lock

Most broken door locks can be fixed quickly with graphite lubricant, silicone spray, and proper alignment techniques. Ninety percent of deadbolt issues stem from misalignment rather than internal damage, making adjustment the first step you should try. Regular maintenance every six months prevents most common failures and extends the life of your lock significantly.
Start your repair by diagnosing the specific symptom, then apply the appropriate fix from this guide. If basic repairs fail to resolve the issue, replacing the entire lock assembly is a straightforward task that improves your home security immediately.



