
Is someone helping themselves to your food or drinks? Whether you share a kitchen, host parties in the garage, or store supplies outdoors, learning how to put a lock on a fridge protects your groceries, medications, and beverages. Without a secure closure, fridges in common areas become easy targets for roommates, guests, or even thieves.
The good news: you don’t need to replace your appliance. You just need to add the right lock. This guide covers two proven approaches: a drill-free epoxy bracket for temporary, reversible security and a heavy-duty hasp lock with alarm for permanent, high-risk zones. You’ll learn exactly what tools to use, how to install each system step by step, and which option fits your space.
Pick the Right Locking Method for Your Fridge
Not all fridge locks serve the same purpose. Your choice depends on location, security level, and whether drilling is allowed. One method avoids permanent changes. The other offers maximum protection, even in harsh weather.
Match the Lock to Your Environment
Use a non-invasive epoxy-mounted bracket if you rent, share a space, or need a removable solution. It’s strong, discreet, and leaves no holes behind. For outdoor fridges, sheds, or high-theft zones, go with a heavy-duty hasp lock, optionally linked to an alarm. This version resists tampering, seals the door tighter, and deters intruders electronically. Ask yourself: Is the fridge indoors or outside? Do you own the space? Is theft a real concern? Your answers point to the best approach.
Install a Drill-Free Epoxy Bracket on Your Fridge
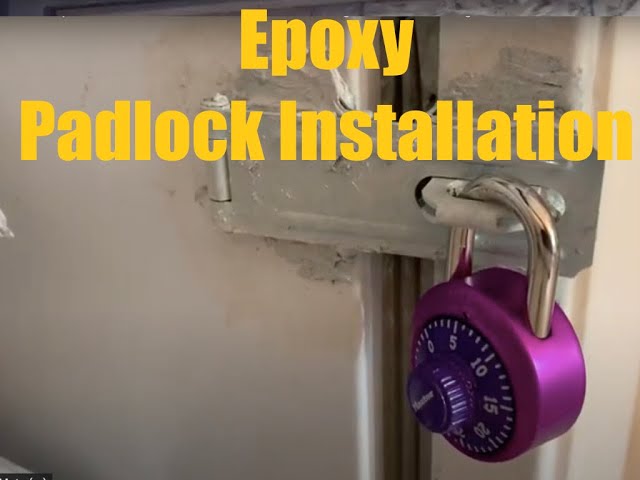
This method secures your fridge without drilling. It works perfectly for renters, dorms, or party zones where you want strong protection but no permanent changes.
Gather the Tools You Need
Before you start, collect these items:
– Heavy-duty metal bracket (door or cabinet grade)
– High-strength epoxy (50/50 mix ratio)
– Padlock (shackle must fit through bracket and handle)
– Utility knife or sandpaper (for cleanup)
– Paint (optional, to match the fridge)
Choose a bracket wide enough to span the door edge and latch securely around the handle. A stainless steel model resists rust and provides long-term durability.
Apply Epoxy to Mount the Bracket
Start by cleaning the fridge surface with rubbing alcohol. Any grease or dust weakens the bond. Mix the epoxy in a 50/50 ratio as instructed. Spread a thick, even layer on the back of the bracket. Press it firmly onto the fridge, aligning it so the padlock can pass through both the bracket and the door handle. Apply a second coat on the opposite side of the bracket for full adhesion.
Critical Warning: Keep epoxy away from hinges and moving parts. Once cured, it’s nearly impossible to remove.
Wait 24 Hours for Full Cure
Let the epoxy harden undisturbed for 24 hours. Do not test, touch, or stress the bracket during this time. A fully cured bond is stronger than many metal joints and can withstand repeated locking and pulling.
Clean and Blend the Finish
After curing, trim excess epoxy with a utility knife or smooth it with sandpaper. For a seamless look, paint the bracket with appliance-safe paint. White blends best with most fridges. This step improves appearance and adds a layer of corrosion resistance.
Test the Lock and Confirm Security
Slide the padlock through the bracket and handle. Close the door and ensure the lock holds firm. The fridge is now secured with zero damage, full reversibility, and solid deterrence. To remove later, carefully cut the epoxy bond and sand the surface clean.
Why This Method Works
- No drilling means no property damage
- Epoxy creates a near-permanent hold
- Easily removed when needed
- Ideal for indoor shared spaces
- Low cost with high effectiveness
Set Up a Heavy-Duty Hasp Lock System
When security is critical, like an outdoor fridge in a garage, shed, or backyard, this method delivers maximum protection. It uses a rugged hasp, screws, and weatherproofing to lock the door shut and improve insulation.
Mark and Pre-Drill Mounting Points
Position two 4¼-inch heavy-duty hasps on the fridge door and frame. Use a pen to mark where screws will go. Because the angle is awkward, brace your hand or use tape to stabilize the pen. Accuracy matters because misaligned holes reduce strength. Pre-drill pilot holes at each mark to prevent wood from splitting or metal from cracking when you drive in screws.
Seal Against Weather and Moisture
Apply silicone sealant around each pilot hole before inserting screws. This creates a waterproof barrier that stops rust, rot, and moisture from entering. It’s essential for outdoor use and extends the life of both the lock and fridge.
Secure the Hasp and Improve the Door Seal
Attach the hasp with screws designed for your fridge material. Use stainless steel for metal or coated screws for wood. Tighten fully. As you close the door and lock it, notice how the hasp pulls the door tightly against the frame. This compression closes gaps, improves the rubber seal, and boosts energy efficiency. A side benefit: better insulation means lower power use and more consistent cooling.
Upgrade With an Alarm Sensor (Optional)
For high-theft areas, connect a door sensor to your home or shop security system. Mount the sensor so it detects any door movement. Use a wired connection to your alarm panel or a wireless module if available. When the fridge opens, the alarm triggers immediately, scaring off intruders and alerting you.
Alarm Setup Tips
- Test the sensor after installation by opening the door slowly to confirm the alarm sounds
- Place the sensor away from direct sunlight or heat sources to avoid false triggers
- Use tamper-proof screws on the hasp to prevent removal
Benefits of This Method
- Extremely strong physical lock
- Weather-resistant with proper sealing
- Improves fridge efficiency by sealing gaps
- Can integrate with existing security systems
- Best for permanent outdoor installations
Compare Both Fridge Lock Methods Side by Side
Choosing the right method comes down to your specific needs. Here’s how the two stack up:
| Feature | Epoxy Bracket | Hasp + Alarm |
|---|---|---|
| Drilling Required | No | Yes |
| Reversible | Yes | No |
| Best For | Indoor/shared spaces | Outdoor/theft-prone areas |
| Weatherproof | Limited | Yes (with sealant) |
| Security Level | Moderate | High |
| Installation Time | 24+ hours (cure time) | 30 to 60 minutes |
| Cost | Low | Moderate |
| Door Seal Improvement | No | Yes |
| Alarm Support | No | Yes |
| Ideal User | Renter, party host | Homeowner, outdoor setup |
Use the epoxy method if you need flexibility and no damage. Choose the hasp system when security, durability, and performance matter most.
Decide Based on Key Factors Before Installing
Before installing any lock, consider these five factors to make the right choice for how to put a lock on a fridge.
Location: Indoor vs. Outdoor
Indoor fridges in kitchens, basements, or offices benefit from the clean, no-drill epoxy lock. Outdoor units must use the hasp method with silicone sealant to survive rain, humidity, and temperature swings.
Security Level Needed
If you’re just keeping roommates from snacking, a padlock on an epoxy bracket is enough. For areas with real theft risk, like unlocked garages or communal sheds, the hasp plus alarm combo is worth the extra effort.
Fridge Door Condition
Does the door sag or not seal well? The hasp lock actively fixes this by pulling the door tight. Over time, that improves cooling and cuts energy costs. For a well-sealing fridge where appearance and reversibility matter more, go epoxy.
Ownership and Permanence
Renters should avoid drilling. The epoxy method leaves no trace when removed. Homeowners with permanent outdoor setups can commit to the hasp system for long-term protection.
Existing Security Setup
Already have a home alarm? Adding a door sensor to the hasp is a smart, low-cost upgrade. No system in place? Stick to mechanical locks unless you plan to install one.
Follow Safety and Maintenance Tips for Fridge Locks
Even the best lock fails if installed or maintained poorly. Avoid common mistakes with these best practices.
Avoid Epoxy Mistakes
- Never apply epoxy near hinges, because cured glue can jam moving parts
- Work in a ventilated area since epoxy fumes are strong
- Don’t rush the cure; 24 hours is non-negotiable for strength
Prevent Hasp Installation Errors
- Always pre-drill, especially in older fridges with brittle metal or wood
- Use the correct screws because wrong size or type can strip or weaken the hold
- Seal every screw hole with silicone, or rust and water damage will follow
Maintain Your Lock Long Term
- Test the lock weekly to ensure the padlock engages smoothly
- Inspect outdoor hasps monthly for loose screws or corrosion
- Reapply silicone sealant annually in wet climates
- Replace padlocks if the shackle shows signs of cutting or wear
Frequently Asked Questions About Locking a Fridge
Can I put a lock on a fridge without drilling?
Yes. You can use a heavy-duty metal bracket bonded with high-strength epoxy. This method requires no drilling and is fully reversible. It’s ideal for renters or anyone who wants to avoid permanent modifications.
What is the best lock for an outdoor fridge?
A heavy-duty hasp lock with silicone weatherproofing works best for outdoor fridges. Adding a door sensor connected to a security system provides extra deterrence against theft.
How long does epoxy take to cure on a fridge lock?
High-strength epoxy needs a full 24 hours to cure completely. During this time, avoid touching or stressing the bracket. A fully cured bond is stronger than most metal joints.
Will a hasp lock improve my fridge’s seal?
Yes. When tightened, the hasp pulls the fridge door tightly against the frame. This compression closes gaps, improves the rubber seal, and boosts energy efficiency.
Can I remove an epoxy fridge lock later?
Yes. The epoxy bracket method is fully reversible. To remove it, carefully cut the epoxy bond with a utility knife and sand the surface clean. No permanent damage remains.
Do fridge locks work with home alarm systems?
Some do. A door sensor mounted on the fridge can connect to your home or shop security panel. When the fridge opens, the alarm triggers immediately, alerting you to potential theft.
Key Takeaways for Locking Your Fridge Securely

Putting a lock on a fridge doesn’t have to be complicated. The drill-free epoxy bracket offers flexibility and zero damage for renters and shared spaces. The heavy-duty hasp with alarm delivers maximum security and improved insulation for outdoor setups. Both methods work well when installed correctly.
Focus on your environment, security needs, and long-term plans before choosing. Install carefully, maintain regularly, and you’ll keep your food safe, your energy costs down, and intruders out. For renters, enjoy peace of mind without breaking lease rules. For homeowners, upgrade outdoor security with a lock that also improves performance.
Now that you know how to put a lock on a fridge the right way, take action before the next snack thief strikes. Gather your tools, pick your method, and secure your fridge today.



