
Forgetting your keys or worrying if you locked the door ends when you learn how to install a smart lock. This upgrade transforms your entryway into a secure, keyless gateway controlled by codes or your phone.
This guide walks you through checking compatibility, mounting hardware, and setting up remote access in under an hour. You will gain the confidence to replace your old deadbolt with a modern digital system using basic tools.
Verify Door Compatibility Before Buying Hardware
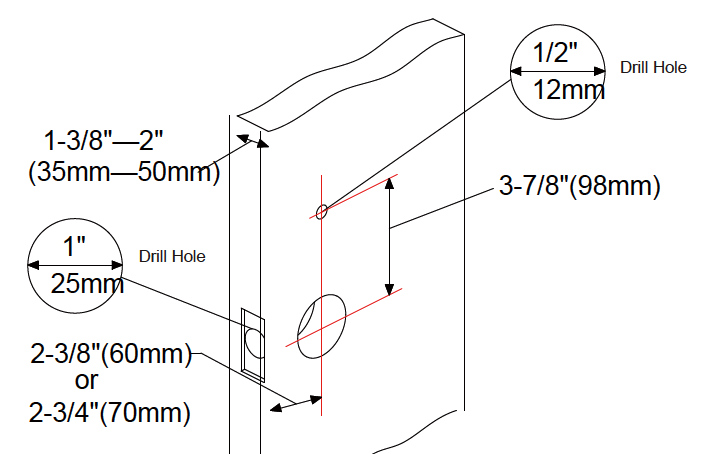
Checking your door specifications prevents frustration and returns later. Most smart locks fit standard doors, but unique configurations require specific models.
Measure Door Thickness and Bore Holes
Smart locks generally fit doors between 1-3/8 inches and 2 inches thick. Use a tape measure to confirm your door falls within this range before purchasing.
Check your existing bore holes against these standard sizes:
* Large hole: 2-1/8 inches in diameter for the lock body.
* Edge hole: 1 inch in diameter for the deadbolt latch.
Hold the paper template from your kit against the door to test alignment. You may need a drill to enlarge holes if they do not match.
Avoid Incompatible Handle Systems
Most smart locks replace only the deadbolt or interior knob separately. If your door uses a combined handle-and-deadbolt unit, confirm the new model supports full replacement.
Models like the Schlage Encode Plus handle full replacements, while basic keypad locks often do not. Check the product description carefully if you have older or unique hardware.
Ensure Frame Strength for Security
A strong door frame is essential for security. The strike plate must anchor into the door jamb stud rather than just the trim wood.
Use the long reinforcing screws included in your kit, which are typically 3 inches or longer. These secure the strike plate deep into the wall framing to prevent kick-in attacks.
Remove Existing Deadbolt and Trim Safely
Start the physical installation by taking off your current lock system. Work gently to avoid damaging the door surface or paint.
Unscrew Interior Assembly First
Locate the two screws on the interior back plate and remove them with a Phillips screwdriver. Gently pull the inner mechanism away from the door surface.
If the assembly sticks, wiggle it slightly instead of forcing it. Keep these screws nearby as you might reuse them for the new lock mounting.
Extract Latch and Exterior Trim
Unscrew the latch plate found on the vertical edge of the door. Slide the entire deadbolt assembly out from the edge hole toward the exterior.
Remove the exterior trim and faceplate from the front of the door. Set all old parts aside in a safe place in case you need to reinstall them later.
Remove Old Strike Plate
Take the strike plate off the door frame using your screwdriver. Examine the recess depth to see if the new plate will fit flush.
You may need a chisel or rotary tool if the new plate requires a larger recess. Do not force the new hardware if the fit is not perfect.
Install New Deadbolt Latch Mechanism

Install the core mechanical components before attaching the electronic units. Proper orientation ensures smooth operation.
Insert Latch with Correct Orientation
Slide the new smart deadbolt latch into the edge of the door. Look for the TOP marking or arrow and ensure it faces upward.
Position the latch so the bolt extends horizontally when in the unlocked position. This alignment is critical for the motor to function correctly.
Adjust Latch Length If Needed
Some latches feature an adjustable length for different door thicknesses. Press the black button on the bottom of the latch to extend or retract it.
Test the fit until the latch sits flush in the edge hole. Secure the latch with the two provided wood screws without stripping the threads.
Fit and Reinforce Strike Plate
Place the new strike plate over the latch hole in the door frame. It should align cleanly with the bolt when the door is closed.
If the recess is too small, trace the outline and remove excess wood with a chisel. Secure the plate with extra-long screws that penetrate into the wall stud for maximum security.
Mount Exterior Keypad and Route Cable
Smart locks with keypads require careful cable management between the outside and inside units.
Feed Connecting Cable Through Door
Position the exterior keypad on the outside of the door. Feed the attached cable through the large bore hole so it emerges on the interior side.
Ensure the tailpiece on the back of the keypad aligns with the latch mechanism inside. The cable must pass through freely without kinks.
Align Keypad Flush to Door
Press the keypad flat against the door surface to check the fit. It should sit evenly without gaps that could cause binding.
Leave the keypad in place temporarily but do not secure it yet. You will finalize the positioning after installing the interior unit.
Assemble Interior Lock Unit Properly
The interior assembly powers and controls the entire system. Install it carefully to avoid pinching the connecting cable.
Thread Cable Through Mounting Plate
Take the interior mounting plate and feed the cable through its center hole. Tuck the cable into the groove or slot on the plate to keep it organized.
This step prevents the cable from getting pinched when you tighten the housing. A neat cable path ensures long-term reliability.
Attach Mounting Plate to Door
Align the plate with the screw holes on the interior side of the door. Insert the two long bolts through the plate and into the door structure.
Hand-tighten these bolts for now. You will fully secure them after connecting the lock body to ensure proper alignment.
Connect Keypad Cable to Interior Unit
Plug the cable from the exterior keypad into the adapter port on the interior lock module. Listen for a click to confirm the connection locks in place.
Tuck any excess cable into the housing and secure it in the retaining clip. This prevents tension on the connection point.
Finalize Interior Assembly
- Align the interior lock housing over the mounting plate.
- Insert the three small machine screws through the housing into the plate.
- Tighten securely with a screwdriver.
- Reattach the battery cover but do not install batteries yet.
Wait to insert batteries until you have completed the configuration steps.
Replace Door Knob If Using Integrated System
Some systems like the Schlage Encode Plus replace both the deadbolt and main door knob.
Remove Existing Knob Assembly
Unscrew the interior back plate and remove the old knob completely. Prop the door open before removing the latch to prevent accidental locking.
Pull out the old latch from the edge of the door. Discard or store the old hardware as needed.
Install Smart Knob Latch
Insert the new smart latch into the edge hole of the door. Secure it firmly with the provided latch plate screws.
Ensure the latch moves freely without rubbing against the door wood. Proper installation prevents future mechanical issues.
Mount Back Plate and Attach Knob
Slide the back plate over the spindle and press it against the door. Tighten the screws securely to hold the assembly in place.
Snap or screw the new smart knob into place following the manufacturer instructions. Verify the locking mechanism engages correctly.
Power Up and Set Master Code
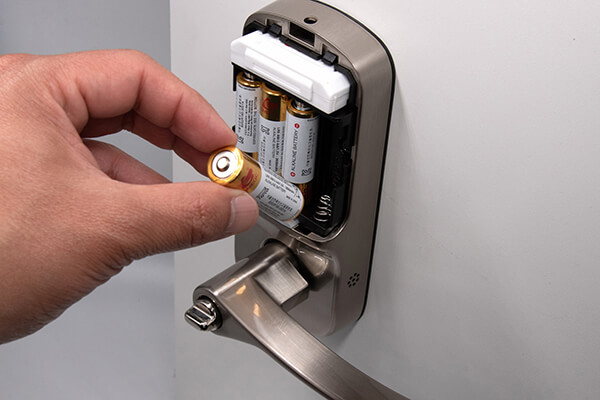
Bring your smart lock to life by installing power and creating your primary access code.
Insert Batteries and Activate
Open the battery compartment on the interior unit. Insert four AA batteries following the polarity markings inside.
Close the cover and press a button or place your hand on the keypad to wake the device. Most models emit a sound or light to confirm power is on.
Create Master PIN On-Device
This code serves as your primary access method and should be at least 6 digits.
On the keypad, press the gear icon, enter a 4 to 8-digit Master PIN, and press the gear icon again to save. Write this code down and store it securely.
Pair with App and Wi-Fi
Download the manufacturer app such as Schlage Home or Yale Access from your app store. Follow the prompts to connect via Bluetooth and join your Wi-Fi network.
Complete any firmware updates immediately. Do not skip this step as it ensures security and performance.
Add Users and Manage Access Codes

Grant access to family or guests without handing out physical keys.
Create PINs via Keypad Sequence
To add a user, enter your Master PIN and press the gear icon. Press 2 then the gear, followed by 1 and the gear again.
Enter a User Number between 1 and 100, press the gear, and type the new 4 to 8-digit PIN. The lock confirms with a beep or flash.
Manage Access Remotely
Use the app to create temporary codes for cleaners or guests. You can revoke access instantly or set schedules for specific times.
View entry history to see who entered and when. This feature provides peace of mind without changing locks.
Automate Locking with Rules and Schedules
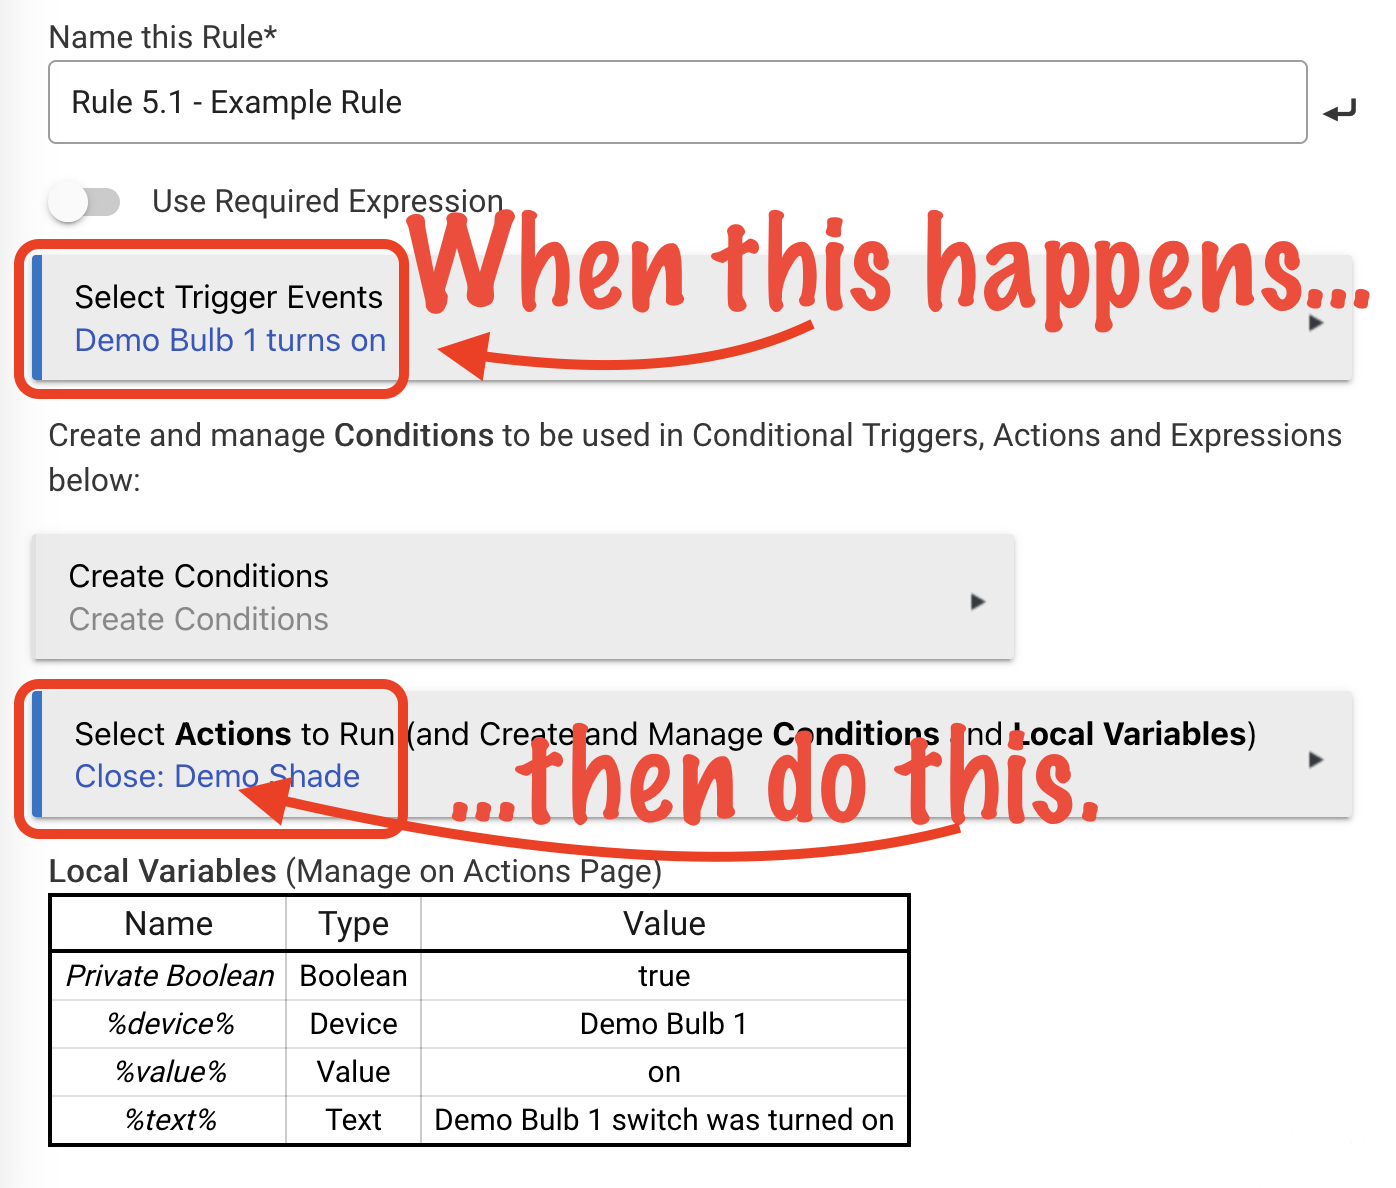
Turn your smart lock into a proactive security system with automation.
Create Event-Triggered Rules
Go to Automation in your app and select Add New Rule. Name the rule and set a trigger like leaving home or a specific time.
Choose the action to lock all doors. Select your devices and active days, then save the rule for automatic execution.
Set Recurring Schedules
Navigate to Schedules and select Add New Schedule. Name it and select the days and times for access.
Assign a user code or unlock command for that window. This works perfectly for recurring visitors like dog walkers.
Test Functionality and Troubleshoot Issues
Verify everything works before relying on your new smart lock daily.
Perform Full Function Test
Check mechanical operation by locking and unlocking manually. Try your Master and user PINs to ensure code recognition.
Test remote control via the app when away from home. Confirm that auto-lock features execute as scheduled.
Fix Common Installation Issues
If the bolt does not extend fully, the strike plate is likely misaligned. Loosen screws, realign the plate with the bolt path, and retighten.
If the keypad fails to respond, check for low batteries or a loose cable. Open the interior unit to ensure the cable lies flat without kinks.
Maintain Security and Performance Long Term
Keep your smart lock running smoothly with regular maintenance.
Update Firmware Regularly
Manufacturers release updates to patch vulnerabilities. Enable automatic updates in the app or check monthly for new versions.
Monitor Battery Life
Most apps alert you when batteries are low. Replace them every 1 to 2 years using alkaline batteries only.
Avoid rechargeable batteries as they may not deliver consistent voltage. Inspect hardware annually to tighten any loose screws.
Frequently Asked Questions About Smart Lock Installation
Do I need an electrician to install a smart lock?
No, you do not need an electrician for most smart lock installations. The process uses standard batteries and requires only basic hand tools like a screwdriver.
Will a smart lock fit my current door?
Most smart locks fit standard doors between 1-3/8 and 2 inches thick. You must measure your door thickness and bore holes to confirm compatibility before buying.
What happens if the batteries die completely?
You can still enter using a physical backup key or a 9-volt battery jump-start method on the keypad. Most models also provide low-battery warnings weeks in advance.
Can I still use my existing keys?
Many smart locks retain a keyhole for emergency access, but some keyless models do not. Check the specific product features to see if a physical key override is included.
How many user codes can I create?
Most systems support up to 100 unique user PIN codes. You can create, modify, or delete these codes instantly via the mobile app.
Key Takeaways for Installing Your Smart Lock
Installing a smart lock is a DIY-friendly project that boosts security and convenience significantly. By verifying compatibility, following the step-by-step mounting guide, and configuring automation rules, you create a secure keyless entry system.
Start by measuring your door and gathering your tools today. Your journey to a smarter, safer home begins with this simple upgrade.



