
You may need to swap your current lock after moving into a new house or losing your keys. Learning how to change a deadbolt lock ensures only you hold access to your home while replacing worn hardware.
This guide walks you through gathering tools, removing old parts, and installing a fresh unit in under thirty minutes. You will finish with a secure door and total confidence in your locking system.
Gather Essential Tools for Deadbolt Replacement

Collecting the right items before you start prevents frustrating trips to the hardware store mid-project. Most homeowners already own these basic tools in their standard toolbox.
Required Equipment List
- Phillips or flathead screwdriver matching your current screws
- Tape measure for checking door thickness and backset distance
- Utility knife to clear paint or debris from the door edge
- Pencil for marking drill points if adjustments are needed
- New deadbolt set matching your door specifications
Ensure your new lock fits doors between 1-3/8 inches and 1-3/4 inches thick. Most kits include necessary screws and templates for easy installation.
Remove the Existing Deadbolt Assembly
Start the process by taking out the old hardware to inspect the door condition. This step clears the path for your new security upgrade.
Locate and Unscrew Interior Components
Find the two screws on the inside face of your door that hold the lock together. Remove them carefully with your screwdriver and pull the interior and exterior halves apart.
Pro Tip: Place removed screws in a small bowl so they do not get lost in carpet fibers.
Extract the Bolt Mechanism
Look at the edge of the door where the bolt slides in and out. Remove the two screws holding the mechanism to the door frame and slide the entire assembly out.
Check the wood around the hole for rot or old paint buildup. Use your utility knife to scrape away debris so the new unit sits flush against the surface.
Verify Door Measurements Before Installation

Not every deadbolt fits every door, so precise measuring prevents installation errors. Skipping this step often leads to buying the wrong product.
Measure the Backset Distance
The backset is the space from the door edge to the center of the large hole. Standard residential doors use either a 2-3/8-inch or 2-3/4-inch measurement.
Your new lock must match this number exactly or offer an adjustable latch. Measure twice to ensure you purchase the correct model for your specific door.
Confirm Door Thickness Specifications
Standard exterior doors range from 1-3/8 inches to 1-3/4 inches in thickness. Compare your tape measure reading with the package details of your new lock.
Thicker or thinner doors may require special adapter plates or extended bolts. Installing a mismatched lock can cause the mechanism to bind or fail completely.
Install the New Deadbolt Hardware
Follow the manufacturer instructions included with your specific model for the best results. These general steps apply to most standard deadbolt replacements.
Insert the Latch Into Door Edge
Slide the new latch into the side of the door with the curved side facing the door frame. Secure it firmly with the two provided screws without overtightening.
Warning: Overtightening can warp the metal or strip the wood screws immediately.
Mount the Exterior and Interior Units
Push the exterior cylinder through the front hole until it rests against the latch mechanism. Align the interior assembly on the other side and thread the connecting screws.
Tighten the screws alternately to ensure even pressure on both sides. Test the thumb turn to verify the bolt extends and retracts smoothly without resistance.
Test Bolt Operation and Alignment
A properly installed lock must engage easily with the strike plate on the door frame. Testing reveals minor adjustments needed before final tightening.
Operate the Lock Manually
Turn the key and thumb turn several times to check for smooth movement. If the bolt sticks, loosen the mounting screws slightly and realign the components.
Minor shifts in position often eliminate friction points inside the door edge. Retighten the screws once the motion feels fluid and consistent.
Align Bolt With Strike Plate
Close the door and try to extend the bolt into the frame hole. If it hits the metal plate instead of sliding in, mark the contact point with a pencil.
Use a file to enlarge the hole or loosen the strike plate screws to shift its position. Proper alignment prevents wear on your new lock and ensures reliable security.
Tighten Hardware and Secure Installation
Finalize the job by ensuring every screw is snug and the unit feels solid. Loose hardware leads to premature failure and security gaps.
Check All Screw Connections
Go over every screw on the latch, interior plate, and exterior cylinder one last time. Ensure they are tight but not stripped from excessive force.
Perform Final Security Tests
Lock the door from the inside and outside to confirm full functionality. Try to wiggle the door when locked to ensure the bolt holds firm against pressure.
A secure deadbolt should prevent any door movement when fully engaged. Repeat the locking cycle multiple times to guarantee consistent performance.
Choose High-Grade Locks for Maximum Safety
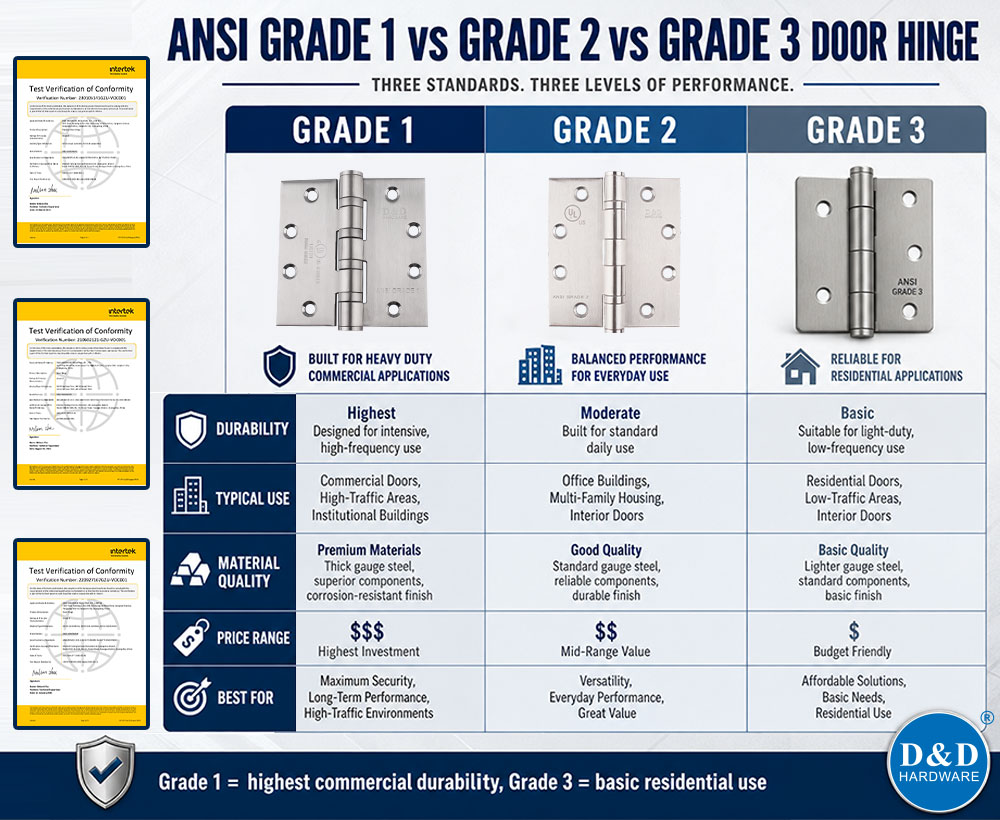
Upgrading your hardware is the perfect time to select a higher security rating. Better locks resist forced entry attempts more effectively than basic models.
Understand ANSI Grading Systems
The American National Standards Institute rates deadbolts by durability and security strength. Grade 1 offers the highest protection while Grade 3 provides basic coverage.
Select a Grade 1 or Grade 2 deadbolt for superior home defense. These units withstand more force and last longer under daily use conditions.
Add Frame Reinforcement Options
Strengthen your entryway by installing longer screws in the strike plate. Three-inch screws reach deep into the wall stud for added resistance against kick-ins.
Consider metal jamb armor plates for extra protection around the lock area. These upgrades make forced entry significantly harder for intruders to achieve.
Troubleshoot Common Installation Problems
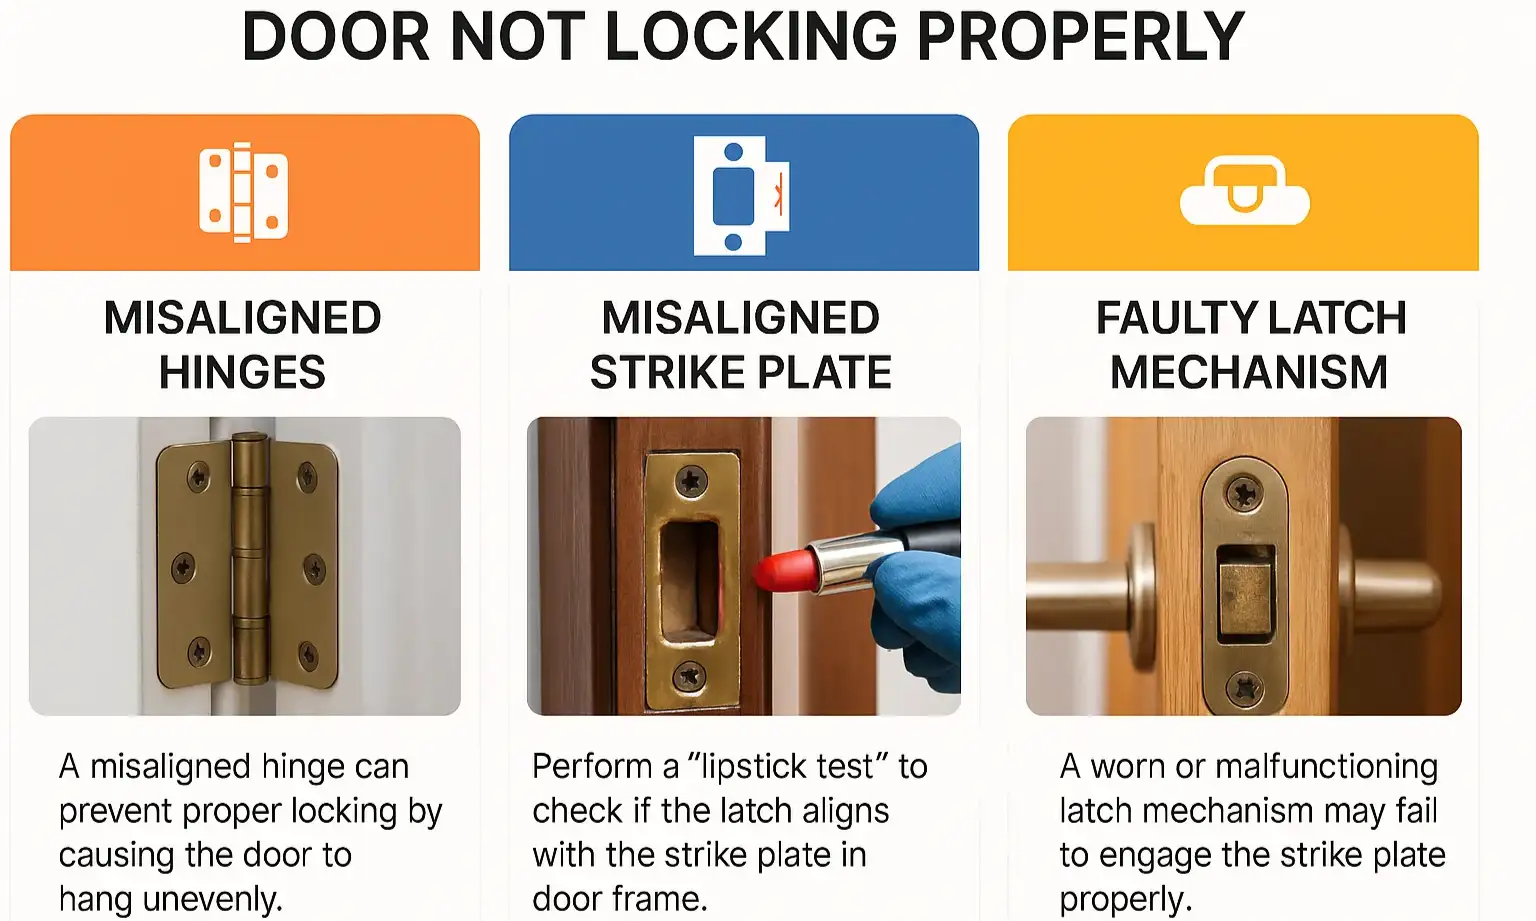
Even careful installers sometimes encounter issues during the process. Knowing how to fix these problems saves time and frustration.
Fix Bolt Extension Issues
If the bolt does not extend fully, check for obstructions in the door edge. Ensure the latch orientation matches the door swing direction.
Repositioning the interior assembly often resolves binding issues quickly. Loose components can cause misalignment that stops the bolt from shooting out.
Resolve Stiff Key Turning
Hard turning usually indicates misalignment or a need for lubrication. Apply dry graphite powder to the keyway rather than oil-based products.
Oil attracts dirt and gums up internal pins over time. Ensure the exterior cylinder sits straight within the borehole for smooth operation.
Stop Lock Wobble
A wobbly lock often results from loose screws or oversized holes. Tighten all visible screws to see if stability improves immediately.
Fill stripped holes with wooden toothpicks and wood glue before reinserting screws. This trick creates a tighter grip for the hardware to hold securely.
Know When to Call a Professional Locksmith
Most replacements are simple DIY tasks, but some situations need expert attention. Recognizing these scenarios prevents costly mistakes or damage.
Address Structural Door Damage
Call a pro if your door frame is cracked or the wood is rotted. A broken frame compromises security regardless of how new the lock is.
Carpenters or locksmiths can repair structural issues before installing new hardware. Ignoring frame damage renders even the best deadbolt ineffective.
Handle Complex Electronic Systems
Smart locks and high-security brands often require specialized knowledge. Professional installation ensures warranty validity and proper electronic function.
Technicians can integrate new locks with existing alarm systems seamlessly. Complex access control systems benefit from expert calibration and setup.
Maintain Your Deadbolt for Longevity
Regular care keeps your new lock functioning smoothly for years. Simple maintenance prevents sudden failures when you need security most.
Lubricate Moving Parts Annually
Clean dust from the keyway using compressed air once a year. Apply graphite lubricant to the bolt and cylinder to maintain smooth operation.
Wipe metal surfaces with a dry cloth to prevent corrosion buildup. Avoid using wet lubricants that attract grime and damage internal mechanisms.
Inspect for Wear Signs Regularly
Check for loose screws or scratches around the keyhole periodically. Difficulty turning the key signals a need for immediate attention.
Addressing small issues early prevents complete lock failure later. Regular inspection extends the life of your investment significantly.
Frequently Asked Questions About Changing Deadbolt Locks
Can I change a deadbolt myself without special skills?
Yes, most homeowners can replace a deadbolt using basic tools like a screwdriver and tape measure. The process typically takes 20 to 30 minutes if the door requires no major modifications.
How do I know which backset size I need?
Measure from the edge of your door to the center of the existing hole. Most homes use either a 2-3/8-inch or 2-3/4-inch backset, and many new locks accommodate both sizes.
Do I need to drill new holes for a replacement lock?
Usually not, as replacement locks fit standard boreholes. You only need to drill if your current hole is damaged or if you are switching from a knob to a deadbolt.
What type of lubricant works best for deadbolts?
Use dry graphite powder because it does not attract dirt or gum up internal parts. Avoid oil-based lubricants like WD-40 which can cause the mechanism to fail over time.
When should I replace my deadbolt entirely?
Replace your lock if you lose keys, move into a new home, or notice signs of wear like sticking bolts. Upgrading to a higher grade lock also improves overall home security significantly.
Key Takeaways for Changing Your Deadbolt Lock
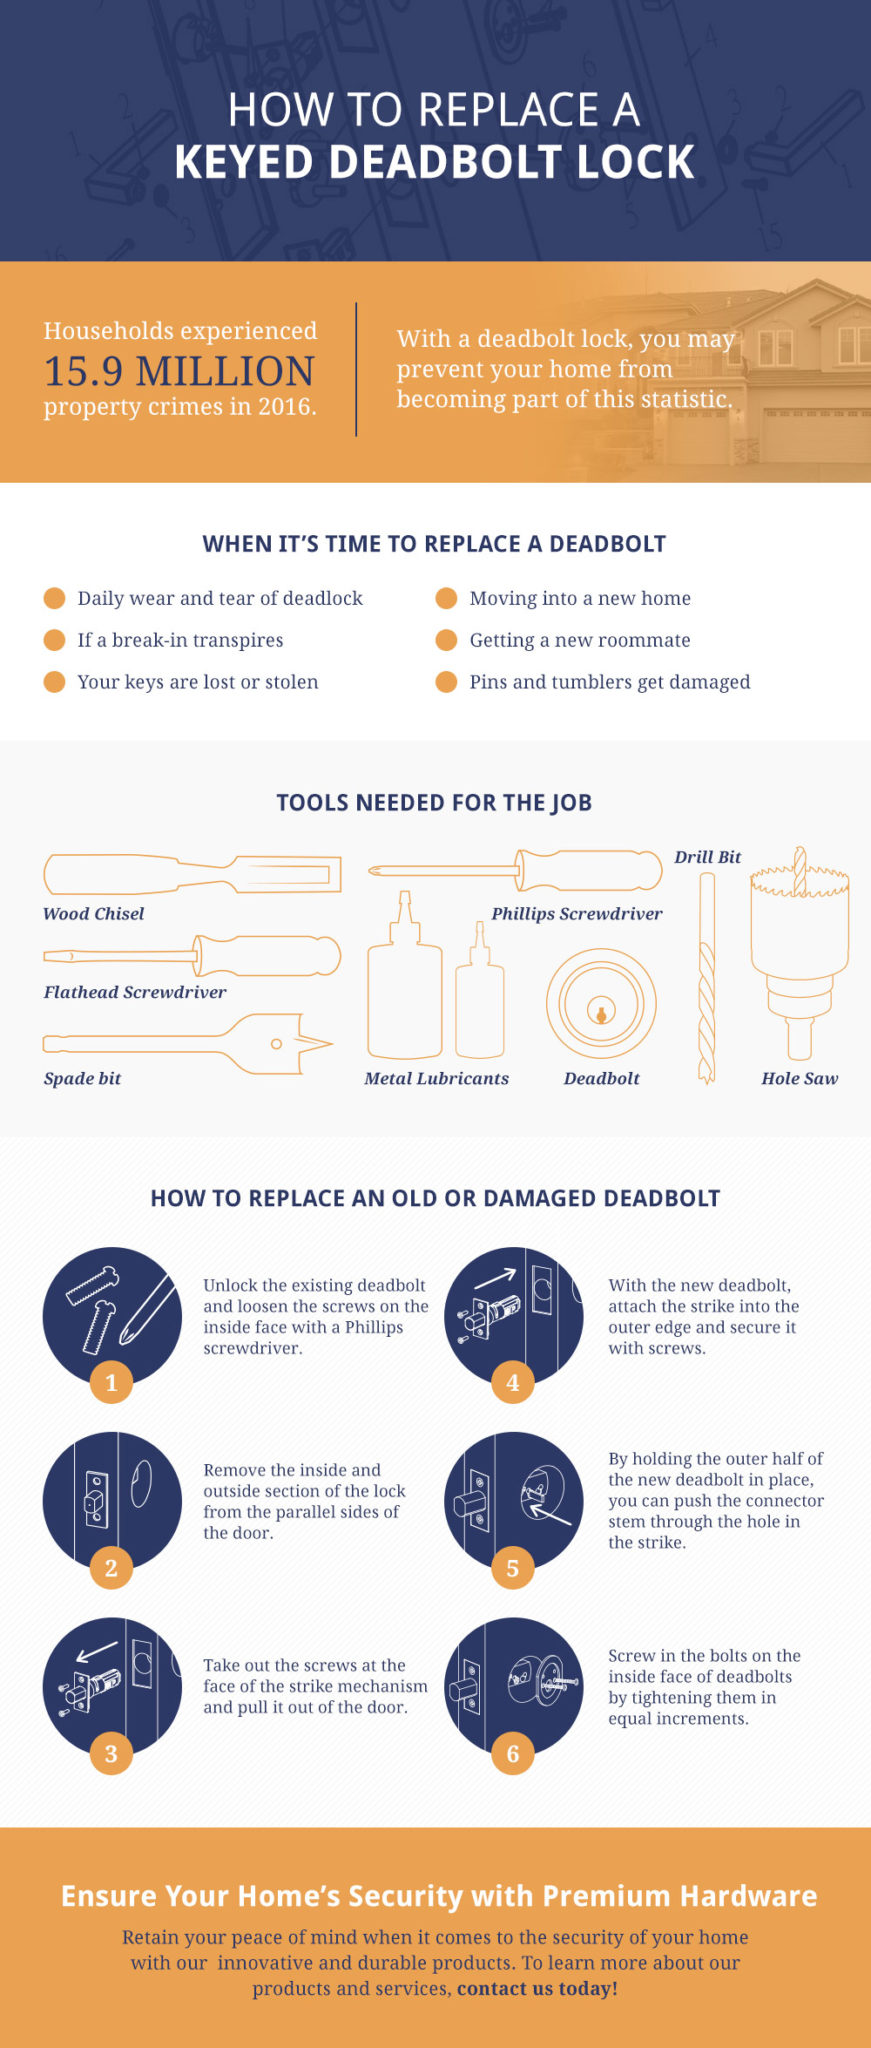
Replacing your deadbolt is a quick project that dramatically improves home safety and peace of mind. By gathering the right tools and measuring carefully, you can install a new lock in under thirty minutes without professional help.
Remember to choose a Grade 1 or Grade 2 lock for the best protection and maintain it with annual graphite lubrication. Take action today to secure your home by swapping out old or compromised hardware.



