
Does your Andersen sliding glass door refuse to lock or feel stiff when you turn the handle? You are not alone as Andersen sliding door lock repair is a common task that fixes misalignment and dried mechanisms in minutes. Most homeowners face this frustrating issue where the thumb latch won’t catch or the key sticks in the cylinder.
You can solve these problems yourself with basic tools and simple adjustments outlined in this guide. We will walk you through diagnosing the root cause and restoring smooth one-handed operation without calling a technician. Learn how to adjust screws, apply the right lubricant, and prevent future failures effectively.
Adjust the Thumb Latch for Proper Engagement
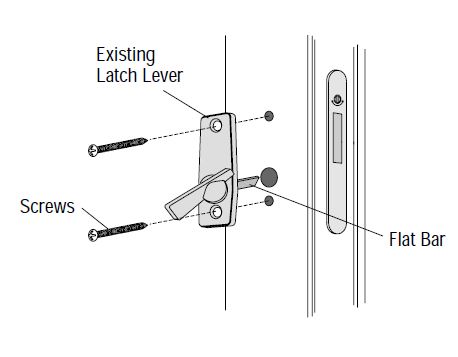
Misalignment is the leading cause of locking failure on Andersen sliding doors. The thumb latch hook simply does not extend far enough to reach the strike plate on the frame. This issue usually requires a minor adjustment rather than a full part replacement.
Locate and Turn the Adjustment Screw
The solution involves a tiny flathead screw located near the latch housing. This specific screw controls the projection distance of the latch hook.
- Open the door slightly to access the edge mechanism.
- Find the small flathead screw on the side of the latch assembly.
- Turn the screw counterclockwise by a quarter to half a turn.
- Watch as the internal stop moves outward to extend the latch further.
This small tweak often transforms a non-locking door into one that clicks securely into place.
Verify Latch Extension and Reach
You must test the mechanism after making any screw adjustments. Close the door fully and attempt to turn the thumb latch to see if it catches.
- The latch should engage the strike plate with minimal effort.
- If it misses, loosen the screw slightly more but do not remove it completely.
- Stop adjusting when the latch extends fully without wobbling.
Over-loosening creates instability so find the sweet spot where the latch catches firmly.
Replace Worn Components if Needed
Sometimes adjustment alone cannot fix a broken or severely worn mechanism. You may need to replace the thumb latch and strike plate as a matched set.
A compatible replacement kit costs under $30 and installs quickly with basic tools. Always match the model number to your specific door for a proper fit.
Lubricate Internal Mechanisms for Smooth Turning
Stiffness and sticking indicate internal friction caused by dirt or dried grease. A complete maintenance service restores fluid motion to the gears and pivot points.
Gather Required Tools and Lubricants
You need specific items to perform this repair correctly without damaging the lock. Using the wrong products can attract dust and ruin the mechanism.
- Phillips head screwdriver
- Small flathead screwdriver or paper clip
- White lithium grease spray
- Clean rag for wiping grime
Avoid standard oil-based sprays like multipurpose WD-40 because they attract dust and gum up over time.
Remove the Latch Assembly Completely
Start by opening the door fully to access both sides of the locking mechanism. Unscrew the inner and outer plates securing the latch to the door frame.
- Set all screws aside in a safe container.
- Gently pull the entire latch assembly out of the door edge.
- Wipe away any grime from behind the mounting plates.
Dirt buildup in this area restricts movement even after you apply new lubricant.
Extract the Replaceable Lock Cartridge
Andersen doors feature a modular design with a replaceable lock cartridge. This component slides out easily for deep cleaning.
Use your fingers or a flat tool to gently pry the cartridge from the housing. No force is needed since it is designed for easy removal. Once out you can see the gear mechanism and pivot points clearly.
Apply Grease to Critical Friction Points
Use white lithium grease for long-lasting and clean performance on all moving parts. Apply sparingly to avoid attracting debris that causes future sticking.
Keyhole: Pop open the cover with a paper clip and squeeze in a tiny amount. Insert the key and rotate it to spread the grease evenly.
Notch Area: Apply a dab near the rotating notch and turn the lock back and forth.
Pivot Points: Target the hinges inside the mechanism where high friction occurs.
Top and Bottom Gears: Coat the gear teeth that drive the locking bolt directly.
Bottom Gear Section: Focus on the lower engagement point to ensure full coverage.
Too much grease attracts dust so remember that less is more.
Reinstall and Align the Mechanism
Slide the lubricated cartridge back into the housing carefully. Ensure the latch is in the unlocked position before reattaching the inner and outer plates.
Align the plates with the cartridge slots before tightening the screws. Use the least-damaged screw on the visible side for a clean finish. Tighten securely but do not over-tighten to avoid stripping holes.
Test Operation with Safety Tab Engaged
You must simulate a closed door to test the lock properly. Press in the white plastic safety tab located near the latch to bypass the interlock.
- Turn the thumb latch from the inside to check for smooth motion.
- Use the key from the outside to ensure it turns with little resistance.
If it still sticks disassemble and apply a bit more lubricant to the gears.
Diagnose Specific Lock Failure Symptoms

Not every lock problem requires the same fix. Use this section to identify your specific issue and apply the correct solution.
Latch Fails to Catch Strike Plate
This symptom indicates misalignment between the latch and the frame. Start with the screw adjustment method to extend the latch reach.
Loosen the flathead screw slightly and test engagement repeatedly. If it still fails inspect the strike plate for bending or wear.
Latch Feels Stiff or Sticky
Dry or dirty internal components cause this resistance. Perform the full lubrication service to clean and grease the gears.
Remove the cartridge and clean all pivot points thoroughly. Avoid forcing the latch as it can break internal components.
Key Turns With Difficulty
This issue points to a dry key cylinder or internal gear friction. Lubricate the key cylinder and internal gears with graphite or white lithium grease.
Work the key back and forth to distribute the lubricant. Replace the lock cartridge if the problem persists after lubrication.
Latch Wobbles or Feels Loose
Loose mounting screws often cause a wobbly latch feeling. Tighten the screws first without over-tightening them.
If the wobble continues the latch housing may be worn out. Replace the entire assembly to ensure reliable security.
Complete Lock Failure
Total failure means the mechanism is beyond simple repair. Replace the thumb latch assembly and strike plate with a new kit.
Choose an OEM or high-quality compatible aftermarket kit. Installation takes under 15 minutes and restores full security immediately.
Understand Andersen Lock Design Features
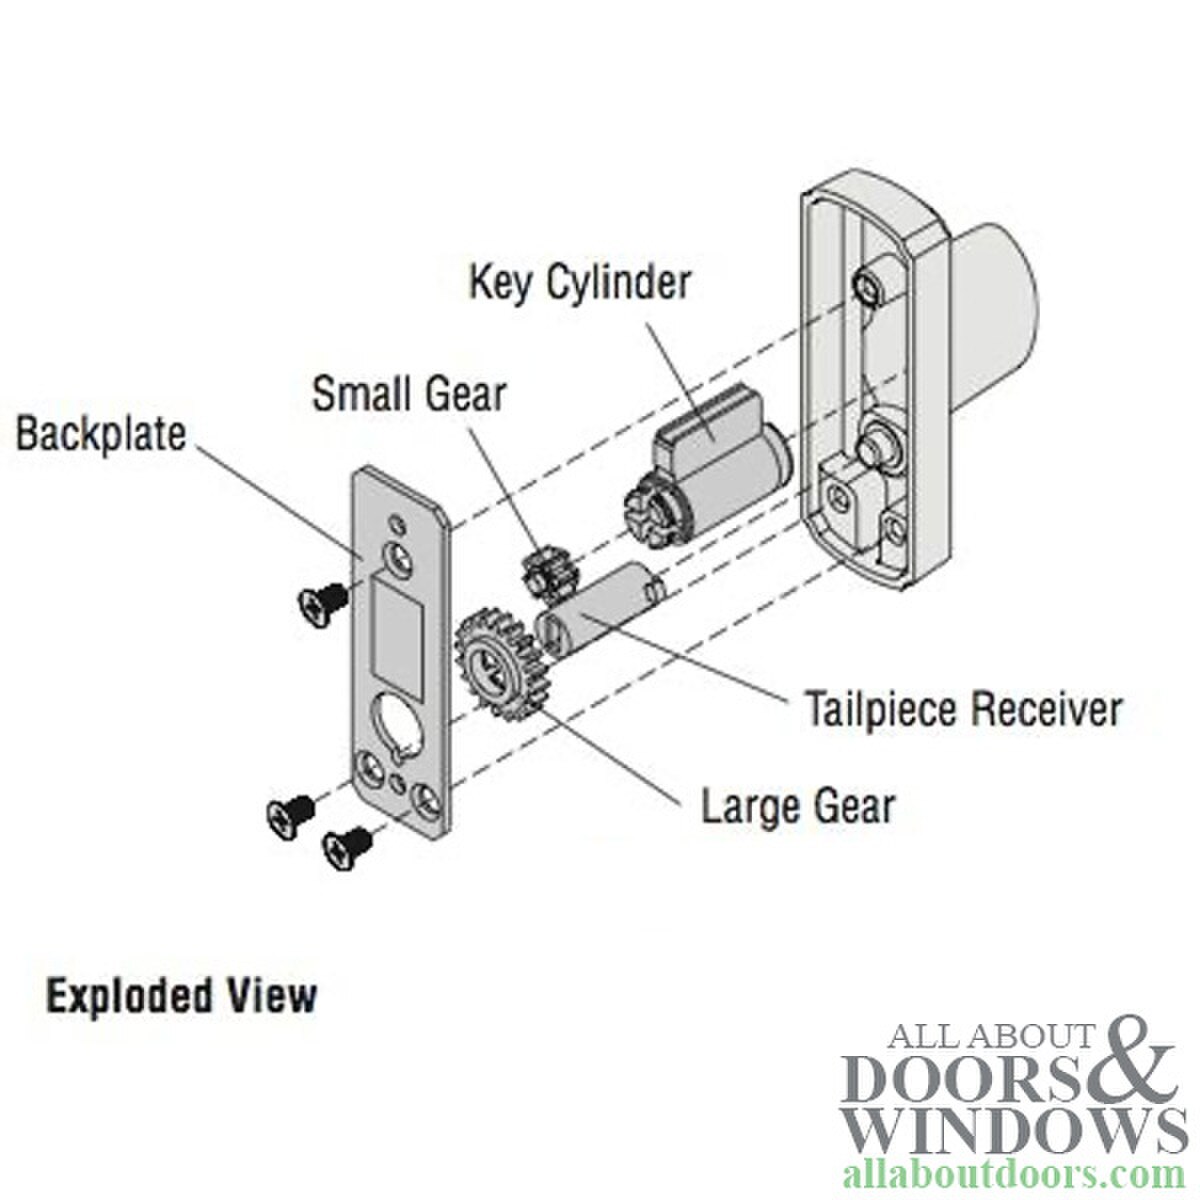
Knowing how your lock works helps you fix it faster and avoid common mistakes. Andersen uses specific design elements that differ from standard locks.
Modular Cartridge System Benefits
Andersen utilizes a modular lock cartridge system for easier repairs. You do not need to replace the whole mechanism when one part fails.
Just pull out the old cartridge and swap it with a new one. This design saves significant time and money during repairs.
Safety Tab Function Explained
The white plastic tab prevents locking when the door is open. This is a critical safety feature and not a mechanical defect.
Always press this tab in when testing the lock with the door open. Ignoring this feature causes confusion during troubleshooting.
Gear-Driven Mechanism Details
Two gears engage the locking bolt when you turn the handle. These gears are common friction points that require regular lubrication.
Focus your grease application on these gear teeth during maintenance. Proper lubrication here ensures smooth bolt engagement.
Pivot Point Wear Patterns
Internal arms pivot with every single use of the lock. Without lubrication these joints bind and cause stiffness.
Focus grease on these joints during your annual maintenance check. This prevents premature wear and tear on the mechanism.
Save Money With DIY Repair Strategies
Most Andersen lock problems do not require professional help. You can restore full function with a screwdriver and inexpensive lubricant.
Utilize Common Household Tools
You likely already own the tools needed for this repair. No specialty equipment is required to fix most lock issues.
- Flathead and Phillips screwdrivers
- Paper clip for keyhole covers
- Clean rag for wiping grime
These simple tools are all you need to complete the job.
Choose Long-Lasting Lubricants
White lithium grease outperforms other options for door locks. It resists dust and grime while providing smooth operation.
Avoid silicone sprays and multipurpose oils that attract dirt. The right lubricant lasts longer and keeps the mechanism clean.
Cost-Effective Replacement Parts
If repair fails replacement parts are affordable and easy to find. Thumb latch assemblies cost between $20 and $30 typically.
Strike plates range from $10 to $15 depending on the model. All parts install in minutes with your existing basic tools.
Restore Reliable One-Handed Operation
The ultimate goal of Andersen sliding door lock repair is smooth reliable one-handed use. Your door should lock effortlessly without jiggling or forcing.
Benefits of Proper Maintenance
Regular care provides reliable security and extends hardware life significantly. You avoid costly replacements by fixing small issues early.
- Reliable security ensures the lock engages every time.
- Extended hardware life means components last for years.
- Ease of use eliminates frustration at the door.
A few minutes of maintenance now prevents hours of hassle later.
Final Tips for Success
Never force the latch as it can break the internal hook instantly. Do not over-lubricate because excess grease traps dirt and worsens performance.
Align the mechanism before tightening screws to ensure smooth operation. Use OEM or compatible parts from trusted brands for best results.
Your Andersen sliding door lock will work like new with the right approach. No technician is required for these common fixes.
Frequently Asked Questions About Andersen Sliding Door Lock Repair
How often should I lubricate my Andersen sliding door lock?
You should lubricate the lock mechanism every one to two years. Regular maintenance prevents dirt buildup and keeps the gears moving smoothly.
Can I use WD-40 to fix my sticky door lock?
No you should not use standard WD-40 as it attracts dust. Use white lithium grease or graphite lubricant designed specifically for locks.
Why won’t my Andersen sliding door latch catch?
The latch usually fails to catch due to misalignment. Adjust the small flathead screw on the latch housing to extend the hook reach.
Is the white plastic tab on my lock broken?
No the white plastic tab is a safety feature that prevents locking when open. Press it in to test the lock when the door is open.
Do I need to replace the entire lock if it sticks?
Rarely do you need a full replacement for a sticking lock. Cleaning and lubricating the internal cartridge usually solves the problem.
What tools do I need for Andersen lock repair?
You only need a Phillips screwdriver a flathead screwdriver and lubricant. These common tools allow you to adjust or service the lock easily.
Key Takeaways for Successful Andersen Sliding Door Lock Repair

Fixing your Andersen sliding door lock repair issues is straightforward with the right knowledge. Most problems stem from simple misalignment or lack of lubrication rather than broken parts. You can restore smooth operation in under 30 minutes using basic household tools.
Remember to adjust the thumb latch screw for engagement issues and use white lithium grease for stiffness. Regular maintenance every year prevents future failures and extends the life of your hardware. Start with these simple steps today to secure your home and eliminate frustration.



