
Sliding glass doors often become weak points in home security because their standard latches fail or lack strength. Learning how to install sliding door lock systems correctly stops intruders from forcing entry through these vulnerable spots. You will gain clear steps for adding auxiliary locks, replacing worn handles, or swapping mortise latches with precision. This guide ensures you use the right drill bits and measurements for a secure fit every time.
Select the Correct Lock Type for Your Door

Choosing the right hardware depends on whether you need a secondary barrier or a full primary mechanism replacement. Understanding your specific situation prevents buying the wrong parts and wasting time on incompatible installations.
Evaluate Auxiliary Security Needs
An auxiliary lock acts as a secondary barrier installed directly on the track or frame. This option works best for renters or those wanting a quick security boost without removing existing hardware. Common types include pin locks and slide bolts that block the door from moving along the track.
Assess Primary Handle Condition
Replace the main handle and keeper if your current latch feels stiff or fails to catch fully. Signs you need this upgrade include keys that jam or latches that do not retract smoothly. This process involves swapping the interior and exterior handles along with the metal strike plate on the frame.
Identify Mortise Latch Requirements
Mortise latches sit inside the door edge and require specific lever angles to function. You must match the internal lever angle, often 45 degrees, or the handle will not operate the bolt. Failure to match this angle results in a lock that looks installed but cannot engage.
Gather Essential Tools and Materials
Success relies on having the correct drill bits and safety gear before you start drilling into metal or wood frames. Missing a single tool can halt your progress or lead to inaccurate holes that compromise security.
Required Tool Inventory
You need a measuring tape for spacing and a pencil for marking precise drill points. A power drill creates pilot holes while safety glasses protect your eyes from metal shavings. Use a level to ensure the new keeper sits perfectly straight on the frame.
Specific Drill Bit Sizes
| Bit Size | Application |
|---|---|
| 3 mm metal bit | Creates pilot holes for mounting screws |
| 12.7 mm metal bit | Drills the receiver hole for the lock bolt |
Necessary Hardware Components
Your kit should include a patio door lock with a bolt and plastic receiver insert. Purchase upgraded screws that are thicker and longer than standard ones for metal-reinforced frames. These stronger fasteners prevent stripping and ensure the lock stays secure under pressure.
Install an Auxiliary Sliding Door Lock

Adding a secondary lock provides an extra layer of defense against forced entry attempts. Follow these steps to position and mount the device accurately on your door frame.
Position the Lock on the Frame
Open the sliding door fully to access the fixed frame near the top or bottom. Place the lock so there is exactly a 2.5 mm gap between the bolt and the edge of the moving door panel. Mark the screw holes with a pencil once you achieve this precise spacing.
Pro Tip: Install the lock high up if children are present but keep it within easy reach for adults.
Drill Pilot Holes and Mount
Put on your safety glasses before drilling into the frame to prevent eye injury. Use the 3 mm metal drill bit to create pilot holes at your marked locations. Align the lock body and secure it firmly with screws without over-tightening.
Mark the Receiver Location
Close the sliding door completely to ensure accurate alignment for the receiver. Engage the lock so the bolt presses against the door surface and leaves a visible mark. Use this mark as the exact center point for drilling the receiver hole.
⚠️ Critical: The door must be fully closed during this step or the lock will not align properly.
Drill Receiver and Insert Plastic Plug
Switch to the 12.7 mm metal drill bit for the receiver hole. Drill slowly at the marked center point and stop immediately before the bit exits the other side of the door. Push the plastic receiver into the hole until it sits flush with the surface.
Test the Auxiliary Mechanism
Open and close the door to verify the bolt slides smoothly into the receiver. If the bolt binds or misses, recheck your 2.5 mm gap and alignment. A successful installation means the door cannot be jimmied open when locked.
Replace the Primary Handle and Keeper

Upgrading the main handle fixes wear issues and improves the overall security of your entryway. This process removes old components and installs a fresh locking mechanism with a properly aligned keeper.
Remove Old Handle and Keeper
Locate the two screws on the interior side of the handle and unscrew them carefully. Pull the handle off both sides and inspect the internal latch for wear or stiffness. Remove the old metal keeper from the frame by unscrewing its two mounting bolts.
❗ Note: Use a hand screwdriver if screws are stripped to avoid causing further damage to the frame.
Install the New Handle Set
Insert the new handle into the door and align it with the existing holes. Secure the components by inserting and tightening the screws firmly. Reattach both interior and exterior parts to complete the handle assembly.
Level and Secure the New Keeper
Hold the new keeper against the frame where the latch extends to meet it. Use a level to ensure the plate is perfectly straight before tightening any screws. Adjust the position slightly up or down until the latch clicks in smoothly without force.
🔍 Visual Cue: The latch should slide into the keeper effortlessly without wobbling or sticking.
Perform Dual-Side Testing
Test the lock from the outside using the key to ensure a solid click. Turn the thumb lever from the inside to confirm the latch retracts instantly. Repeat this cycle five to ten times to guarantee smooth operation.
Replace a Mortise-Style Latch Mechanism
Fixing a broken internal latch requires precision to match the lever angle and adjust the bolt extension. This advanced repair restores functionality to doors with embedded locking mechanisms.
Confirm Lever Angle and Type
Remove the handle by unscrewing the mounting bolts to expose the internal latch. Inspect the lever slot angle, which is commonly 45 degrees in most models. Purchase a replacement latch with the exact same angle to ensure the handle connects properly.
❌ Warning: A vertical or horizontal lever will not connect with your handle and will cause total lock failure.
Extract the Old Latch Assembly
Unscrew the top and bottom mounting screws holding the latch in the door edge. Slide the old latch out carefully and remove the internal lever mechanism. Save the original screws in case they are reusable for the new installation.
Install New Latch and Adjust Height
Insert the new latch into the channel without tightening the screws yet. Temporarily reattach the handle to test alignment and ensure the lever moves freely. Loosen the latch screws slightly to allow vertical movement if the bolt does not catch the keeper.
Tune Bolt Extension with Set Screw
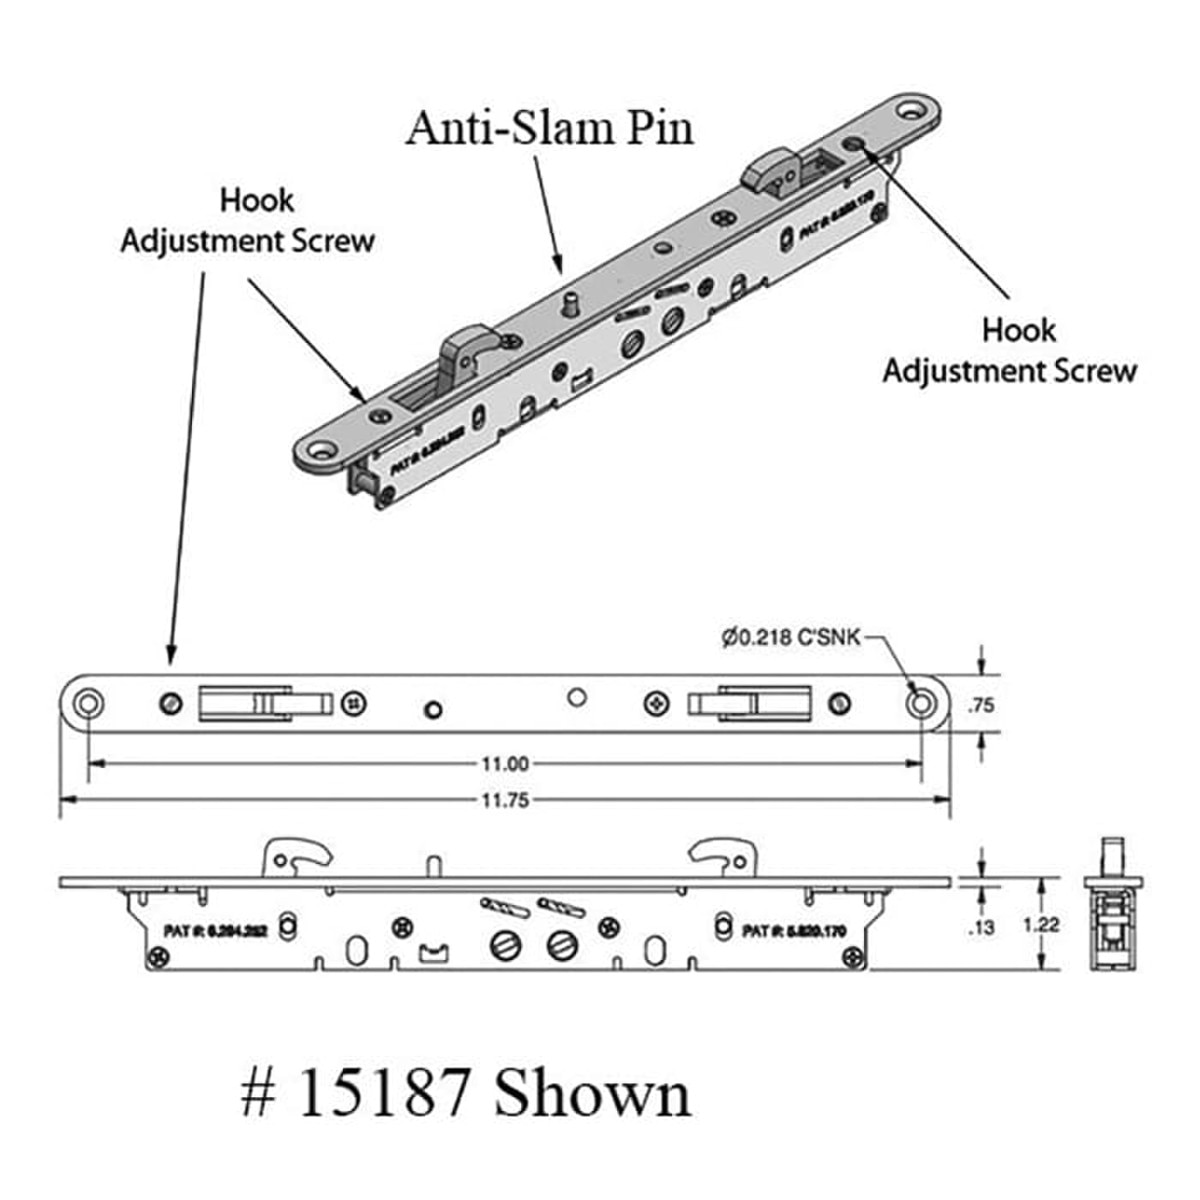
Locate the flathead set screw on the latch body to control bolt length. Turn it clockwise to extend the bolt further or counterclockwise to retract it. Aim for an extension that catches securely behind the keeper without binding.
Secure with Upgraded Screws
Replace original small screws with larger, thicker ones for metal-reinforced doors. Pre-drill pilot holes with a 3 mm bit to prevent stripping the new hardware. Tighten everything down once you confirm the latch operates smoothly.
Troubleshoot Common Installation Issues
Addressing problems early ensures your new lock provides maximum security and longevity. Use these solutions to fix common alignment and operational errors.
Fix Latch Not Catching
The latch may be too low or the bolt not extended enough to reach the keeper. Lower the latch position slightly and turn the set screw clockwise to extend the bolt further.
Resolve Latch Binding
Binding occurs when the bolt extends too far or the latch is misaligned vertically. Turn the set screw counterclockwise to retract the bolt and check vertical alignment with a level.
Prevent Screw Stripping
Stripped screws often result from using power tools on metal frames or over-tightening. Use a hand screwdriver for removal and pre-drill pilot holes before installing upgraded thicker screws.
Correct Incomplete Locking
This issue usually means the door was not fully closed during installation or the lever angle is wrong. Re-verify your 2.5 mm clearance and ensure the lever angle matches the handle exactly.
Verify Final Operation and Security
Thorough testing confirms that your installation efforts have resulted in a secure and functional door. Do not skip these final validation steps.
Conduct Dual-Side Function Test
Lock the door with the key from the outside and listen for a solid click. Unlock it from the inside using the thumb turn to ensure instant release. Repeat this process ten times to verify consistency.
Perform Multiple Cycle Checks
Open, close, and lock the door repeatedly to check for resistance. Ensure there is no binding or partial latching during any cycle.
Validate Physical Security
Try to lift or shake the door while it is locked to test stability. The auxiliary lock should prevent movement while the primary latch holds firm against pulling.
Maintain Your Sliding Door Lock System
Regular maintenance keeps your locking mechanism working smoothly for years to come. Simple habits prevent future failures and extend the life of your hardware.
Lubricate Moving Parts Regularly
Apply WD-40 to the latch and bolt every six months to prevent stiffness. Avoid over-lubricating as dust buildup can cause sticking issues later.
Inspect Hardware Annually
Check for worn keepers, loose screws, or misaligned latches once a year. Look for signs of rust or corrosion that might weaken the mechanism over time.
Upgrade Proactively for Safety
Replace flimsy plastic receivers with metal inserts for better durability. Install anti-lift blocks to prevent anyone from removing the door from the track.
Frequently Asked Questions About Sliding Door Locks
What drill bit size do I need for the receiver hole?
You must use a 12.7 mm metal drill bit specifically for drilling the receiver hole where the bolt enters. Using a smaller bit will prevent the bolt from engaging, while a larger one may compromise structural integrity.
How far should the bolt be from the door edge?
Maintain a precise distance of 2.5 mm between the bolt and the edge of the sliding door panel. This gap ensures the bolt engages fully without binding when the door is closed.
Why is my new mortise latch not working with the handle?
The internal lever angle likely does not match your handle mechanism. Most levers require a 45-degree angle, and a mismatch prevents the handle from operating the bolt.
How do I stop screws from stripping in metal frames?
Pre-drill pilot holes with a 3 mm bit and use a hand screwdriver for initial tightening. Replace standard screws with larger, thicker upgraded screws designed for metal reinforcement.
Can I install these locks without removing the door?
Yes, you can install auxiliary locks and replace handles without removing the door from its track. However, ensure the door is fully closed and stable during installation for accurate alignment.
Key Takeaways for Installing Your Sliding Door Lock
Securing your home starts with choosing the right lock type and following precise installation steps. Whether you add an auxiliary lock or replace a mortise latch, accurate measurements and correct drill bits are essential. Always test your work thoroughly from both sides to ensure reliable security.
Take action today by gathering your tools and inspecting your current sliding door hardware. A few minutes of proper installation can prevent a break-in and give you lasting peace of mind.



