
A sliding door that fails to lock creates an immediate security risk for your home. If the handle spins freely or the latch refuses to catch, you need to know how to change sliding door lock hardware quickly.
This guide walks you through diagnosing the broken spring, removing the old mortise latch, and installing a new kit in under 30 minutes. You will learn the specific tools required and the pro techniques needed to prevent the latch from falling inside your door frame.
Diagnose Why Your Sliding Door Lock Fails

Most sliding door lock failures stem from a single internal component. The brass mortise latch contains a small spring that pushes the locking hook outward. When this spring snaps, the mechanism cannot function.
Identify Broken Spring Symptoms
You can confirm a broken spring without removing the hardware yet. Look for these specific signs of internal failure.
* The latch hook does not extend when you flip the lock lever.
* The handle turns loosely with no resistance or clicking sound.
* The door locks only intermittently or requires constant jiggling.
Since the spring is sealed inside the housing, you cannot repair just that part. You must replace the entire latch assembly to restore security.
Verify Latch Dimensions Before Buying
Purchasing the correct replacement kit requires precise measurements. Sliding doors use a mortise latch that fits into a rectangular pocket cut into the door edge.
* Measure the length, width, and depth of your existing latch.
* Measure the total thickness of your door from the outer edge to the inner side.
Using a latch with incorrect dimensions will prevent the handles from aligning. It may also cause the screws to miss the internal framing entirely.
Gather Essential Tools for Lock Replacement
You do not need a professional workshop to complete this repair. A few specific hand tools will ensure the job goes smoothly and safely.
Must-Have Tools for the Job
Collect these items before you start disassembling the door handle. Having them ready prevents delays during critical steps.
* Phillips screwdriver: A magnetic tip is highly recommended for holding screws.
* Flathead screwdriver: Use this for prying the latch hook outward.
* Vice grips or locking pliers: Essential for gripping the latch hook securely.
* Thin prying tool: A walnut pick or small flathead works best.
* Strong magnet: Place this below the work area to catch falling parts.
* Tape measure: Required for checking door thickness and latch size.
Skipping the magnet is a common mistake that leads to lost parts. If the latch falls into the hollow door cavity, retrieval is nearly impossible without cutting the door open.
Select the Right Replacement Kit
Standard sliding door lock kits are affordable and widely available at hardware stores. A quality kit includes both interior and exterior handles along with the mortise latch.
* Ensure the kit includes multiple screw lengths for various door thicknesses.
* Check that the latch hook style matches your door frame keeper.
* Verify compatibility with your door brand if you have a specialized model.
Universal fit kits work for most standard sliding glass doors. If your current lock uses a key, ensure the new kit includes a matching cylinder.
Remove the Old Lock Assembly Safely
Disassembly requires a specific order of operations to prevent damage. Rushing this stage often results in dropped screws or lost latch mechanisms.
Extend and Secure the Latch Hook
You must extend the locking hook before removing any screws. This provides a solid point to grip the mechanism.
1. Insert a flathead screwdriver or walnut pick into the door edge near the hook.
2. Gently push or pry the hook outward until it clicks into the extended position.
3. Clamp your vice grips firmly onto the flat side of the extended hook.
Holding the hook steady prevents the entire latch from sliding inward as you loosen the screws. Never grip the curved part of the hook as it may slip.
Unscrew and Detach Handles
With the latch secured, you can now remove the handle assembly. Support the handles with your free hand to keep them from dropping.
1. Locate the two long screws connecting the interior and exterior handles.
2. Loosen the screws using your Phillips screwdriver while holding the handles together.
3. Remove the interior handle first, then the locking tab, and finally the exterior handle.
4. Set all components aside in a safe place.
Keep the screws organized by length. You may need to reuse them if the new kit does not include the correct size for your door thickness.
Extract the Mortise Latch Mechanism
This is the most critical step where the magnet proves its value. Gravity will pull the loose latch downward once the screws are removed.
1. Locate the top and bottom screws securing the latch to the door edge.
2. Hold the vice grips tightly while loosening the bottom screw first.
3. Remove the top screw completely.
4. Slide the entire latch assembly out through the side of the door.
Place your strong magnet directly below the handle opening before starting. This catches the latch if your grip slips during extraction.
Install the New Latch Mechanism
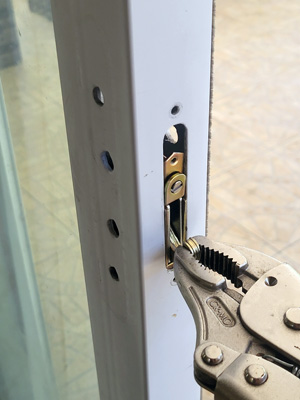
Installing the new hardware mirrors the removal process but requires careful alignment. Proper positioning ensures the lock functions smoothly for years.
Position and Insert the New Latch
Prepare the new latch before attempting to insert it into the door frame.
1. Ensure the new latch hook is fully extended.
2. Attach the vice grips to the flat side of the hook for control.
3. Insert the top of the latch into the mortise pocket first.
4. Angle the bottom of the latch gently to slide it into place without binding.
Keep the vice grips attached throughout this entire process. This gives you full control over the alignment and prevents the unit from falling inward.
Secure Latch with Mounting Screws
Once the latch is seated correctly, secure it to the door frame.
1. Insert and tighten the top screw first while holding the latch steady.
2. Insert and tighten the bottom screw next.
3. Stop tightening once the screws feel snug.
Do not overtighten these screws. Excessive force can crack the door frame or strip the screw holes, especially on doors with plastic or composite edges.
Reattach Handles and Locking Tab
Reassembling the handles requires patience to ensure perfect alignment. Misaligned handles cause binding and premature wear on the new lock.
Insert Locking Tab and Align Interior Handle
The locking tab connects the interior lever to the latch mechanism inside the door.
1. Slide the locking tab into the designated hole on the interior side.
2. Position the interior handle so the longer oval end faces inward.
3. Select the correct screw length based on your door thickness measurement.
Use a magnetic screwdriver or a second pair of hands to hold the screws during alignment. This prevents them from falling into the handle cavity.
Attach Exterior Handle and Tighten Evenly
Align the exterior handle with the interior assembly and insert both long screws. Do not tighten them fully yet.
1. Tighten one screw about half a turn.
2. Switch to the other screw and tighten it half a turn.
3. Alternate between the two screws until both are snug.
This ping-pong tightening method ensures even pressure across the handle assembly. It prevents the handles from tilting or binding against the door surface.
Adjust the Keeper Strike Plate
The keeper is the metal piece mounted on the door frame that catches the latch hook. Proper alignment here is crucial for security.
Remove Old Keeper and Install New One
Replace the old keeper even if it looks acceptable. Worn metal can cause false locking or difficulty closing the door.
1. Unscrew the two mounting screws holding the old keeper to the jamb.
2. Position the new keeper in the exact same location as the old one.
3. Screw it in loosely so you can adjust the position if needed.
Close the door and flip the lock to test the engagement. You should hear a solid click when the latch hits the keeper.
Fix Misalignment with Simple Shims
If the hook misses the keeper or hesitates, you can adjust the position easily.
* Too high or low? Slide a business card under one side of the keeper to shift it.
* Too recessed? Add a second shim behind the entire plate to bring it forward.
Re-tighten the screws while holding the shim in place. Test the lock repeatedly until the latch engages smoothly every time.
Test and Troubleshoot Your Installation
Perform a full function check before considering the job complete. This verifies that the lock is secure and operates correctly.
Perform Full Function Check
Test every aspect of the new installation to ensure safety.
1. Flip the lock lever to ensure the hook extends fully.
2. Turn the thumb-turn to verify instant retraction.
3. Use the key from the outside to check for smooth turning.
4. Slide the door open and closed five times to check for catching.
5. Pull firmly on the locked door to verify security.
Any hesitation or loose feeling indicates an alignment issue that needs adjustment.
Fix Common Post-Install Issues
Troubleshoot these common problems if the lock does not work perfectly immediately.
* Latch fell into door: This happens if no magnet was used. Prevention is the only fix.
* Screws won’t align: Loosen both screws slightly and wiggle the handles into position.
* Lock won’t engage: Adjust the keeper height using business card shims.
* Frame cracked: This results from overtightening. Replace the screw with a shorter one if necessary.
Maintain Your New Lock for Longevity
A well-installed lock lasts for years with minimal maintenance. Regular care prevents future failures and keeps your home secure.
Prevent Future Problems
Simple habits can extend the life of your new sliding door lock significantly.
* Clean the latch track every six months to remove dirt and debris.
* Lubricate sparingly with silicone spray, avoiding oil-based products.
* Check screw tightness quarterly as vibration can loosen them over time.
* Store spare keys in a known, safe place immediately after installation.
Know When to Upgrade
Consider upgrading to a reinforced lock kit if your door experiences repeated issues. Dual-point locking systems offer added security for high-traffic entryways.
Frequently Asked Questions About Changing Sliding Door Locks
Can I repair the broken spring inside my current latch?
No, you cannot repair the internal spring. The spring is sealed inside the brass housing and is not sold separately. You must replace the entire mortise latch assembly to fix the problem.
What tools do I absolutely need to change a sliding door lock?
You need a Phillips screwdriver, a flathead screwdriver, vice grips, and a tape measure. A strong magnet is also critical to prevent the latch from falling into the hollow door cavity during removal.
How do I stop the latch from falling inside my door?
Place a strong magnet directly below the handle opening before you start. Additionally, use vice grips to hold the latch hook firmly while you remove the mounting screws.
Why won’t my new lock screws align properly?
Misaligned screws usually mean the handles are not sitting flush against the door. Loosen both screws slightly, wiggle the handles into position, and tighten them alternately using the ping-pong method.
How do I fix a lock that won’t catch on the frame?
The issue is likely a misaligned keeper or strike plate. Insert a thin shim like a business card under the keeper to adjust its height or depth until the latch engages smoothly.
How long does it take to replace a sliding door lock?
Most homeowners can complete this task in 20 to 30 minutes. The process involves removing the old handles and latch, inserting the new mechanism, and adjusting the keeper plate.
Key Takeaways for Changing Your Sliding Door Lock

Replacing a broken sliding door lock is a fast and affordable way to improve home security. By diagnosing the broken spring early and using vice grips with a magnet, you can avoid common installation disasters. Remember to align your handles carefully and adjust the keeper plate for a perfect fit.
Gather your tools and a replacement kit today to restore full function to your door. With proper installation, your new lock will provide reliable security for years to come.



