
Upgrading to a smart home entry system eliminates lost keys and adds modern convenience, yet many homeowners hesitate due to fears of complex wiring or door damage. A proper electronic lock installation actually fits standard doors and requires only basic hand tools to complete in under thirty minutes.
This guide details every phase from removing old hardware to programming your new access codes and reinforcing the door frame for maximum security. You will learn precise alignment techniques, how to route internal cables without pinching, and the critical steps to ensure your new deadbolt operates smoothly for years.
Remove Old Hardware and Inspect Door Prep
Clearing the door of existing components is the essential first step before any new hardware touches the wood. You must completely remove the old deadbolt assembly and strike plate to assess the condition of the bore holes.
Extract Existing Lock Components
Use a #2 Phillips screwdriver to remove the interior and exterior faceplates of your current lock. Once the screws are out, separate both sides of the lock and pull the tailpiece from the door edge. Carefully extract the entire deadbolt mechanism from the side of the door. Move to the door frame and unscrew the old strike plate to clear the jamb completely.
Verify Bore Hole Dimensions
Inspect the large round hole on the door face and the rectangular cutout on the edge. Most modern units fit standard 2-1/8 inch cross-bores and 1 inch edge holes. Clean out any wood chips or dust to ensure a clear path for the new components. If your door has non-standard preparations, verify compatibility with your new kit before proceeding.
Install Deadbolt Mechanism with Correct Orientation

Proper alignment of the deadbolt within the door edge prevents binding and ensures the bolt extends fully every time. Incorrect orientation is a common cause of mechanical failure in new installations.
Align Bolt Top Marking Upward
Insert the new deadbolt into the edge of the door with the arrow or “TOP” marking facing upward. This specific orientation allows internal gears to engage correctly with the motor. Visually confirm the bolt sits flush with the door surface when you slide it out manually.
Trim Mortise for Flush Fit
Trace the outline of the new faceplate onto the door edge if the existing mortise is too small. Use a sharp chisel to remove excess wood in shallow passes to avoid gouging the door. The goal is a clean recess where the plate lies perfectly flat against the wood surface.
Secure Latch Plate by Hand
Fasten the latch plate to the door edge using the included screws and a hand screwdriver. Never use a power drill for this step as over-tightening can strip the wood or crack the plate. Confirm the bolt moves freely in and out without scraping the metal housing.
Route Control Cables and Mount Interior Unit
Smart locks require internal wiring to connect the exterior keypad to the interior motor housing. Proper cable management prevents connection failures and ensures the door closes tightly.
Feed Cable Through Door Bore
Route the control cable from the interior side of the door through the lower bore hole to the exterior. Some models require a top-down feed so consult your specific diagram before pulling. Ensure the cable remains straight and is not kinked or pinched during the routing process.
Connect Tailpiece to Mechanism
Insert the metal tailpiece into the slot marked “SL” or “TAIL” on the deadbolt mechanism. Slide the backplate over the cable and position it flush against the interior door surface. Hold it temporarily in place to maintain alignment while you prepare the housing.
Attach Interior Housing Securely
Tuck any excess cable into the housing cavity to prevent crushing when you close the unit. Connect the cable plug firmly to the interior smart lock port. Align the unit with the mounting holes and secure it with screws using only a hand screwdriver to avoid damage.
Mount Exterior Keypad and Security Plate
The exterior keypad must sit parallel to the door to ensure weather resistance and reliable touch input for every user. Misalignment here can cause water intrusion or button failure.
Flatten Alignment Tabs Before Mounting
Position the keypad so any rotating alignment tabs are completely flat against the back of the unit. This allows the device to slide smoothly into the mounting bracket without forcing internal connectors. Misaligned tabs will prevent full seating and may damage the electronics.
Install Security Mounting Plate
Slide the security plate behind the door from the interior side to meet the exterior screws. Look through the hole to align screw points with those on the opposite side of the door. Insert screws and hand-tighten them first before applying final pressure with a screwdriver.
Avoid Power Tool Damage Risks
Never use a power drill for final tightening of the keypad screws. Over-torquing can crack the door surface or strip the threads permanently. Ensure the keypad sits parallel to the door surface before fully securing the final screws.
Insert Batteries and Test Mechanical Operation
Battery installation must follow a specific sequence to ensure internal gears engage properly with the bolt mechanism. Skipping this step often leads to motor sync issues.
Extend Bolt Before Powering Up
Manually extend the deadbolt fully before inserting any batteries into the compartment. If the bolt is retracted during power-up, the motor may fail to sync with the gear train causing operational failure. Keep the bolt extended throughout the entire battery insertion process.
Load AA Batteries with Correct Polarity
Insert the required number of AA batteries into the interior housing or battery pack. Observe the polarity markers carefully to ensure positive and negative ends match the diagram. Snap the battery cover into place securely.
Test Manual Operation First
Use the thumb turn or mechanical key to cycle the bolt several times before programming. It should extend and retract smoothly without resistance or grinding noises. If resistance occurs, check bolt alignment and strike plate fit immediately.
Upgrade Strike Plate for Maximum Security

Reinforcing the strike plate is the most critical step in preventing forced entry and kick-in attacks. This simple upgrade significantly increases the structural integrity of your entry point.
Replace with Reinforced Strike Plate
Use the heavy-duty strike plate included with your lock kit instead of the original. If it is larger than the existing recess, trace the new outline and chisel out excess material from the door jamb. A flush fit prevents wobbling and ensures full bolt coverage.
Install 2½-Inch Security Screws
Use the extra-long 2½-inch screws to anchor the strike plate deep into the wall framing. These screws bypass the weak door jamb and lock into the structural studs of the house. Pre-drill pilot holes to avoid splitting the wood frame during installation.
Match Screw Head Finish Aesthetically
If security screws do not match the strike plate color, use a black permanent marker to blend them. This simple trick maintains a clean and professional appearance for your new hardware. It ensures the upgrade looks intentional rather than makeshift.
Program Access Codes and Configure App

Once mechanical installation is confirmed, you must configure electronic access and smart features for daily use. This step transforms the hardware into a functional smart home device.
Enter Default Master Code
Find the factory default code in your manual which is often 12345 or 00000. Press the program button usually located inside the battery compartment. Enter your desired 4 to 8 digit custom code for daily access.
Save and Confirm New User Code
Press the confirmation key such as the brand logo or “Enter” button. The lock typically responds with a beep or green flash to indicate success. Test the new code immediately by locking and unlocking the door to verify functionality.
Download and Pair Smart App
Download the manufacturer’s app such as Schlage Home for Wi-Fi or Bluetooth models. Follow pairing prompts to connect via Bluetooth and enable remote features. Set up guest codes and access logs for complete monitoring control.
Integrate with Smart Home Systems
Link your lock to Apple HomeKit, Google Assistant, or Amazon Alexa for voice commands. Set routines like “Lock at 10 PM” or “Unlock when I arrive home” for automation. This integration provides seamless control alongside your other smart devices.
Fix Common Installation Issues Quickly
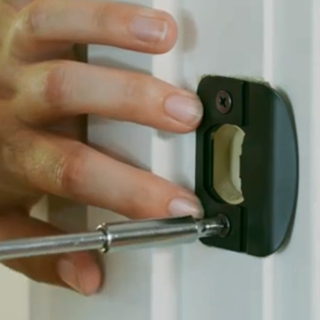
Post-installation problems are usually mechanical and easily corrected with minor adjustments. Addressing these quickly ensures long-term reliability.
Resolve Deadbolt Binding Issues
If the bolt sticks, check alignment between the deadbolt and strike plate. Gently bend the strike plate spring tab outward to create more room. If it springs back, insert a small wooden shim behind it to hold the adjustment.
Repair Stripped Screw Holes
Remove the screw and fill the hole with wood filler or a toothpick dipped in wood glue. Let it dry completely then re-drill a small pilot hole. Reinstall the screw using hand-tightening only to prevent future stripping.
Correct Crooked Keypad Alignment
Loosen the mounting screws and realign the security plate from behind the door. Ensure it is seated flat before re-tightening the screws. A misaligned plate will torque the keypad causing uneven gaps.
Troubleshoot Power Failure
If the lock does not respond, remove batteries and confirm the bolt was extended during installation. Re-extend it manually and reinsert batteries to retry. Check battery orientation and freshness if the issue persists.
Maintain Performance and Longevity
Regular upkeep ensures your electronic lock remains reliable and secure for years of daily use. Simple maintenance tasks prevent major failures.
Replace Batteries Proactively
Monitor low-battery alerts via the app or keypad beeps regularly. Replace AA batteries every 12 to 18 months even if not fully depleted. Keep a spare set accessible for emergencies to avoid lockouts.
Use Graphite Lubricant Only
Apply dry graphite powder to the mechanism if the bolt becomes stiff. Never use oil-based lubricants as they attract dust and damage electronics. This dry lubricant ensures smooth operation without residue buildup.
Test Lock Weekly
Cycle the lock manually and electronically at least once a week. This prevents gear slippage and confirms remote access still functions. Regular testing identifies small issues before they become major problems.
Update Firmware Regularly
Check the manufacturer’s app periodically for firmware updates. These patches improve security and fix bugs. They also enhance compatibility with smart home systems.
Frequently Asked Questions About Electronic Lock Installation
How long does a typical electronic lock installation take?
Most homeowners complete the process in 10 to 30 minutes using basic hand tools. The time varies based on whether you need to chisel the door edge or drill new pilot holes for security screws.
Can I install a smart lock on any standard door?
Yes, most units fit standard 2-1/8 inch bore holes and 1 inch edge holes found on residential doors. You may need to chisel the mortise slightly if your door prep is non-standard or older.
What happens if the batteries die completely?
The lock will still function with a mechanical key or a 9-volt battery jump-start feature on the exterior. You should always keep a mechanical key in a secure location for total power failure emergencies.
Do I need special tools for electronic lock installation?
You primarily need a #2 Phillips screwdriver and possibly a sharp chisel for trimming. Avoid power drills for final tightening to prevent stripping screws or cracking the door material.
How often should I change the batteries in my smart lock?
Replace batteries every 12 to 18 months or when the low-battery alert appears. Usage frequency and connectivity features like Wi-Fi can impact battery life significantly.
Key Takeaways for Successful Electronic Lock Installation
A successful electronic lock installation relies on precise alignment, hand-tightened screws, and correct battery insertion sequences. By reinforcing your strike plate with long security screws and testing mechanical operation before programming, you ensure both security and reliability.
Take time to verify the bolt orientation and cable routing to prevent future binding or connection issues. Follow the maintenance schedule for battery replacement and firmware updates to keep your system running smoothly. Start your upgrade today by gathering your tools and reviewing your specific model instructions.



