
Your new door lock sits in its box while your front door remains vulnerable, but you hesitate because drilling large holes feels risky. Learning how to install a door lock yourself saves money and boosts your home security faster than waiting for a locksmith.
This guide walks you through measuring backsets, drilling clean holes, and mounting both mechanical and smart locks without error. You will gain the confidence to complete this upgrade in under an hour using standard tools found in most garages.
Measure Handle Height and Backset Accurately

Precise measurements prevent awkward placement and ensure your new hardware fits perfectly. Skipping this step often leads to misaligned holes that compromise the entire installation.
Set the Correct Handle Height
Match the height of existing handles in your home for visual consistency. If no reference exists, use the standard residential height of 1,050 mm or 41.3 inches from the floor to the center of the handle. Place deadbolts exactly 5.5 inches above the latch center to align with standard door preparations.
Determine Your Specific Backset
The backset is the distance from the door edge to the center of the main hole. Residential doors in the US typically use a 2 3/8 inch backset while commercial doors often require 2 3/4 inches. International homes usually follow metric standards of 60 mm or 70 mm.
Mark the Center Point Precisely
Find the center of your door thickness, which is 11/16 inch on a standard 1¾-inch door. Measure your specific backset distance from the edge along this center line and mark it clearly. Transfer this mark to the door edge and draw a perpendicular line using a speed square.
Gather Essential Tools for Installation
Having the right equipment ensures clean cuts and prevents damage to your door. Poor tools often result in splintered wood or stripped screws that ruin the finish.
Required Drilling Equipment
- 2 1/8-inch hole saw for the main bore hole
- 1-inch spade bit for edge holes
- 3/8-inch drill bit for auxiliary latches
- Pilot drill bit for accurate starting points
- Smaller 24–25 mm hole saws for metric locks
Chiseling and Finishing Supplies
- 1/4-inch chisel for tight corners
- 3/4-inch chisel for removing bulk wood
- Router with mortising jig for precise recesses
- Phillips and flathead screwdrivers
- Utility knife for tracing outlines
- Speed square for straight marks
Safety and Stability Tips
Stabilize the door with a clamp or your foot to prevent movement during drilling. Wear safety glasses to protect your eyes from flying wood chips and dust.
Drill the Main Bore Hole Correctly
The main bore hole houses the knob mechanism and sets the foundation for the whole project. A crooked hole here causes binding issues later that are hard to fix.
Align and Start Drilling
Attach the 2 1/8-inch hole saw to your power drill securely. Position the pilot bit directly over your marked center point on the door face. Hold the drill at a perfect 90-degree angle to ensure a straight cut.
Drill from Both Sides
Apply steady pressure until the pilot bit just breaks through the opposite side. Stop immediately to prevent wood splintering or blowout on the exit side. Flip the door and complete the hole from the other side using the breakthrough point as your guide.
Fix Minor Misalignments
Gently rework any angled edges with the hole saw while rotating slowly. Do not force the bit as this damages the door structure. Let the tool cut naturally to maintain a smooth finish.
Cut Edge Holes and Mortises
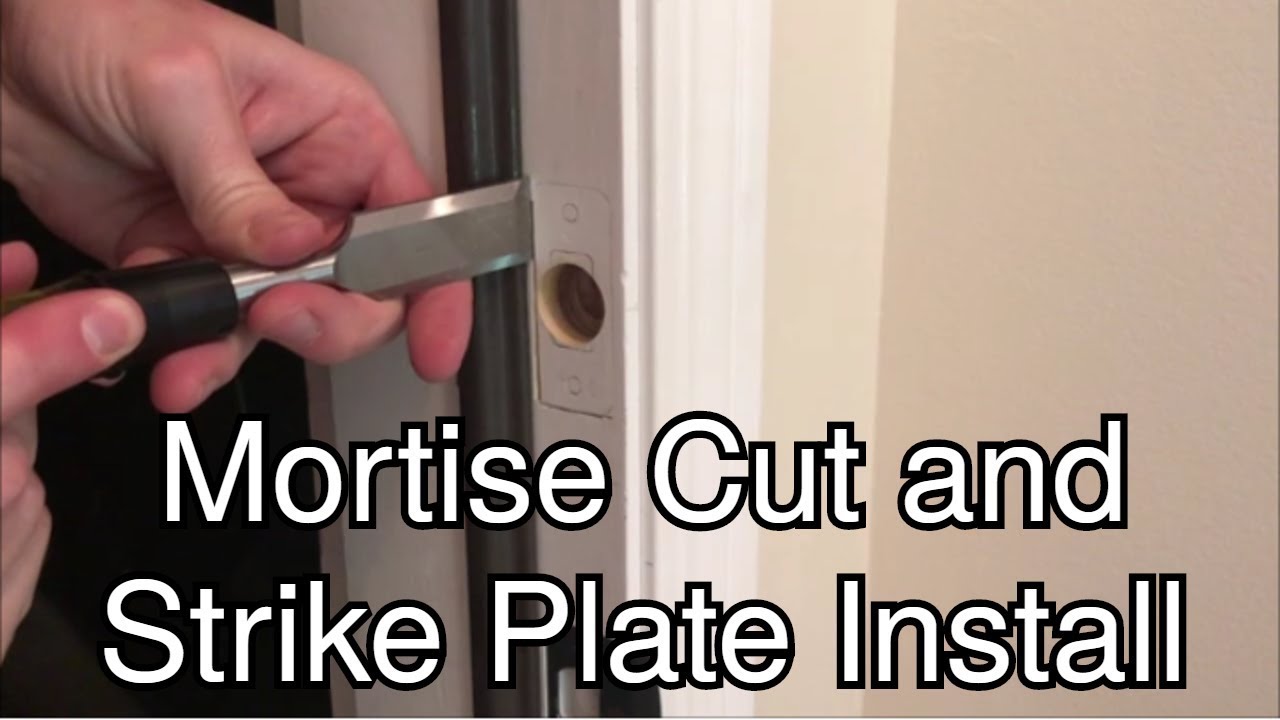
Preparing the door edge allows the latch and faceplate to sit flush against the wood. Rough edges here cause the door to stick or fail to close properly.
Drill the Latch and Deadbolt Holes
Use a 1-inch spade bit for both the latch and deadbolt edge holes. Align the bit with your mark on the door edge and drill straight in at 90 degrees. Ensure the hole intersects the main bore cleanly without leaving rough wood fragments.
Mortise the Faceplate Recess
The faceplate needs a recess depth of 1/8 inch to sit flush with the door edge. Trace the plate outline with a utility knife before removing any wood. Use a 1/4-inch chisel for corners and a 3/4-inch chisel for flat areas.
Hand Chiseling Method
Start cutting from the outer edges inward rather than the center. Tap lightly with a hammer to avoid splitting the wood grain. Test-fit the plate frequently and remove material in small increments.
Router with Mortising Jig
Set the router bit depth to match the plate thickness exactly. Clamp the mortising jig over the edge hole securely. Run the router around the perimeter for a clean, uniform recess with minimal effort.
Install the Latch and Deadbolt
Assembling the mechanical components requires attention to orientation and screw tightness. Incorrect installation here leads to locks that stick or fail to engage.
Insert the Latch Correctly
Slide the latch into the edge hole with the curved side facing the door frame. This orientation allows the door to close and latch automatically. Installing it backward prevents the door from catching on the frame.
Secure the Latch Plate
Pre-drill screw holes slightly to prevent the wood from splitting. Use the two small wood screws provided with your hardware kit. Tighten firmly but avoid over-tightening which can warp the plate.
Install the Deadbolt Cylinder
Insert the cylinder from the exterior side of the door carefully. Slide on the security collar before attaching the interior assembly if your model includes one. Align the key slot vertically in the 12 to 6 o’clock position.
Fasten the Assembly
Use the two long machine screws to connect the interior and exterior halves. Tighten just enough to hold the parts together without binding the mechanism. Loosen one screw slightly if the lock sticks to let parts settle.
Adjust the Backset If Needed
Many modern deadbolts feature a twist-adjustable backset mechanism. Rotate the bolt to match your door measurement of 2 3/8 inches or 2 3/4 inches. Verify the setting before final assembly to ensure proper fit.
Attach Knob or Lever Mechanism
The primary locking mechanism connects to the latch via a spindle. Proper alignment here ensures smooth operation and prevents premature wear.
Align the Spindle
Insert the spindle through the latch mechanism inside the door. Slide the exterior knob or lever onto the spindle carefully. Position the interior piece and align the screw holes perfectly.
Secure and Test Operation
Insert the mounting screws and tighten them evenly. Do not force the knobs together if they do not align naturally. Check spindle positioning or bore obstruction if resistance occurs.
Troubleshooting Fit Issues
Use a file or drill bit to gently enlarge the hole if needed. Snap on the escutcheon cover cap to hide the screws completely. Note that Schlage locks often have looser tolerances than high-security brands.
Install the Strike Plate
The strike plate anchors the lock to the door jamb and ensures smooth latching action. Proper installation here prevents kick-ins and ensures the door closes quietly.
Mark the Jamb Accurately
Close the door and let the latch touch the jamb gently. Use a pencil to mark the height of the latch center on the jamb. Measure from the door edge to the latch face and transfer that distance accurately.
Cut the Recess
Position the strike plate over your marks and trace its outline. Drill out the bulk of the wood with a spade bit. Chisel to a depth of 1/8 inch so the plate sits flush with the jamb surface.
Secure with Long Screws
Install the thick base plate first if your hardware uses a two-part system. Use a short screw temporarily to test alignment before finalizing. Replace with 3-inch screws that anchor into the wall stud for maximum security.
Smart Lock Installation Steps
Smart locks follow the same mechanical process but add wiring and digital setup requirements. Careful handling of internal components prevents electrical failures.
Remove Old Deadbolt
Take out the entire existing deadbolt including exterior cylinder and interior assembly. Clear any old wiring or debris from the bore hole. Ensure the area is clean before installing new components.
Install Smart Latch and Wiring
Insert the smart latch with the curved side facing the frame correctly. Identify the torque blade and route internal wires underneath the latch. Test blade rotation to ensure it moves freely without pinching wires.
Mount Interior Plate and Connect Wires
Attach the mounting plate to the door securely. Feed wires through the center and connect the wire harness to the interior assembly. Plug the second connector into the back of the lock unit per manufacturer instructions.
Assemble and Power Up
Slide the interior assembly onto the mounting plate and snap into place. Insert batteries into the battery pack carefully. Hold the program button while inserting the pack to hear the initialization beep.
Program and Test the Lock
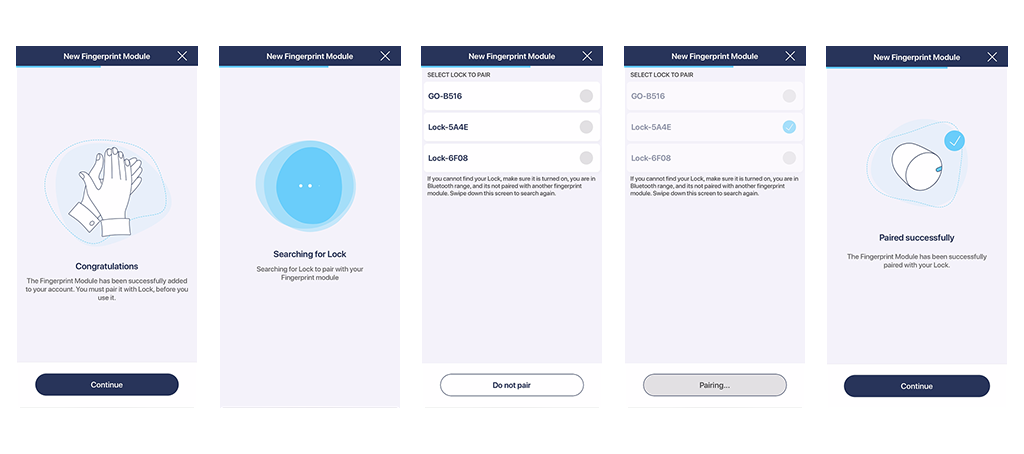
Digital configuration completes the installation process for electronic models. Verifying all features ensures your smart home integration works flawlessly.
Sync with Smartphone App
Download the manufacturer app such as August, Yale, or Schlage. Follow in-app prompts to pair the lock via Bluetooth or Wi-Fi. Create user codes and enable auto-lock features as desired.
Set Up Biometrics If Available
Enroll fingerprints in good lighting for best results. Register multiple fingers for reliability during daily use. Test recognition from different angles to ensure consistent access.
Verify Physical Key Override
Immediately test the physical key as your backup during battery failure. Turn the key smoothly from both sides of the door. Check for misalignment or debris if the key sticks.
Final Testing and Adjustments
Even perfect installations may need minor tweaks for smooth operation. Regular maintenance extends the life of your new hardware significantly.
Check for Smooth Operation
Turn the knob to ensure it moves freely without resistance. Engage the deadbolt to verify it extends and retracts fully. Close the door to confirm the latch catches without slamming.
Fix Misalignment Issues
Chisel the jamb slightly if the bolt hits the strike plate edge. Reposition the strike plate vertically if the bolt is too high or low. Use a file to enlarge the hole if the latch binds.
Prevent Future Issues
Lubricate annually with graphite powder rather than oil. Check screw tightness every six months to maintain security. Replace batteries in smart locks every 6 to 12 months.
Paint and Maintain Properly
Protecting your investment requires care during home improvement projects. Paint inside the mechanism causes sticking and eventual failure.
Remove Locks Before Painting
Always take off knobs, levers, and plates before painting the door. This prevents paint from entering the internal workings. Keep all small parts organized for reassembly.
Reinstall After Curing
Wait until paint is fully dry and cured before reinstallation. This usually takes 24 to 48 hours depending on the product. Reinstall hardware carefully to avoid scratching the new finish.
Upgrade Security and Finish
Simple upgrades significantly increase the security profile of your entryway. Matching finishes improves curb appeal while reinforcing protection.
Install Long Strike Plate Screws
Replace short factory screws with 3-inch screws immediately. These drill through the jamb and into the wall stud. This is one of the most effective anti-burglary upgrades available.
Match Hardware Finishes
Choose finishes that coordinate with other door hardware like hinges. Popular options include brushed nickel, satin chrome, and oil-rubbed bronze. Consistency improves both security perception and visual appeal.
Choose the Right Lock Type
Single-cylinder deadbolts work best for most homes with keyed outside access. Double-cylinder models require keys on both sides for added window security. Smart locks offer remote access ideal for tech-savvy users.
Frequently Asked Questions About Door Lock Installation
What is the standard height for installing a door handle?
The industry standard height is 1,050 mm or 41.3 inches from the finished floor to the center of the handle. You should match existing handles in your home for consistency if possible. This height works for both interior and exterior residential doors.
How do I determine the correct backset for my door?
Measure the distance from the edge of the door to the center of the existing hole. Residential doors typically use 2 3/8 inches while commercial doors use 2 3/4 inches. Many modern locks feature adjustable backsets to fit both measurements.
Can I install a smart lock on an existing door?
Yes, smart locks generally fit standard door preparations used for traditional deadbolts. You must remove the old deadbolt completely before installing the new unit. Follow the specific wiring and app setup instructions for your model.
What tools are essential for installing a door lock?
You need a 2 1/8-inch hole saw, 1-inch spade bit, chisels, and a drill. A router with a mortising jig provides the cleanest recesses for faceplates. Safety glasses and a method to stabilize the door are also required.
Why does my new lock stick or bind after installation?
Binding usually occurs from over-tightening the mounting screws or misaligned holes. Loosen the screws slightly to let the mechanism settle then retighten gently. Check that all holes are drilled at perfect 90-degree angles.
How often should I maintain my door lock?
Lubricate the mechanism with graphite powder once a year to prevent sticking. Check screw tightness every six months to ensure security remains intact. Replace smart lock batteries every 6 to 12 months based on usage alerts.
Key Takeaways for Installing Your Door Lock
Successful installation depends on precise measurements of handle height and backset before drilling begins. Using the right tools like a 2 1/8-inch hole saw and proper chiseling techniques ensures a professional finish. Avoid over-tightening screws and always test the physical key override for smart locks.
Take time to prepare your door edge and jamb for the strike plate to guarantee smooth operation. Upgrade to long 3-inch screws for enhanced security against forced entry. With careful attention to detail, you can install a secure, reliable door lock yourself today.



