
If your Yale lock won’t stay latched or makes a loud bang when closing, you likely have a bent latch or dried grease. These common issues rarely mean the whole lock is broken and ready for the trash. You can fix a Yale lock in under an hour using basic tools found in most home toolboxes.
This guide shows you how to diagnose the exact problem and disassemble the mechanism safely. You will learn to straighten bent parts and apply the correct lubricant to extend your lock life by years.
Diagnose Why Your Yale Lock Fails to Stay Locked
You must identify if your issue is mechanical bending or lubrication failure before starting. These two problems require completely different repair approaches to solve effectively.
Is the Latch Springing Back When Released?
When you push the handle down, the latch engages but springs back up immediately upon release. This specific symptom indicates a bent latch blade rather than a broken spring. The metal twist prevents the latch from seating into the lower notch of the housing properly.
Does the Door Bang Loudly When Closing?
A harsh clunk or gritty resistance points to lubrication breakdown inside the unit. Factory grease hardens over time into a sticky residue that traps dust and increases friction. This issue mimics mechanical failure but is purely a maintenance problem you can fix.
Gather Essential Tools to Fix Yale Lock Mechanisms
You do not need specialized locksmith equipment to complete this repair successfully. Most items required are likely already sitting in your standard home toolbox.
Required Repair Tools List
- Phillips #2 screwdriver for removing handle plates
- Thin flathead screwdriver for prying and manipulating cams
- Sturdy pliers or needle-nose pliers for gripping springs
- Hammer for gentle tapping during metal realignment
- Lint-free cloths or wet wipes for degreasing parts
- Microfiber cloth for drying components thoroughly
- Small brush for clearing debris from internal tracks
Select White Lithium Grease Only
You must use multi-purpose white lithium grease for this job without exception. It is lightweight, long-lasting, and resists dust buildup better than other options. Avoid silicone sprays, WD-40 as a final lube, and oil-based products that attract dirt.
Fix Latch Spring-Back Issue on Yale Locks
A Yale lock that refuses to stay down usually suffers from a bent latch bolt. Follow these steps to realign the metal and restore security.
Remove Interior Handle Plate
Locate the two screws on the interior handle plate securing the unit. Use your Phillips #2 screwdriver to remove them carefully. Gently lift off the cover plate to expose the spindle and internal mechanism.
Extract Spindle and Latch Bolt
Carefully pull out the spindle while watching for spring tension. Once the spindle is clear, slide the latch bolt out from the edge of the door. This gives you full access to the bent section needing repair.
Inspect and Straighten the Bent Latch
Lay the latch on a flat surface and examine the lower half for twists. Use pliers to apply steady, controlled pressure to pull the metal back into alignment.
* Use a hammer to gently tap the edge flat if needed
* Work in small increments to avoid cracking the metal
* Frequently test fit the latch into the housing
The latch must sit flush in both upper and lower notches when reinstalled.
Reassemble and Test the Repair
Slide the straightened latch back into the door edge and reinsert the spindle. Replace the cover plate and tighten the two screws securely. Push down on the handle to ensure the latch engages and stays locked without springing back.
Service Stiff or Noisy Night Latch Units
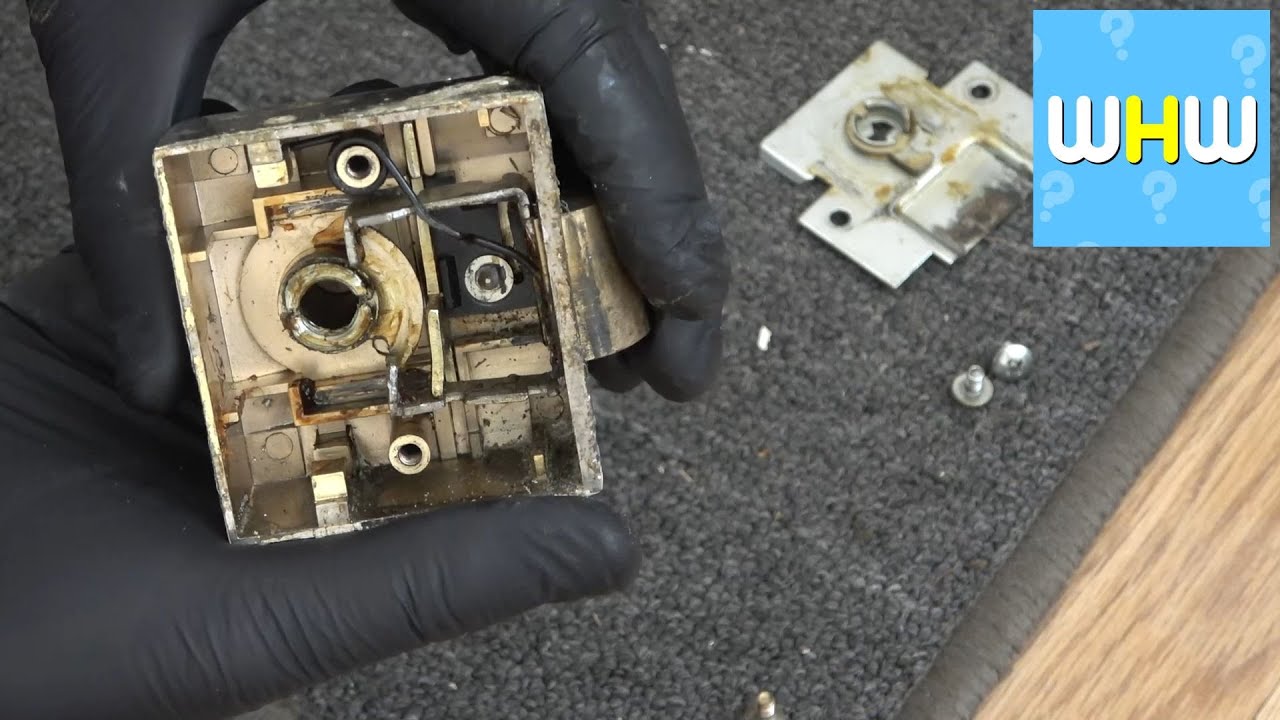
Lubrication failure causes most Yale lock noise and resistance during operation. This repair process restores smooth and silent function to your door.
Secure the Door Before Disassembly
Lock the door with a secondary deadbolt or chain before removing the latch. This prevents accidental lockout or security breaches while the main mechanism is out of the door.
Remove Latch Body From Door Frame
Find the two Phillips screws on the side of the lock body inside the door frame. Remove them and gently pull the entire latch mechanism out of the door edge. The mounting plate stays fixed in place.
Take Off Back Plate and Expose Internals
Locate two small screws on the rear of the latch holding the back plate. Remove them and slide the plate forward while wiggling slightly to clear internal notches. Use a flathead screwdriver to rotate the internal cam and reveal the spring.
Remove Spring and Latch Frame
Use needle-nose pliers to lift the return spring off its post carefully. Pull out the latch bolt and frame to expose the sliding beds and cam contact points for cleaning.
Clean All Moving Parts Thoroughly
Degreasing is critical because built-up gunk is the root cause of noise and stiffness. You must remove all old residue before applying new lubricant.
Wipe Down Sliding Beds and Tracks
Use a wet wipe or lint-free cloth to clean the left and right sliding beds. Wipe the cam contact surface and the latch frame groove to remove black sticky residue. Repeat this step if any gunk remains on the metal.
Dry Components Completely
Use a dry microfiber cloth to wipe all components until clean. Let them air-dry for 2–3 minutes to ensure no moisture remains inside. Re-lubricating wet parts reduces grease adhesion and effectiveness.
Never Grease the Spring Groove Area
Do not apply grease to the groove where the return spring sits. This area contacts your hand when exiting, and grease here transfers to fingers and attracts dirt. Only lubricate moving tracks and specific contact points.
Apply Lithium Grease Correctly to Fix Yale Lock
Use a thin and even layer of white lithium grease on specific spots only. Over-greasing collects dust and turns gummy again within months.
Target Specific Contact Points
Apply grease to the left and right sliding beds and the cam-to-frame contact point. Add a small dab to the spring post and the back plate contact surface where wear marks appear. A thin film is enough for smooth operation.
Reassemble the Mechanism With Precision
Rebuilding requires precision so follow each step carefully to ensure proper function.
Reinsert Latch and Frame
Slide the latch and frame back into the housing and ensure smooth movement. The parts should move freely before you attempt to reattach the spring.
Reattach the Return Spring
Position the short end of the spring against the latch body bent opposite the long end. Hold it in place with your finger and use pliers to bend the long end around the retaining post. Press down firmly with a screwdriver to seat it securely.
Slide Back Plate Into Position
Align the arrow and indentation on the back plate with markers on the latch body. Slide it forward until it clicks under the lugs correctly. Misalignment here prevents deadlock engagement.
Reinstall and Final Test Your Work
Now put the lock back in the door and verify everything works smoothly.
Mount Latch Into Door Edge
Align the key barrel metal bar with the latch mechanism inside the door. Insert the unit at a slight angle and slide it into the cavity. Secure it with the two side mounting screws.
Test Smooth Operation and Deadlock
Manually push the latch in and out to check for zero resistance. Turn the key or internal knob to activate the deadlock and ensure it locks solidly. Close the door to listen for a soft quiet thud instead of a loud bang.
Prevent Future Issues With Your Yale Lock
Fixing the current problem is only half the battle for long-term reliability. Smart maintenance prevents recurrence of these common issues.
Service Every 2 to 3 Years
Clean and re-grease the mechanism every 2–3 years in normal conditions. Service annually in high-traffic homes or humid climates to prevent buildup.
Recognize Early Warning Signs
Act before total failure occurs by watching for slight resistance or faint grinding noises. Early servicing prevents full breakdown and expensive replacements.
Avoid Wrong Lubricants Entirely
Never use WD-40 as a long-term lube or silicone spray on your lock. These attract dirt and degrade plastics making problems worse over time.
Troubleshoot Common Post-Repair Issues
| Symptom | Likely Cause | Fix |
|---|---|---|
| Latch still springs back | Latch not fully straightened | Re-disassemble and realign metal |
| Grease on fingers | Applied to spring groove | Clean groove and re-lube tracks only |
| Deadlock won’t engage | Back plate misaligned | Recheck arrow and indent alignment |
| Stiff movement after reassembly | Excess grease or debris | Wipe tracks and reapply thin layer |
| Key won’t turn smoothly | Cam not lubricated | Add grease to cam contact point |
Frequently Asked Questions About Fixing Yale Locks
Can I use WD-40 to lubricate my Yale lock?
No, you should never use WD-40 as a final lubricant because it attracts dust and dries out quickly. It is acceptable only as an initial cleaner for corrosion before applying proper grease.
How often should I service my Yale night latch?
You should service your lock every 2–3 years in normal conditions to prevent grease hardening. High-traffic doors or those in humid climates need annual servicing to maintain smooth operation.
Why does my latch spring back after I release the handle?
This issue is caused by a bent latch blade that prevents proper seating in the housing notch. Lubrication will not fix this, so you must straighten the metal using pliers and a hammer.
What type of grease is best for door locks?
Multi-purpose white lithium grease is the best choice because it is lightweight and resists dust buildup. Avoid silicone sprays and oil-based lubes that damage seals and attract debris.
Do I need to replace my entire Yale lock if it is stiff?
No, most stiffness issues are due to dried grease rather than mechanical failure. You can fix a Yale lock by cleaning the internal parts and applying fresh lithium grease.
Key Takeaways for Fixing Your Yale Lock Successfully
Most Yale lock failures stem from a bent latch or dried grease rather than total mechanical breakdown. You can fix these issues yourself using basic tools and white lithium grease to restore smooth operation. Regular maintenance every few years prevents noise and stiffness from returning.
Start by diagnosing whether your problem is mechanical bending or lubrication failure. Follow the specific repair steps outlined here to straighten metal or clean internal tracks effectively. Your lock will function like new with just a little time and effort.



