
Is your French door lock stuck or refusing to turn? You are likely dealing with a multi-point locking system where central, top, and bottom bolts must disengage together. When one part fails, the whole door remains locked tight.
This guide helps you fix a French door lock by diagnosing jammed mechanisms and correcting misalignment. You will learn to repair worn hardware using basic tools without replacing the entire door.
Diagnose Why Your French Door Lock Won’t Turn

Identifying the root cause saves time before you start removing screws. Most failures stem from installation errors, structural sagging, or internal wear.
Thumb-Turn Won’t Rotate After Installation
If the thumb-turn freezes immediately after setup, you likely turned it toward the hinges instead of the strike side. This action engages internal spring-loaded wafers in a locked position.
Check for these signs:
* Thumb-turn will not budge after recent installation
* No visible damage to the lock body
* Mechanism was turned toward the hinge side first
This is a setup error rather than a broken part. You can release it with a simple tool.
Handle Feels Loose or Bolt Won’t Retract
A floppy handle often indicates door sagging rather than lock failure. Worn hinges or frame shifts force the latch bolt into the strike plate at an angle.
Warning signs include:
* Door rubs against the bottom threshold
* Uneven gaps around the door frame
* Key turns with significant resistance
Never force the handle. Doing so can snap internal linkages or damage the cylinder permanently.
Key Turns But Lock Does Not Engage
If the key rotates freely without moving the bolts, internal components like gears or springs are likely stripped. This wear prevents power transfer from the key to the locking mechanism.
Indicators of wear:
* Key rotates with no mechanical action
* Visible debris or corrosion in the keyway
* History of repeated repairs or heavy use
Replacement is often the only reliable fix for these internal failures.
Release a Frozen Thumb-Turn Using a Paper Clip
A frozen thumb-turn is the most misunderstood issue with French door locks. You can bypass the lock-up using a common household item.
Steps to Free the Mechanism
- Locate the release slot on the underside of the thumb-turn housing.
- Straighten a paper clip into a thin rod to use as a tool.
- Insert the tool into the slot and push the first spring cylinder inward gently.
- Pull the thumb-turn down while holding the spring compressed to disengage wafers.
- Rotate the thumb-turn toward the strike side to engage bolts correctly.
- Turn back to locked to secure the position.
Pro Tip: Always turn the thumb-turn toward the strike side on the very first motion during installation. Turning toward the hinges locks the mechanism again.
Correct Door Sag to Stop Lock Binding
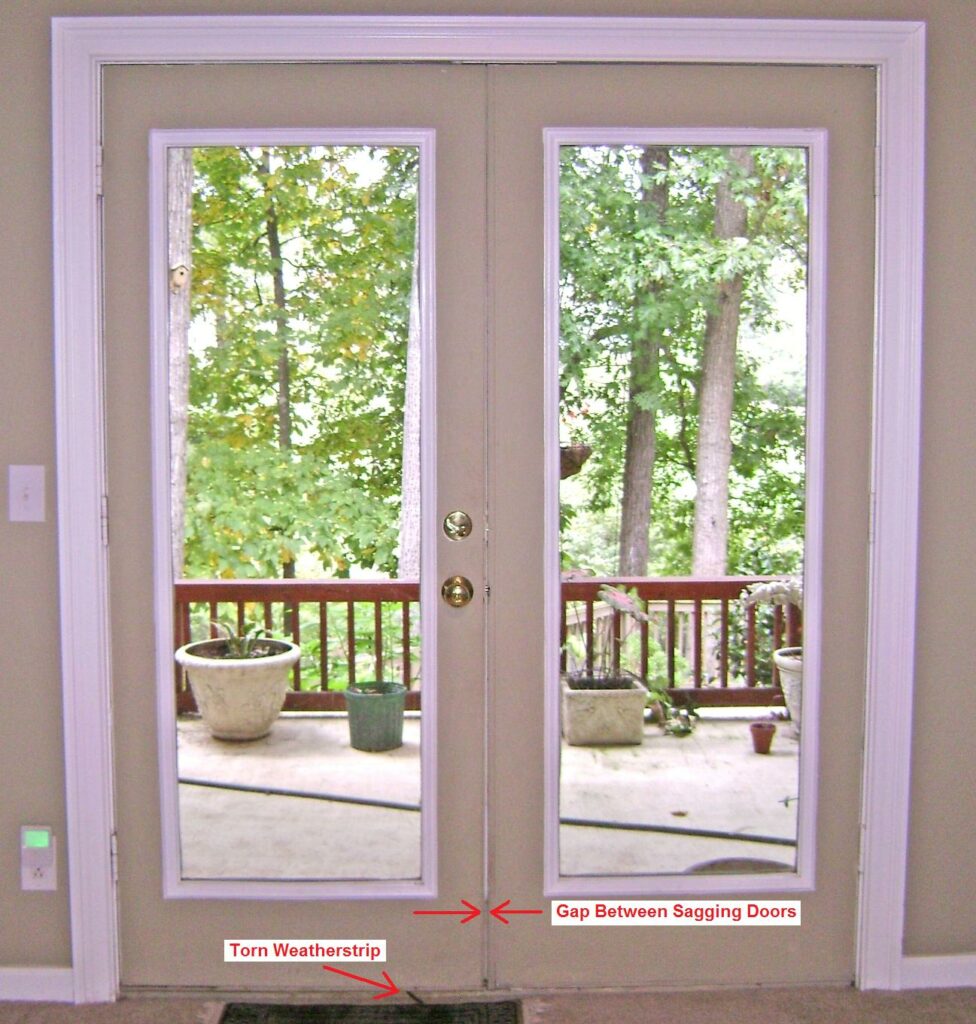
A sagging door is the leading cause of lock binding. Fixing alignment prevents future failure even after you replace parts.
Inspect Structural Shifts
Open the door and examine the gaps around the frame. Look for rubbing at the bottom edge or uneven spacing on the sides. Even a small shift can bind the latch.
Tighten and Reinforce Hinges
- Tighten all hinge screws using a Phillips screwdriver or drill.
- Fix stripped holes by injecting wood glue and inserting a toothpick before re-screwing.
- Use longer screws that reach into the wall framing for a stronger hold.
- Lift the door gently while tightening the top hinge to redistribute weight.
Test Bolt Movement
Close the door and lift the handle to test the repair. The bolt should retract instantly and fully without dragging. Adjust the strike plate slightly if the bolt still sticks.
Replace a Faulty Lock Mechanism
When repair is not enough, you must replace the lock entirely. Universal kits work for most UPVC doors, while Andersen models need specific steps.
Gather Required Tools and Parts
You will need safety glasses, a 5/32-inch hex wrench, and a Phillips screwdriver. A 1/8-inch flat blade screwdriver and utility knife are also essential for disassembly.
Required items list:
* Replacement lock mechanism
* Universal UPVC lock kit (if not Andersen)
* Safety glasses
* Utility knife
Note: Save all screws and mounting studs during removal. Tribeca-style hardware uses separate mounting studs you must reuse.
Replace Lock on Andersen Active Panel

Follow these steps specifically for the active panel of Andersen Frenchwood doors. Precision ensures the new mechanism functions smoothly.
Remove Old Hardware
- Unlock and open the active panel completely.
- Loosen the set screw under the interior handle with a hex wrench.
- Slide off both handles while supporting the strike plate.
- Remove strike plate bolts and the interior strike plate.
- Extract cylinder mounting bolts, limiting plate, lock actuator, and the cylinder itself.
- Remove all screws securing the lock body and pull it out.
Install New Lock
- Insert replacement with the dead bolt positioned above the latch.
- Secure with original screws to fasten the lock body.
- Align the gasket on the exterior strike plate and insert the cylinder.
- Reinstall mounting bolts, limiting plate, and actuator.
- Position interior strike plate and insert bolts without tightening fully.
- Slide spindle through from outside and attach interior handle with bushing on flange side.
- Push handles together and secure the set screw tightly.
- Fully tighten strike plate bolts to finish.
Replace Lock on Andersen Passive Panel
The passive panel requires cutting a seal and careful reassembly of the astral component.
Prepare and Disassemble
- Cut the varnish seal between the astral and panel with a utility knife.
- Open both doors to access the passive panel edge.
- Remove strike plate, lock bolt receiver, and hook bolt receivers.
- Remove the astral and set it aside carefully.
- Loosen set screw and remove both handles.
- Extract old lock by removing the single securing screw and pulling the mechanism.
Install and Reassemble
- Insert new lock and secure with the saved screw.
- Align gasket on exterior strike plate and position on panel.
- Reinstall handles with bushings facing the flange and secure set screw.
- Roll astral into place ensuring the lock bolt receiver cutout faces away from glass.
- Reinstall receivers without overtightening to allow smooth movement.
- Engage block tongue into the lock mechanism slot.
- Reattach strike plate and test operation thoroughly.
Adjust Latch Alignment for Smooth Operation

If the latch does not catch or binds, you may need to reverse its orientation. This is common after replacing a mechanism.
Reverse the Latch Direction
- Ensure correct orientation where the sloped side faces the exterior.
- Insert flat blade screwdriver into the latch reversal hole.
- Push down firmly until the latch releases from its housing.
- Rotate latch 180 degrees and push it back into place.
- Test operation by closing the door to verify smooth engagement.
Prevent Future Lock Failures
A repaired lock will not last if underlying issues persist. Routine care prevents recurrence of binding or jamming.
Maintain Hinges Every Six Months
Inspect hinges for looseness or corrosion regularly. Tighten screws immediately and replace stripped ones with longer versions or epoxy-filled alternatives. Ignoring hinge wear leads to repeated lock binding.
Lubricate Moving Parts
Use a dry, non-gummy lubricant like silicone spray or graphite powder. Apply lightly to the latch bolt, throw, and head and foot bolts. Avoid oil-based lubricants as they attract dirt and cause grime buildup.
Check Astral Installation
When servicing the passive panel, ensure the lock bolt receiver cutout faces away from the glass. Confirm the weather strip is flat and not folded. Test that the astral rolls smoothly into place every time.
When to Call a Professional
Some situations require expert help beyond DIY repairs. You should seek assistance if the lock cylinder is broken and stuck or if the door frame is warped.
Contact a professional if:
* Multiple components fail repeatedly
* You are unsure about reassembly steps
* The door frame is damaged
Reputable services offer free estimates and transparent pricing. For Andersen doors, contact Customer Care at 888-888-7200 for OEM parts and support.
Frequently Asked Questions About French Door Locks
Why won’t my French door thumb-turn rotate after installation?
The thumb-turn was likely turned toward the hinges instead of the strike side during setup. This locks internal wafers. Use a bent paper clip to compress the spring and release the mechanism.
How do I fix a French door handle that feels loose?
Loose handles usually indicate door sagging caused by worn hinges. Tighten all hinge screws or replace stripped ones with longer screws to realign the door and restore handle tension.
Can I replace a French door lock with a universal kit?
Yes, universal lock replacement kits work for most UPVC French doors. However, Andersen Frenchwood models often require specific active or passive panel mechanisms for proper fit.
How often should I maintain my French door locks?
Inspect hinges and lock function every six to twelve months. Regular maintenance includes tightening screws, lubricating bolts with dry spray, and checking for door sag.
What tool do I need to reverse a latch on an Andersen door?
You need a 1/8-inch flat blade screwdriver. Insert it into the latch reversal hole, push down to release the latch, rotate it 180 degrees, and push it back in.
Key Takeaways for Fixing Your French Door Lock
Most French door lock issues stem from improper installation, door sagging, or simple wear. You can fix these problems by diagnosing the failure mode and using the correct tools for your specific door type.
Regular maintenance every six months prevents future lock-ups and extends the life of your hardware. Start by checking your hinges and thumb-turn orientation before attempting a full replacement.



